Difference between revisions of "DID Management"
m (→Timeout Digit) |
|||
| (88 intermediate revisions by 13 users not shown) | |||
| Line 1: | Line 1: | ||
= Description = | = Description = | ||
DID is an external number to have incoming calls to your VoIP network reach a particular device. | |||
'''VERY IMPORTANT RULE: DIDs in MOR MUST be in E.164 format.''' | |||
You can reach window, with list of all DIDs, in '''SETTINGS –> Billing –> DIDs''': | |||
<br><br> | |||
[[File:Dids updated.png]] | |||
<br><br> | |||
User/Dial Plan and Device show who will answer when dialing this DID. | |||
''' | Clicking on User or Device brings you to their settings. If you click on the [[Image:callflow.png]] icon, you will go to the device's [[Call Flow]] window. | ||
In this page you can | |||
*[[DID_Management#Add_new_DID(s) | Add new DID(s)]] | |||
*Reach [[DID_Management#DID_bulk_management | Bulk management]] | |||
*Export DIDs to CSV | |||
*Reach page to change DID [[DID Billing | Rates]] | |||
*Update DID [[DID_Management#Settings | settings]] | |||
*Search only by DID Owner, when using search field called ''Owner'', or search by either DID Owner or DID Reseller at once, when using search field called ''User''. | |||
<!---This functionality is available from MOR X5---> | |||
*Hide Terminated DIDs. When option "Hide Terminated DIDs" is checked, terminated dids will be hidden until option is unchecked. Clear search button or relogin will not clear the checked option. | |||
* Search by User type. | |||
* Search by inclusive Balance range (only for Owners). | |||
* Search by User status (only for Owners). | |||
<br><br> | |||
= Special cases = | |||
Single DIDs can be added with a-z or A-Z values. | |||
DID must consist only of 0-9, a-z, A-Z, and begin with a number. | |||
Example DID: 0B69847249887528 | |||
'''NOTE:''' when number contains letters and you do not want to cut destination, enable '''clean_destination = 0''' in '''/etc/asterisk/mor.conf'''.<br> | |||
More information [[Mor.conf]] | |||
<br><br> | |||
= Status = | = Status = | ||
| Line 30: | Line 53: | ||
* '''Terminated''' – the DID is no longer used in MOR. It remains only for historical purposes. You can make it Free if you want. | * '''Terminated''' – the DID is no longer used in MOR. It remains only for historical purposes. You can make it Free if you want. | ||
= | <br><br> | ||
= Add new DID(s) = | |||
In the main DIDs window, if you want to add new DID(s), click on [[Image:add.png]] '''New DID''': | |||
[[Image:dids5.png]] | |||
In this window you can: | |||
# Select DID(s) [[DID_Management#Details | details]] | |||
# Add one DID or series of DIDs | |||
# [[ DID_Import_from_CSV | Import DID(s) from CSV file]] | |||
<br> | |||
'''NOTE:''' You should select the Provider which sold you this DID. DID Provider is ONLY for informational purposes. If you do not know which Provider to assign - create dummy Provider to represent company from which you buy DID. If this is fake DID - assign any Provider you want. If your DID Provider has several IP addresses (as DIDWW) and you configured several Providers in MOR - assign ANY configured Provider. | |||
<br><br> | |||
== VIDEO: How to create a DID == | |||
<html> | |||
<iframe width="640" height="360" src="https://www.youtube.com/embed/SVJS_stEgBQ" frameborder="0"></iframe> | |||
</html> | |||
<br><br> | |||
==Details== | |||
*'''Provider''' – DID Provider is ONLY for informational purposes. If you do not know which Provider to assign - create dummy Provider to represent company from which you buy DID. If this is fake DID - assign any Provider you want. If your DID Provider has several IP addresses (as DIDWW) and you configured several Providers in MOR - assign ANY configured Provider. | |||
*'''Language''' – option to set language for voice prompts in the Asterisk Dial Plan | |||
*'''Call limit''' – describes how many simultaneous calls DID can '''receive'''. 0 (zero) means that calls are unlimited. | |||
*'''Max Call Duration (Timeout)''' – a number of seconds before a Call via DID is terminated ('''NOTE:''' due to a global safeguard Calls are terminated ~3 sec. earlier than this setting). | |||
*'''Comment''' – option to save some notes about DID. | |||
*'''[[Sound files | Sound file]]''' – here you can add [[IVR Greeting for DID]]. There are two options: | |||
# Answer and play. | |||
# Early media. | |||
*'''PIN''' – a numeric PIN code to secure a DID. | |||
*'''PIN retries''' – a number of allowed attempts to enter a PIN code. | |||
*'''[[Sound files | Sound file]] to reenter PIN''' – a Sound File that is played before the next attempt to enter a PIN Code. | |||
*'''MOH instead of Ringing''' – if [[Music on Hold|MOH]] is selected, Music on Hold will be played instead of ringing when DID number is dialled. | |||
*'''[[IVR_system | IVR]] if PIN fails''' – an IVR the Call is transferred to when all attempts to enter a PIN Code fail. '''NOTE:''' when all PIN attempts fail and '''IVR if PIN fails''' is None, a Call is terminated with a [[Hangupcause_Codes|Hangupcause Code]] '''275'''. | |||
<!---This functionality is available from MOR 9---> | |||
*'''Grace Time''' – if call duration is less than Grace Time, it will not be accounted, for example: '''Grace Time''' = 3s, call duration <= 3s, then price for the call = 0 | |||
<!---This functionality is available from MOR 10---> | |||
*'''Timeout Digit''' – the maximum amount of time permitted between digits when the user is typing in a number. When this timeout expires after the user has started to type in a number, the number will be considered complete, and will be interpreted (sent to the system). Works both with entering destination and ANI/PIN. | |||
<!---This functionality is available from MOR 10---> | |||
*'''Timeout Response''' – the maximum amount of time permitted for user to START entering a number. If the user does not begin typing a number in this amount of time, system will notify that nothing was entered. Once the user begins to type a number, system will wait for <b>Digit Timeout</b> to be reached, and <b>Response Timeout</b> has no effect no more. | |||
<!---This functionality is available from MOR 11---> | |||
*'''CallerID Name Prefix''' – option to add a CallerID Name prefix to the incoming CallerID. | |||
<!---This functionality is available from MOR 12---> | |||
*'''Tone zone''' – option to set tone zones. Tone zone is a different ring tone depending on destination (country). | |||
<!---This functionality is available from MOR 12---> | |||
*'''Tariff for Calling Card''' – option to set a tariff for DID which will be applied for a calling card. It will not be important what tariff is assigned for that card's group. | |||
<!---This functionality is available from MOR X11---> | |||
*'''Active from''' – DID will become active from this date. If DID is not active yet, call is routed like there is no matching DID number. | |||
*'''Active till''' – DID will be active till this date. Expiration does not change DID status, call is routed like there is no matching DID number. | |||
<!---This functionality is available from MOR X13---> | |||
* '''Blacklist Source Number Pool''' - this will set [[Number Pool]] for Blacklist Source. When calling this DID, if Source Number match number in this pool, call will be rejected with '''HGC 283 - Source number is in DID blacklist'''. | |||
* '''Send call anonymously''' - default no. Ability to show Anonymous on incoming call. | |||
* '''Send CallerID in UUI header''' - default no. The ability to show the caller ID on all calls in Sip UUI messaging. | |||
Header example: | |||
User-to-User: hexCallerid;pd=XX;encoding=hex;purpose=isdn-uui;content=isdn-uui | |||
<br><br> | |||
= DID Wildcard = | |||
It is possible to use Wildcard '''*''' to match several DID numbers.<br> | |||
For example, DID '''37088888*''' would match 37088888'''81''' 37088888'''72''' 37088888'''93''' 37088888'''5555555''', etc. <br> | |||
'''IMPORTANT''' DID numbers without a Wildcard have higher priority.<br> | |||
[[File:Did wildcard.png]] | |||
<br><br> | |||
= | = Settings = | ||
' | If you want to edit a DID's settings, click on the [[Image:edit.png]] icon. | ||
<br><br> | <br><br> | ||
[[Image:dids4.png]] | |||
<br><br> | <br><br> | ||
[[ | The above window is for Free DID. You can: | ||
# Change [[DID_Management#Details | details]] | |||
# [[DID_Management#Reserve_DID_for_User | Reserve DID for User]]. | |||
# [[DID_Management#Assign_to_Dial_Plan | Assign to Dial Plan]]. | |||
# Terminate a DID. | |||
<br><br> | <br><br> | ||
=== | ==Reserve DID for User== | ||
When a DID is assigned to a Device (Reserve for User first), you have a few different choices: | |||
[[File:DidAssign5.png]] | |||
Here you can: | |||
# Change [[DID_Management#Details | details]]. | |||
# Assign DID to device. Here you can select different Devices for the same user. For select Trunk Device is next section. | |||
# Assign DID to Trunk. Here you can select different Trunk Devices for the same user. | |||
# Stop a DID subscription and reserve the DID for 90 days (by default) to this user in case he changes his mind and wants to get the DID back. | |||
<br><br> | |||
= | ==Assign to Dial Plan== | ||
When DID is assigned to [[Dial_Plans | Dial Plan]], in DID settings you can: | |||
# Change [[DID_Management#Details | details]]. | |||
# Make DID free. | |||
[[ | When you have [[Quickforwards_rules | Quickforward Rule]] for this DID, in DID edit you will see additional notice: | ||
[[Image:DID_edit_collisions_with_qf_rule.png]] | |||
<br><br> | |||
= Delete DID = | = Delete DID = | ||
At first, mark it as "not used" (Free). Then terminate it. When you do, you will see [[Image:delete.png]] next to the DID in the main DID window. By clicking on it, you can delete the DID. | At first, mark it as "not used" (Free). Then terminate it. When you do, you will see [[Image:delete.png]] next to the DID in the main DID window. By clicking on it, you can delete the DID. | ||
'''Note:''' you cannot delete DIDs that are associated with calls. You can only Terminate these DIDs. | |||
<br><br> | |||
= DID bulk management = | = DID bulk management = | ||
In the main DIDs window, click [[Image:edit.png]] Bulk Management and you will be able to perform various actions either on: | |||
*'''DIDs interval''' - this will apply action on selected DID interval, | |||
*'''DIDs pattern''' - this will apply action on selected pattern. Supported wildcard symbols in pattern: | |||
** '''%''' matches any symbols, for example '''370%''' will match any number starting with '''370''' | |||
** '''_''' matches one symbol, for example '''370_1334455''' will match numbers in format '''370x1334455''', where '''x''' is any number. | |||
<br><br> | |||
[[Image:dids6.png]] | |||
<br><br> | |||
Here you can choose which DIDs to update and what to do: | |||
*'''Update''' - option to change some of DID details, Reserve DID for User (only free DIDs can be reserved) or Make DID free. | |||
*'''Delete''' - option to delete DIDs by Provider or make DIDs Free/Terminated/Closed. | |||
*'''Manage rates''' - option to change Rates for [[DID Billing]]. | |||
*'''[[Assign DID to Trunk]]'''. | |||
<!---This functionality is available from MOR 9---> | |||
*'''Reserve for User''' - option to reserve DID for User (only free DIDs can be reserved). | |||
*'''Assign Dial Plan''' - option for Assign DID to [[Dial_Plans | Dial Plan]] | |||
<br><br> | |||
= Allowing Users to route their DIDs = | |||
Since '''MOR X5''' users are able to route their DID to a Device or an External Server . | |||
This functionality can be enabled in '''SETTINGS -> Setup -> Visual''' by checking the 'Allow User to assign DID to Device:' setting. | |||
[[ | Once the functionality is enabled, the user will be able to see an Edit icon, in his DIDs list. | ||
<br><br> | |||
[[File:Dids_list_with_did_routing.png]] | |||
<br><br> | |||
By pressing the icon, the user will be redirected to a page where he will be able to route his DID either to one of his MOR Devices, or to a Device on an external server (eg. SIP/370xxxxxx@123.123.123.123). | |||
<br><br> | |||
[[File:Did_routing_panel.png]] | |||
<br><br> | |||
'''NOTE:''' Reseller's DID list permissions are independent from Resellers' User, this means that Resellers' User can view DID list (if permissions are enabled for them) even when Resellers cannot. | |||
=See Also= | |||
*[[DID Billing]] | |||
*[[DIDs Usage]] | |||
*[[MOR_API_did_create | Create DID through API]] | |||
*[[MOR_API_did_device_assign | Assign Device to DID through API]] | |||
*[[MOR_API_did_device_unassign | Unassign Device from DID through API]] | |||
*[[Providers#Provider_Grace_Time|Provider Grace Time]] | |||
*[[Grace_time|Device Grace Time]] | |||
*[[Example - Configuring DID to ring some Device]] | |||
*[[DID is not working]] | |||
*[[ DID_Import_from_CSV | Import DID(s) from CSV file]] | |||
*[[Number Pool]] | |||
Latest revision as of 11:26, 27 April 2023
Description
DID is an external number to have incoming calls to your VoIP network reach a particular device.
VERY IMPORTANT RULE: DIDs in MOR MUST be in E.164 format.
You can reach window, with list of all DIDs, in SETTINGS –> Billing –> DIDs:

User/Dial Plan and Device show who will answer when dialing this DID.
Clicking on User or Device brings you to their settings. If you click on the ![]() icon, you will go to the device's Call Flow window.
icon, you will go to the device's Call Flow window.
In this page you can
- Add new DID(s)
- Reach Bulk management
- Export DIDs to CSV
- Reach page to change DID Rates
- Update DID settings
- Search only by DID Owner, when using search field called Owner, or search by either DID Owner or DID Reseller at once, when using search field called User.
- Hide Terminated DIDs. When option "Hide Terminated DIDs" is checked, terminated dids will be hidden until option is unchecked. Clear search button or relogin will not clear the checked option.
- Search by User type.
- Search by inclusive Balance range (only for Owners).
- Search by User status (only for Owners).
Special cases
Single DIDs can be added with a-z or A-Z values.
DID must consist only of 0-9, a-z, A-Z, and begin with a number.
Example DID: 0B69847249887528
NOTE: when number contains letters and you do not want to cut destination, enable clean_destination = 0 in /etc/asterisk/mor.conf.
More information Mor.conf
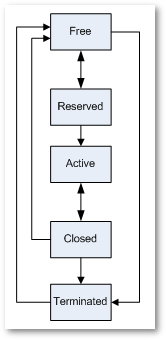
Status
Status is very important. For every just-created DID, the status is Free.
A DID can have several statuses:
- Free – this status means that the DID is free to be reserved for any user/device. You can also Terminate it.
- Reserved – the DID is reserved but NOT actually used for a user. "Reserved" is useful at the negotiation stage before signing a contract. When a user decides to sign up, we Activate the DID. We can also make the DID Free.
- Active – the DID is assigned to a Device and is functional. We can Close it.
- Closed – the DID is no longer functional, so that all calls going to this DID will get Hangup. One important feature of this state: when a DID is Closed, it will be closed for a set time (the default is 90 days) in case the user changes his mind and decides to use this DID again. This is useful when a user is not paying for services, as we can suspend the DID by using Closed. MOR will make it Free after the Closed period runs out. You can manually make it Free or Terminate this DID.
- Terminated – the DID is no longer used in MOR. It remains only for historical purposes. You can make it Free if you want.
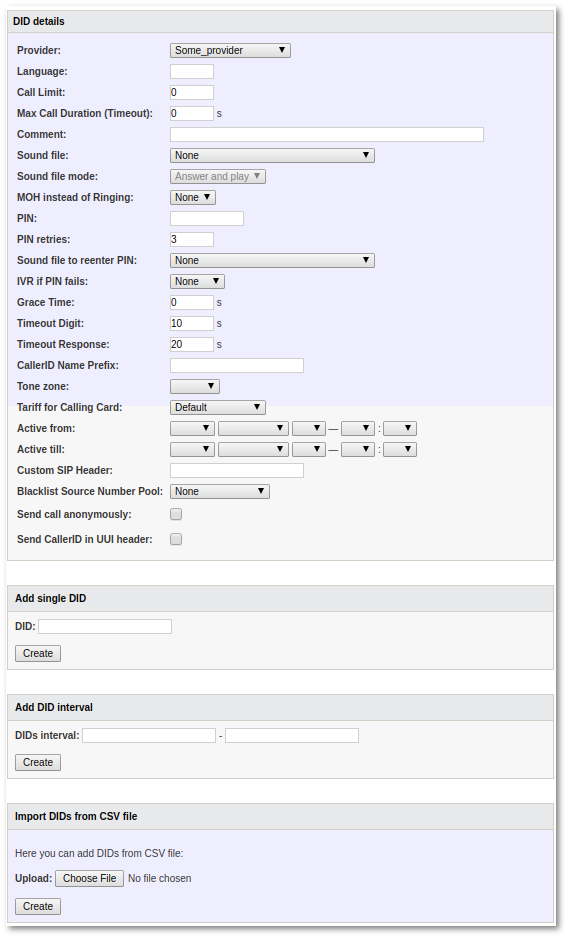
Add new DID(s)
In the main DIDs window, if you want to add new DID(s), click on ![]() New DID:
New DID:
In this window you can:
- Select DID(s) details
- Add one DID or series of DIDs
- Import DID(s) from CSV file
NOTE: You should select the Provider which sold you this DID. DID Provider is ONLY for informational purposes. If you do not know which Provider to assign - create dummy Provider to represent company from which you buy DID. If this is fake DID - assign any Provider you want. If your DID Provider has several IP addresses (as DIDWW) and you configured several Providers in MOR - assign ANY configured Provider.
VIDEO: How to create a DID
Details
- Provider – DID Provider is ONLY for informational purposes. If you do not know which Provider to assign - create dummy Provider to represent company from which you buy DID. If this is fake DID - assign any Provider you want. If your DID Provider has several IP addresses (as DIDWW) and you configured several Providers in MOR - assign ANY configured Provider.
- Language – option to set language for voice prompts in the Asterisk Dial Plan
- Call limit – describes how many simultaneous calls DID can receive. 0 (zero) means that calls are unlimited.
- Max Call Duration (Timeout) – a number of seconds before a Call via DID is terminated (NOTE: due to a global safeguard Calls are terminated ~3 sec. earlier than this setting).
- Comment – option to save some notes about DID.
- Sound file – here you can add IVR Greeting for DID. There are two options:
- Answer and play.
- Early media.
- PIN – a numeric PIN code to secure a DID.
- PIN retries – a number of allowed attempts to enter a PIN code.
- Sound file to reenter PIN – a Sound File that is played before the next attempt to enter a PIN Code.
- MOH instead of Ringing – if MOH is selected, Music on Hold will be played instead of ringing when DID number is dialled.
- IVR if PIN fails – an IVR the Call is transferred to when all attempts to enter a PIN Code fail. NOTE: when all PIN attempts fail and IVR if PIN fails is None, a Call is terminated with a Hangupcause Code 275.
- Grace Time – if call duration is less than Grace Time, it will not be accounted, for example: Grace Time = 3s, call duration <= 3s, then price for the call = 0
- Timeout Digit – the maximum amount of time permitted between digits when the user is typing in a number. When this timeout expires after the user has started to type in a number, the number will be considered complete, and will be interpreted (sent to the system). Works both with entering destination and ANI/PIN.
- Timeout Response – the maximum amount of time permitted for user to START entering a number. If the user does not begin typing a number in this amount of time, system will notify that nothing was entered. Once the user begins to type a number, system will wait for Digit Timeout to be reached, and Response Timeout has no effect no more.
- CallerID Name Prefix – option to add a CallerID Name prefix to the incoming CallerID.
- Tone zone – option to set tone zones. Tone zone is a different ring tone depending on destination (country).
- Tariff for Calling Card – option to set a tariff for DID which will be applied for a calling card. It will not be important what tariff is assigned for that card's group.
- Active from – DID will become active from this date. If DID is not active yet, call is routed like there is no matching DID number.
- Active till – DID will be active till this date. Expiration does not change DID status, call is routed like there is no matching DID number.
- Blacklist Source Number Pool - this will set Number Pool for Blacklist Source. When calling this DID, if Source Number match number in this pool, call will be rejected with HGC 283 - Source number is in DID blacklist.
- Send call anonymously - default no. Ability to show Anonymous on incoming call.
- Send CallerID in UUI header - default no. The ability to show the caller ID on all calls in Sip UUI messaging.
Header example:
User-to-User: hexCallerid;pd=XX;encoding=hex;purpose=isdn-uui;content=isdn-uui
DID Wildcard
It is possible to use Wildcard * to match several DID numbers.
For example, DID 37088888* would match 3708888881 3708888872 3708888893 370888885555555, etc.
IMPORTANT DID numbers without a Wildcard have higher priority.

Settings
If you want to edit a DID's settings, click on the ![]() icon.
icon.
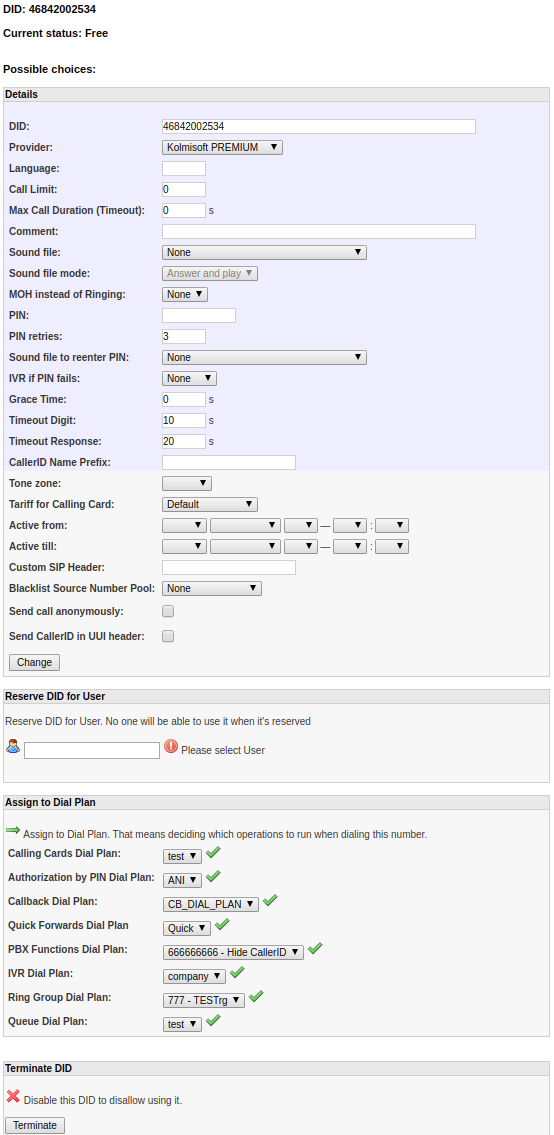
The above window is for Free DID. You can:
- Change details
- Reserve DID for User.
- Assign to Dial Plan.
- Terminate a DID.
Reserve DID for User
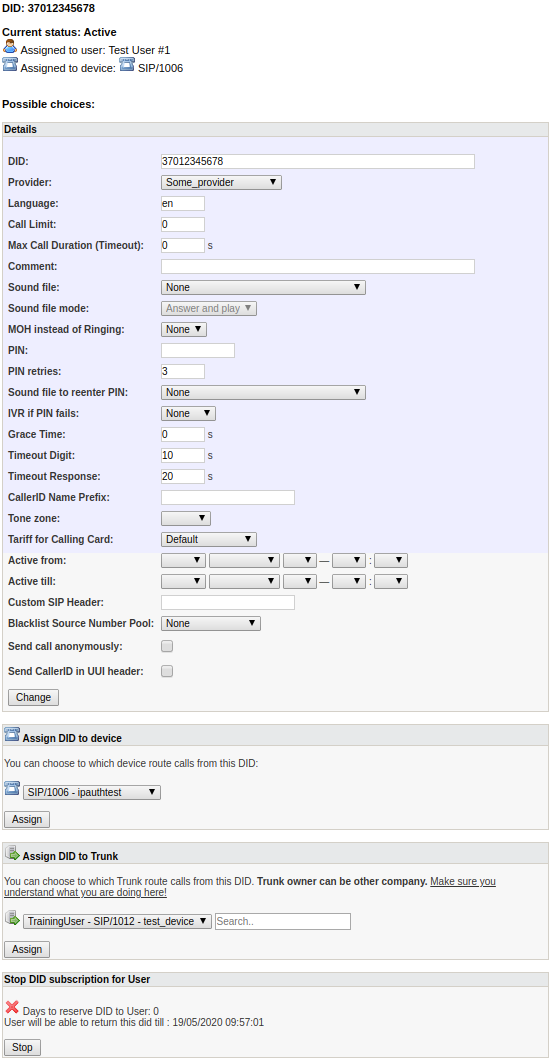
When a DID is assigned to a Device (Reserve for User first), you have a few different choices:
Here you can:
- Change details.
- Assign DID to device. Here you can select different Devices for the same user. For select Trunk Device is next section.
- Assign DID to Trunk. Here you can select different Trunk Devices for the same user.
- Stop a DID subscription and reserve the DID for 90 days (by default) to this user in case he changes his mind and wants to get the DID back.
Assign to Dial Plan
When DID is assigned to Dial Plan, in DID settings you can:
- Change details.
- Make DID free.
When you have Quickforward Rule for this DID, in DID edit you will see additional notice:
Delete DID
At first, mark it as "not used" (Free). Then terminate it. When you do, you will see ![]() next to the DID in the main DID window. By clicking on it, you can delete the DID.
next to the DID in the main DID window. By clicking on it, you can delete the DID.
Note: you cannot delete DIDs that are associated with calls. You can only Terminate these DIDs.
DID bulk management
In the main DIDs window, click ![]() Bulk Management and you will be able to perform various actions either on:
Bulk Management and you will be able to perform various actions either on:
- DIDs interval - this will apply action on selected DID interval,
- DIDs pattern - this will apply action on selected pattern. Supported wildcard symbols in pattern:
- % matches any symbols, for example 370% will match any number starting with 370
- _ matches one symbol, for example 370_1334455 will match numbers in format 370x1334455, where x is any number.
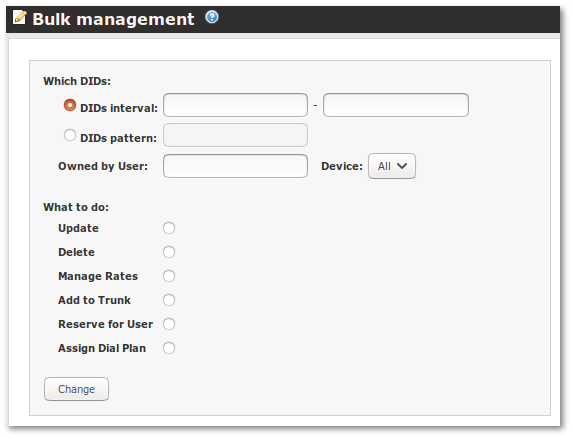
Here you can choose which DIDs to update and what to do:
- Update - option to change some of DID details, Reserve DID for User (only free DIDs can be reserved) or Make DID free.
- Delete - option to delete DIDs by Provider or make DIDs Free/Terminated/Closed.
- Manage rates - option to change Rates for DID Billing.
- Assign DID to Trunk.
- Reserve for User - option to reserve DID for User (only free DIDs can be reserved).
- Assign Dial Plan - option for Assign DID to Dial Plan
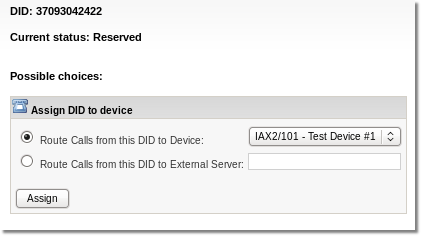
Allowing Users to route their DIDs
Since MOR X5 users are able to route their DID to a Device or an External Server . This functionality can be enabled in SETTINGS -> Setup -> Visual by checking the 'Allow User to assign DID to Device:' setting.
Once the functionality is enabled, the user will be able to see an Edit icon, in his DIDs list.

By pressing the icon, the user will be redirected to a page where he will be able to route his DID either to one of his MOR Devices, or to a Device on an external server (eg. SIP/370xxxxxx@123.123.123.123).
NOTE: Reseller's DID list permissions are independent from Resellers' User, this means that Resellers' User can view DID list (if permissions are enabled for them) even when Resellers cannot.
