Difference between revisions of "How to make first call"
| Line 9: | Line 9: | ||
This small guide will show how to make your first call after system installation. | This small guide will show how to make your first call after system installation. | ||
=Create a tariff= | |||
= | |||
Go to '''SETTINGS''' -> '''Billing''' -> '''Tariffs''' and click [[file:icon add.png]]'''New tariff''' | |||
[[File:Tariffs new.png]] | |||
Enter the name, select what type of tariff do you want and click ''Create''. In this example tariffs have rates/prices from your Providers. These prices are paid TO Providers when they terminate calls FROM your system to PSTN. | |||
This is self-cost for you, e.g. you buy calls using these prices, as it is written next to the blue information icon ([[file:icon info.png]]). | |||
=Create a provider= | |||
Go to '''SETTINGS''' -> '''Billing''' -> '''Providers''' and click [[file:icon add.png]]'''New provider''' | |||
[[File:Providers new.png]] | |||
Select Technology, from a dropdown list assign Tarrif you have created, select the server and click ''Save''. | |||
=Create a LCR= | |||
Go to '''SETTINGS''' -> '''Billing''' -> '''LCR''' and click [[file:icon add.png]]'''New LCR''' | |||
[[File:Lcr new.png]] | |||
Enter the name, from a dropdown list select the order and click ''Save''. | |||
You will see that there are no providers assigned to this created LCR. | |||
[[File:Lcr provider.png]] | |||
Click [[file:icon providers.png]]'''Providers'''. | |||
[[File:Lcr provider1.png]] | |||
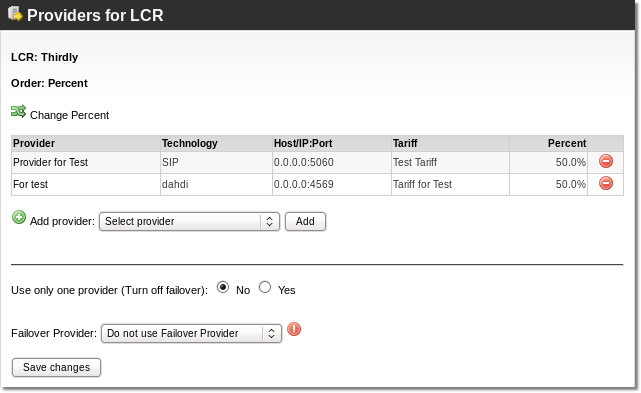
Assign created provider from the dropdown list and click ''Add''. | |||
==Failover provider== | |||
You can also assign a failover provider (a provider in case of emergency) by selecting '''No''' in ''Use only one provider (Turn off failover):''. Default value is '''Yes'''. | |||
[[File:Lcr provider failover.png]] | |||
Assign a provider and click ''Save changes''. | |||
Please note that ''Save changes'' button is only for failover providers, not for providers in general. | |||
=Adding a user= | |||
''(See [[Users]] page for more information about user management)'' | |||
To add a user go to '''SETTINGS''' -> '''Users'''. Click [[file:icon add.png]]'''Add user'''. | |||
[[File:User new.png]] | |||
Assign created LCR anc click ''Create'' at the bottom of the page. | |||
=Add a device for user= | |||
''(See [[Devices]] page for more information about devices)'' | |||
To add a device go to '''SETTINGS''' -> '''Users''' and in the users list click the devices icon ([[file:icon devices.png]]). In the opened window click [[file:icon add.png]]'''Add new device'''. | |||
[[File:Devices new.png]] | |||
Enter the name, select device type and click ''Create''. | |||
= Softphone = | = Softphone = | ||
Revision as of 13:49, 5 May 2012
| Translations: |
This small guide will show how to make your first call after system installation.
Create a tariff
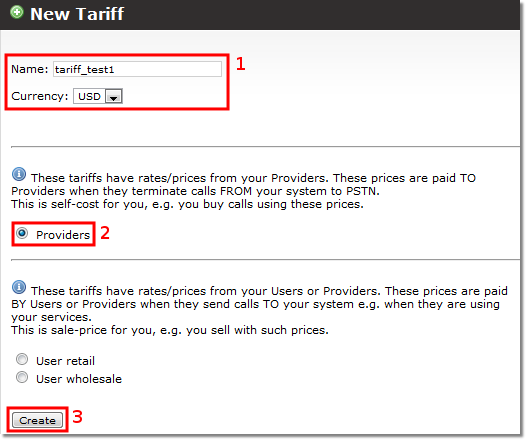
Go to SETTINGS -> Billing -> Tariffs and click ![]() New tariff
New tariff
Enter the name, select what type of tariff do you want and click Create. In this example tariffs have rates/prices from your Providers. These prices are paid TO Providers when they terminate calls FROM your system to PSTN.
This is self-cost for you, e.g. you buy calls using these prices, as it is written next to the blue information icon (File:Icon info.png).
Create a provider
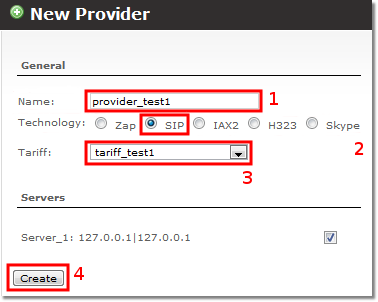
Go to SETTINGS -> Billing -> Providers and click ![]() New provider
New provider
Select Technology, from a dropdown list assign Tarrif you have created, select the server and click Save.
Create a LCR
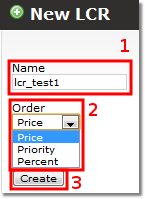
Go to SETTINGS -> Billing -> LCR and click ![]() New LCR
New LCR
Enter the name, from a dropdown list select the order and click Save.
You will see that there are no providers assigned to this created LCR.
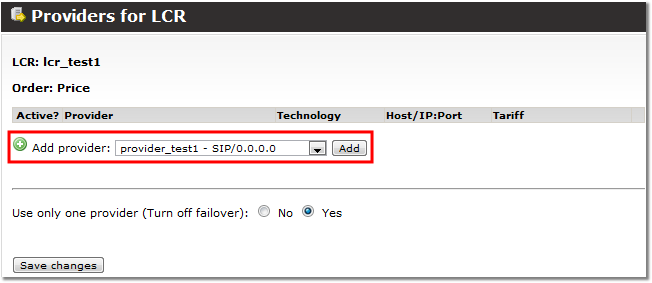
Click File:Icon providers.pngProviders.
Assign created provider from the dropdown list and click Add.
Failover provider
You can also assign a failover provider (a provider in case of emergency) by selecting No in Use only one provider (Turn off failover):. Default value is Yes.
Assign a provider and click Save changes.
Please note that Save changes button is only for failover providers, not for providers in general.
Adding a user
(See Users page for more information about user management)
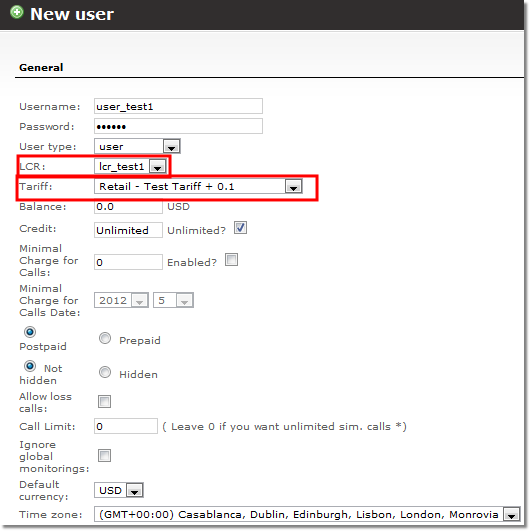
To add a user go to SETTINGS -> Users. Click ![]() Add user.
Add user.
Assign created LCR anc click Create at the bottom of the page.
Add a device for user
(See Devices page for more information about devices)
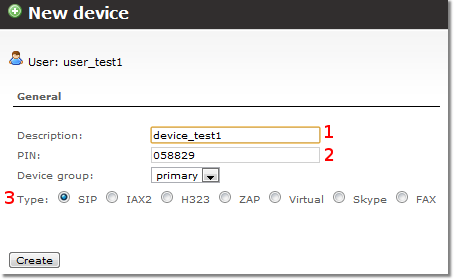
To add a device go to SETTINGS -> Users and in the users list click the devices icon (File:Icon devices.png). In the opened window click ![]() Add new device.
Add new device.
Enter the name, select device type and click Create.
Softphone
To make a real call, you will need a softphone for a quick test.
You can use your own if it supports the SIP or IAX2 protocols.
For the sake of simplicity, we will show how to configure Idefisk 1.37, which is very small and easily configurable.
First, download from our server and install it. (It is for Windows OS.)
For Linux it can be downloaded here, and for MacOS here.
Use this manual to configure Idefisk with your <SERVER_IP> and username/password of test user's device.
NOTE: that User 101 is by default Blocked to insure maximum security to your system. Unblock it before making a test call.
Dialing
Next, enter a phone number into your softphone and try to dial.
NOTE: enter the number in international (E.164) format. Do not use any international prefixes - use country code + area code + number.
For example, a Lithuanian number is 37063042439, where 370 is the country code, 6 is the area code (MOB network), and all the rest is the number itself.
NOTE: USA/Canada numbers should start with 1 (which is the USA/Canada country code).
- If you hear nothing, your softphone is not registered to the server.
- If you hear a message from Kolmisoft, you do not have an account on our server (contact us to get one).
- If you hear ringing, everything is okay.
Call Logs
After the call, you can check your call in the system.
Go to: STATISTICS -> Calls -> Last Calls and you will see your call.
It will be already billed.

