Call Shop Addon
What is Call Shop?
A callshop is a business that physically provides phones for the purpose of making long-distance telephone calls. More information can be found here.
What is a Call Shop Addon?
It is an additional functionality which allows to have and manage Call Shops for Admin and Resellers.
Typical Call Shop Scenarios
Prepaid
- Customer visits the call shop.
- Customer pre-pays the operator for the call.
- The operator will then activate a phone booth for the customer using billing software.
- The customer will go to the phone booth and dial the destination number.
- Billing software will record the call details and the corresponding call charges for future reporting needs.
Postpaid
- Customer visits the call shop.
- Customer chooses a vacant phone booth and dials the destination number.
- Billing software keeps track of each phone booth's call details and the corresponding call charges for invoicing and future reporting needs.
- When the customer has completed his/her calls, the operator generates an invoice for the customer's calls.
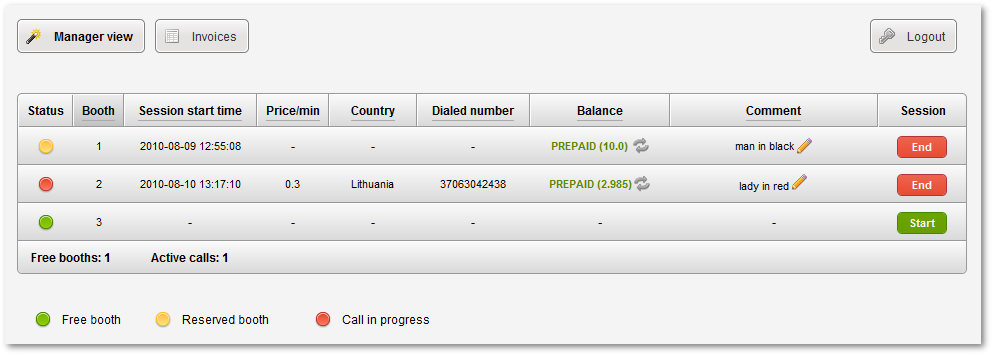
Manager's view
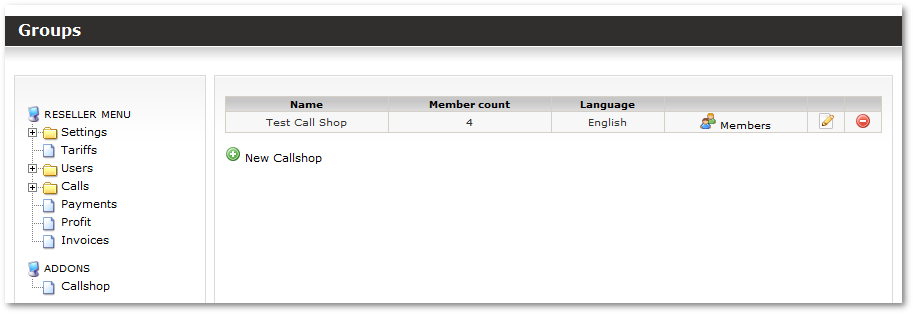
Call Shop Management in Admin's/Reseller's view
Terms
Reseller
Reseller is a Call Shop owner. Reseller can have many Call Shops.
Manager
Manager is a person who works for reseller. (it is not possible for resellers to resell CallShop for his own customers yet) He works in a Call Shop and does these tasks:
- Takes money from users
- Gives change to a user
- Prepares a Call Booth for a user, so he would be able to call
Manager user belongs to reseller
Call booth
Call booth is a special user in MOR billing system dedicated for use in a Call Shop.
Call booth user belongs to reseller.
How to create a Call Shop?
1. You have to be Logged in as an admin or a reseller
2. Create Users named "cb1", "cb2", "cb3". These will represent Booths. Make sure that these Users have Devices. SIP Phones of actual booths should be registered to these devices.
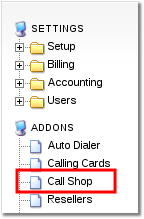
3. Navigate to ADDONS -> Call Shop:
4. Select the marked icon:

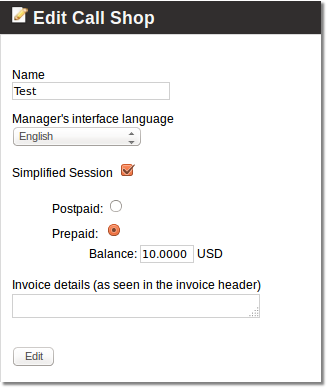
5. Fill the required fields and press "Create" button:
Name - the name for Call Shop
Manager's interface language - this will be the default language for Call Shop manager (the person who will accept payments, enables call booths, etc.)
Invoice details (as seen in the invoice header) - the information you will enter here will be displayed in the invoice
Simplified Session - option to simplify actions in Call Shop interface. If this setting will be checked session will be restarted on button click with parameters which are set below this checkbox - Postpaid/Prepaid, if Prepaid is selected, with defined Balance.
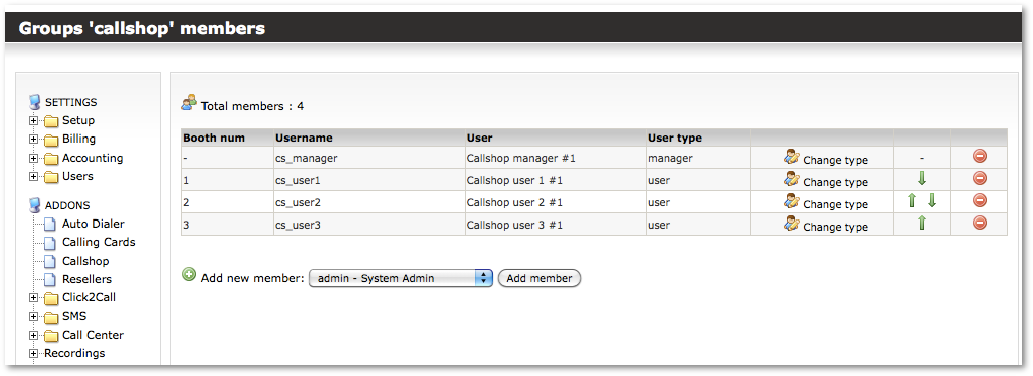
6. Now you have to assign some call booths, select the marked icon to do that:

7. Select a required user from dropdown box (marked with number 1) and press a "Add user as booth" (marked with number 2):
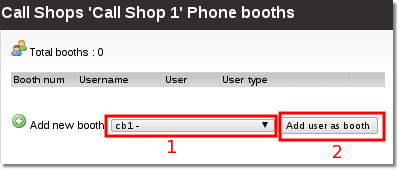
Very important! You have to dedicate user's for call shop booths, that means you must not use these users anywhere else in MOR.
In this way add as many users as you need.
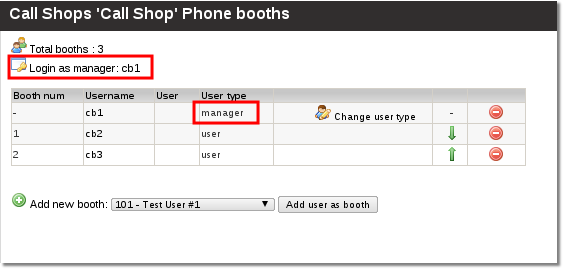
When there is no manager assigned in Call Shop when adding new call booth you will be offered to mark it as a manager. Please do so. If you skip this step you can mark a booth as a manager by pressing a marked icon:
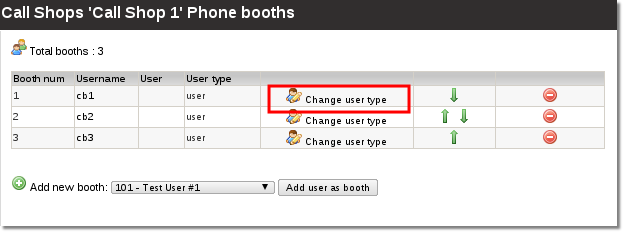
Now you can see, that user's type was changed to manager and you can see a new icon: "Login as manager". You can use this icon to quickly access the manager's view to help him solve problems.
P.S. The manager has his own way to access his manager view. Press here for more info
Call Shop manager interface
How can manager access his management interface?
1. The manager has to enter the server address in his browser (the same way as you access MOR gui). Most commonly it would look like this: http://www.example.com/billing or http://x.x.x.x/billing, where x.x.x.x is an IP address.
2. In open window the manager has to enter his Login and Password:

3. If Login and Password is correct the manager is redirected straight to his manager interface:
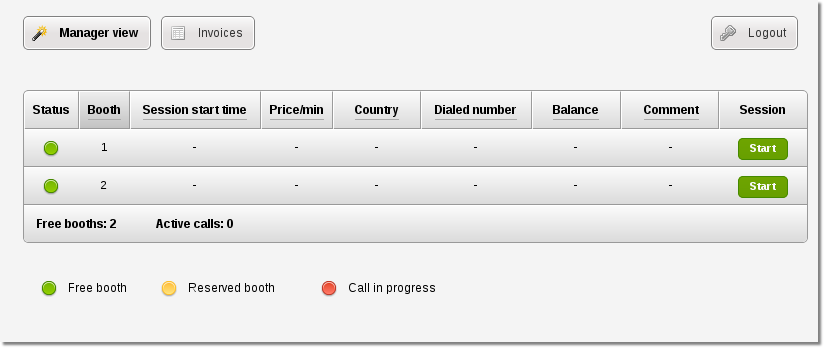
How can the manager assign a call booth for a user?
To assign a call booth the manager has to complete these steps:
1. Press the marked icon:
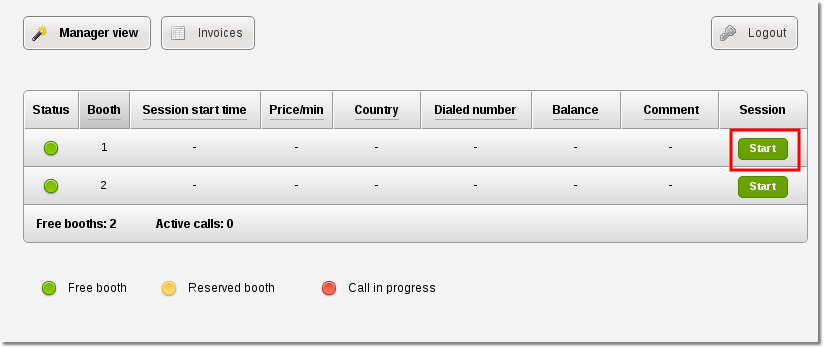
2. After pressing the start button the following settings window will appear:
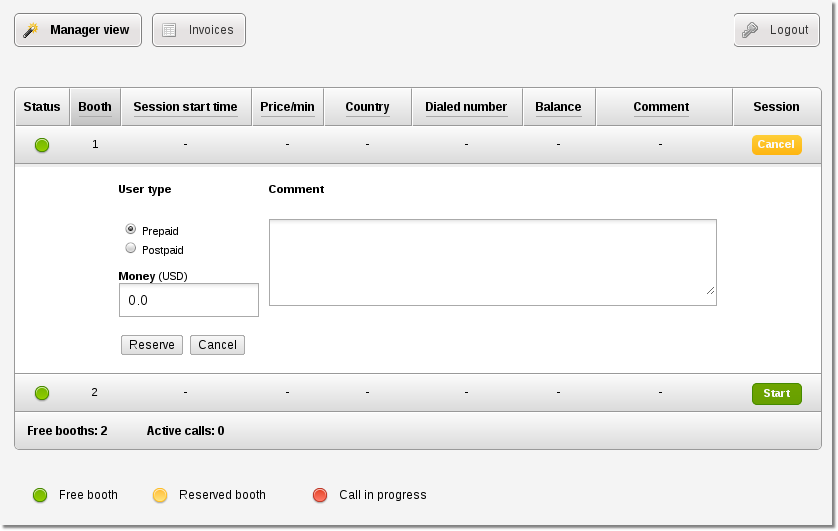
3. Now the manager has 2 options - to mark the user as prepaid or postpaid:
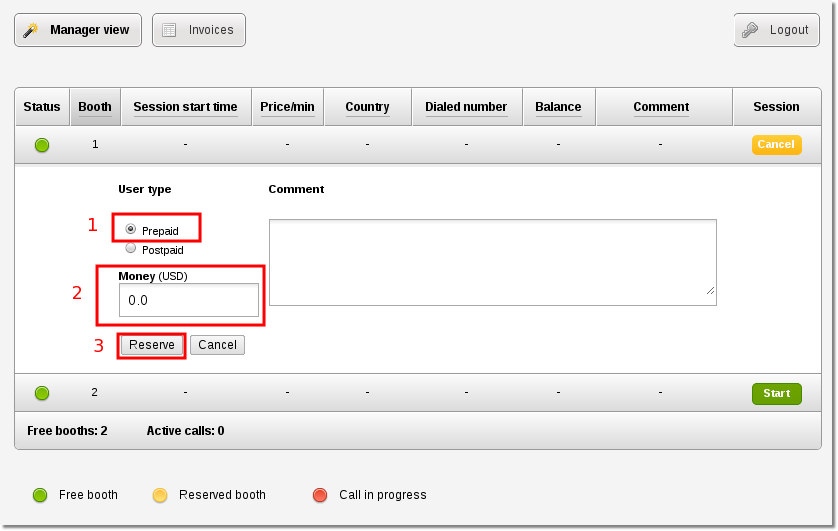
Prepaid - user pays before a call.
1) To mark a user as Prepaid select the marked check box (number 1).
2) In box 2 enter the amount of money the user has paid.
3) Press the button marked with number 3.
Postpaid - user pays after a call.
1) To mark a user as Postpaid select the marked check box (number 1)
2) Press the marked button with number 2
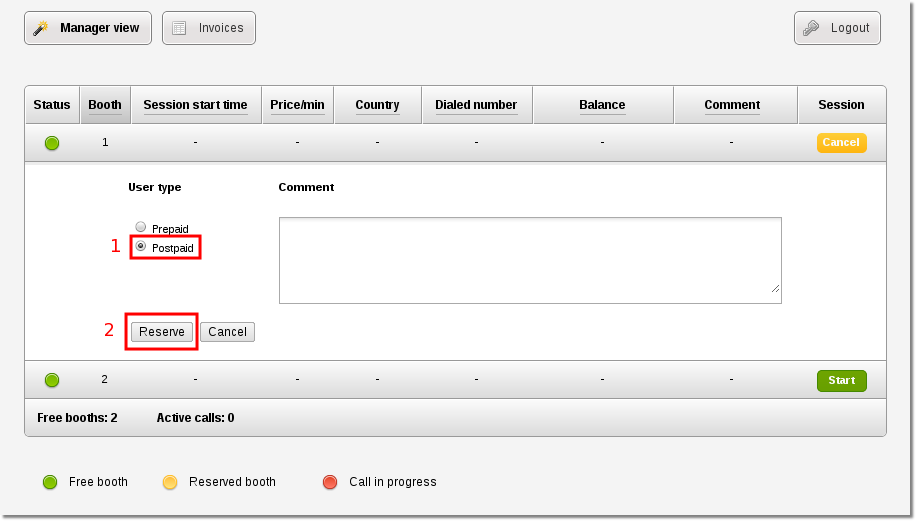
The field Comment can be used to remind yourself some specific details about a user like "The man with a hat" or/and to include some personal info about this user like his Name, Surname, Driver's licence number etc. as this is a requirement in some countries. This field is not limited by any size limits.
4. The booth status changes to reserved (user didn't called any number yet):
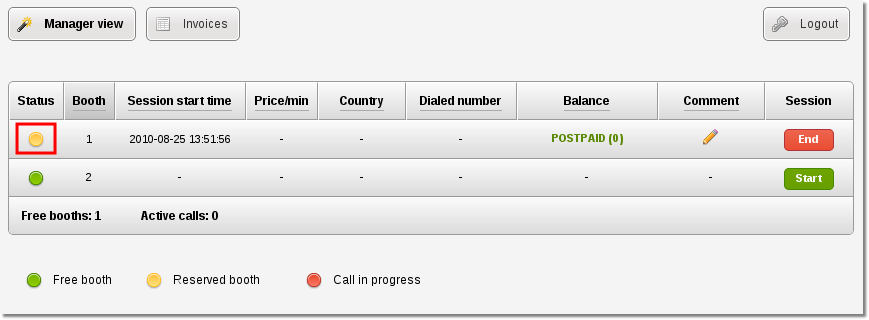
The user can make a call now
How can the manager stop the user call session, write invoice and take money?
1. Firstly you need to press the marked icon:
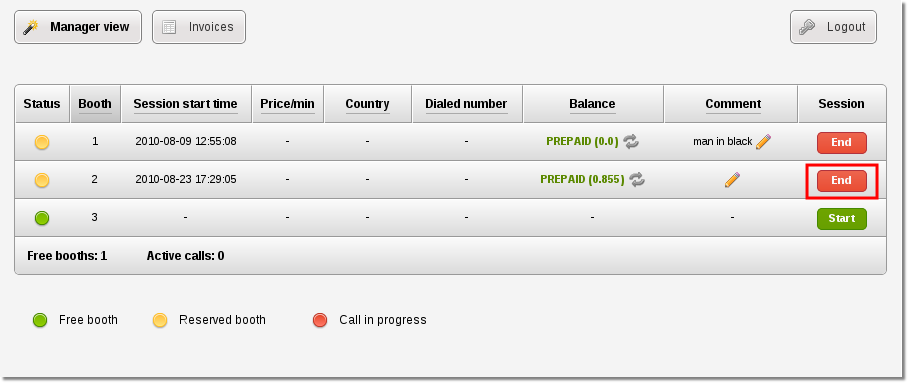
2. The window expands and you will see a lot of valuable information about the current user call session. You can see how much money the user has paid and how much money should be returned to user if his call session type was Prepaid.
The session is NOT ENDED until you press the marked button:
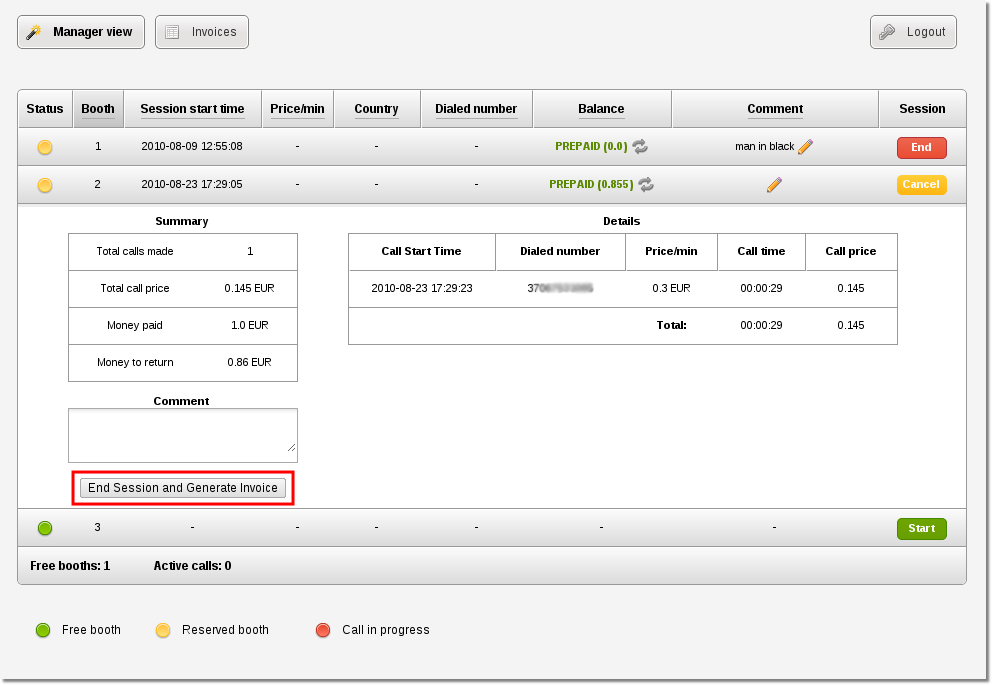
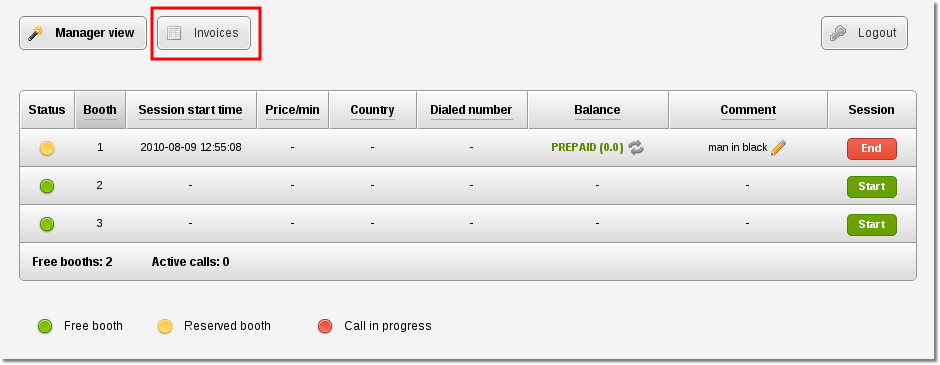
3. When you press the marked button (End Session and Generate Invoice) the call session is stopped (the user will not be able to make any calls) and an invoice is generated. You can find the generated invoice in Invoices section - press the marked button:
4. To view and print an invoice press the marked icon:

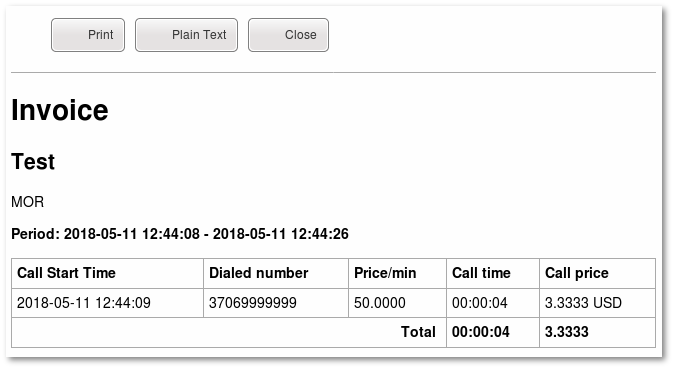
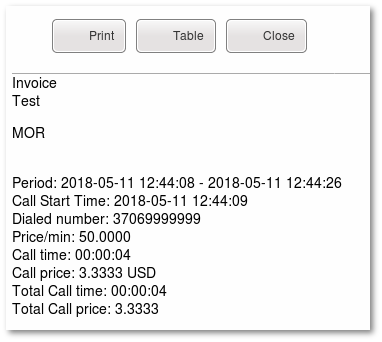
5. Buttons "Table" and "Plain text" allows to switch between Table
and Plain text formats
"Print" button allows to print invoice in chosen format.
What is Partly paid invoice?
When the customer for some reason can't pay full price for the calls he made, manager can select that the invoice is partly paid and enter the amount of money the customer gave him. Don't forget to press "Update invoice" to change it's details.
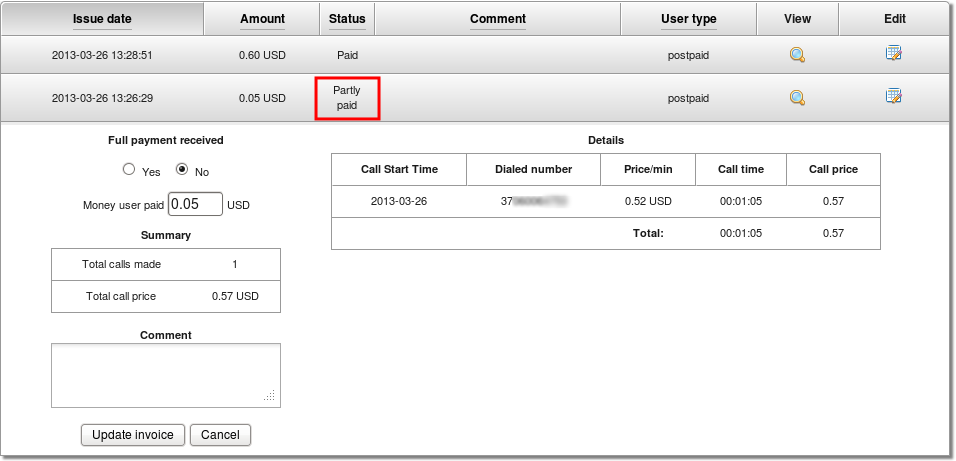
When the customer pays full price for the invoice, the manager needs to select "Yes", check if the amount of money is correct and update the invoice. After this, invoice becomes "Paid" and the payment amount and invoice status can't be changed anymore.
User type is prepaid, how can I top up his balance during the call?
1. Click the marked icon:

2. Enter the required amount (marked with number 1) and choose to increase (marked with number 2) or to decrease (marked with number 3) the current user balance.
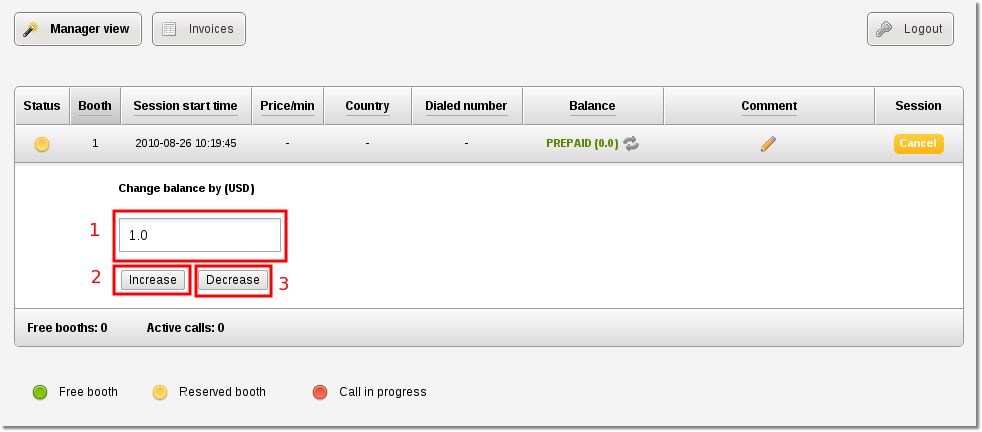
3. Depending on what you have chosen (Increase or Decrease) you will see a similar confirmation:
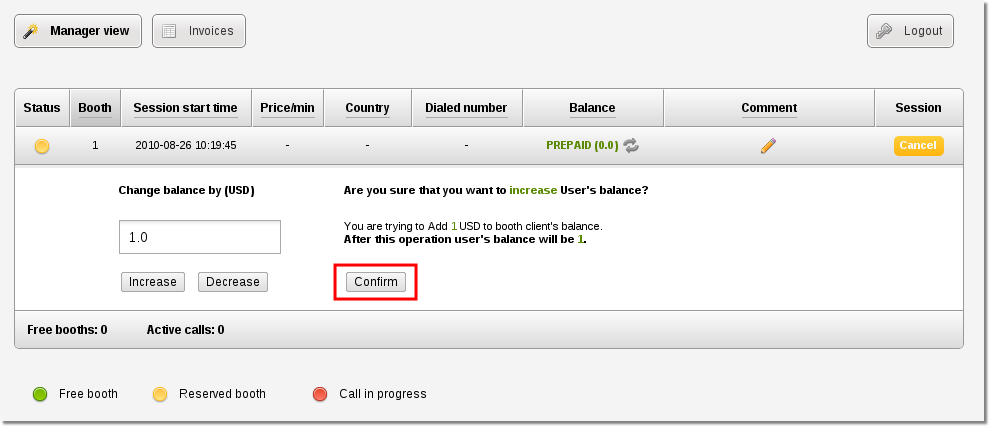
Press the marked button to confirm.
4. The balance get's changed.
Call Shop taxes
This option is available starting from MOR 10
Taxes are counted and shown in Call Shop invoices only if they are set in that call booth's user settings (this allows you to have different call booths with different taxes)
How to enable taxes for a call booth?
1. Go to ADDONS -> Call Shop:

2. Go to Call booths:

3. Now select a booth you want to set tax:
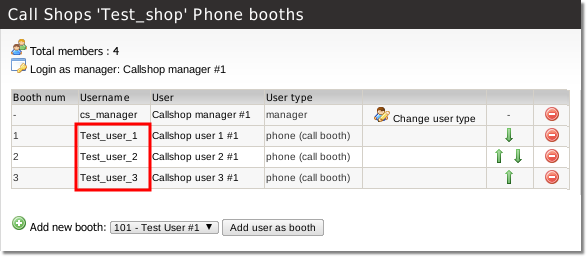
4. Find a displayed section in settings and set tax for a call booth:
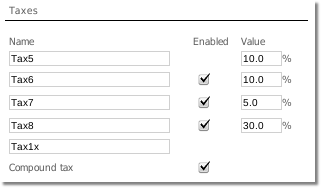
More information about taxes can be found here
5. Save the changes
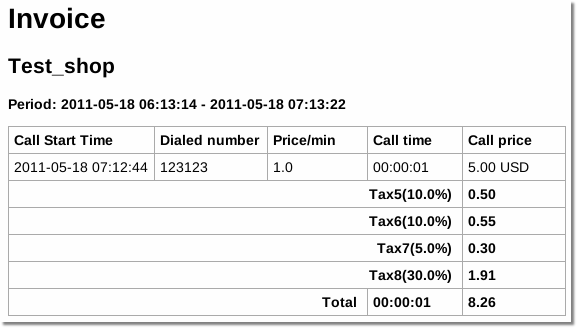
Now when you will end a calling session an invoice will be generated with taxes:
Rate search
This feature is available starting from MOR 11, also backported to MOR 10

Internal information on how Call Shop addon works
When an ordinary user is added to callshop - it is automatically blocked so he would not be able to make calls. When calling session is started by the manager - it is unblocked (can make calls now). When the session is ended - the user account is blocked again. You can always check current booth blocked/unblocked status from admin or reseller in that booth details.
Please do not interfere with MOR system and do not change Blocked/Not blocked status for call booth users.
When Call Shop Manager creates Prepaid or Postpaid session in Call Shop - MOR system also changes Postpaid/Prepaid option and balance for that call booth user. Please do not edit these options manually - it is not necessary.
Features which might be implemented in the future
1. Information about a number: you enter the number and get the information about the price, destination, pricing type (per minute, per second, etc)
2. Possibility for admin to hide some reseller features if needed:
- Hide Settings
3. Possibility to hide Comment field from manager view
4. Possibility to hide Price/Min field from manager view
5. Auto drop a call after a predefined amount of minutes. This setting will allow to drop a call for example after 2 minutes if user want's to pay only for a two minutes.
6. Statistics for each Call Shop: Money collected, Calls made, etc.
Other notes
- 1 call booth (phone) = 1 MOR user with 1 device. If there are more than 1 device assigned for a user - please leave only 1.
- The number of call booths (phones) is unlimited for each Call Shop
Questions and Answers
Which user should have the credit in order Call Shop could make outgoing calls
That depends. If reseller uses his own providers - he must have enough balance (if he is prepaid) on the provider side to make calls. If reseller is using admin's providers - then reseller must have enough balance in MOR in order Call Shop call booths could make calls.
Call Shop manager and a call booth does not need to have any balance. Zero balance is OK.
When the call session is terminated by Call Shop manager - call booth balance is reseted to 0.00
Which browser should I use for manager view for best user experience?
- For best experience use Mozilla Firefox. You can get it here
How many users should I add to a Call Shop?
- You should add 1 manager (you will not be able to see this user in Call Shop manager's view as it is needed only for administrating purposes)
- You should add as many ordinary users as you need. This number depends on how many phone booths (to simplify: phones) you have in your 1 call shop.
For example: You have 8 call booths (phones) in your call shop - then you need to create 9 users. 1 user account for a manager and 8 for call booths (phones).
How to setup tariffs (prices) for a Call Shop
Please refer to tariffs section in MOR manual to answer this question in detail. All information is valid for Call Shop also, because Call Shop users are the same MOR user's just logically grouped into Call Shops.
Basic scenario how admin/reseller should setup a Call Shop with tariff
1. Create rates (tariff import). More information about: rates
2. Assign that tariff to the users he will use in Call Shop
3. Create Call Shop and assign users to Call Shop as booths
Done, now Call Shop manager (the person who sits in Call Shop and collects money) enables call booths from manager interface by assigning them credit/balance.
Other notes
- Admin/Reseller can change Call Shop prices by assigning a different tariff for a call both (user).
- Call Shop booths (users) cannot change prices.
- Admin can check his resellers rates by loging in as reseller.
How to setup a call booth that it would bill in increments: per second, per minute or preferential?
- This can be achieved by creating a separate tariff with such settings. Then you will have to assign this tariff for each Call Shop call booth (phone).
I would like that Call Shop owner would be able to import tariffs for his Call Shops, how to do that?
- Create a reseller account for each Call Shop owner.
I want to separate billing statistics per Callshop
Create a Reseller account per each Call Shop and configure Call Shops on these Resellers. Billing information will be separated per Reseller.
Call Shop manager interface Demo
- http://demo.kolmisoft.com/billing/callc/login
- Username: booth1
- Password: demo
