Difference between revisions of "DID Management"
| Line 3: | Line 3: | ||
What is DID? | What is DID? | ||
In short – it is an external number to | In short – it is an external number to have incoming calls to your VoIP network reach a particular device. (This is a very simplified explanation that will serve for the moment. For a more extensive explanation, please check [http://www.voip-info.org/wiki/view/DID here]). | ||
'''VERY IMPORTANT RULE: DIDs in MOR MUST be in E.164 format.''' | '''VERY IMPORTANT RULE: DIDs in MOR MUST be in E.164 format.''' | ||
| Line 14: | Line 14: | ||
Here you can see all DIDs and their info. | Here you can see all DIDs and their info. | ||
User/Dial Plan and Device | User/Dial Plan and Device show who will answer when dialing this DID. | ||
Clicking on | Clicking on User or Device brings you to their DID settings. If you click on the [[Image:callflow.png]] icon, you will go to the device's [[Call Flow]] window. | ||
= Status = | = Status = | ||
| Line 22: | Line 22: | ||
Status is very important. For every just-created DID, the status is Free. | Status is very important. For every just-created DID, the status is Free. | ||
A DID can have several | A DID can have several statuses: | ||
* '''Free''' – this status means that the DID is free to be reserved for any user/device. You can also Terminate it. | * '''Free''' – this status means that the DID is free to be reserved for any user/device. You can also Terminate it. | ||
* '''Reserved''' – the DID is reserved but NOT actually used for a user. "Reserved" is useful at the negotiation stage before signing a contract. When user decides to sign up, | * '''Reserved''' – the DID is reserved but NOT actually used for a user. "Reserved" is useful at the negotiation stage before signing a contract. When a user decides to sign up, we Activate the DID. We can also make the DID Free. | ||
* '''Active''' – the DID is assigned to | * '''Active''' – the DID is assigned to a Device and is functional. We can Close it. | ||
* '''Closed''' – the DID is no longer functional, so that all calls going to this DID will get Hangup. One important feature of this state: when a DID is Closed, it will be closed for a set time (the default is 90 days) in case the user changes his mind and decides to use this DID again. This is useful when a user is not paying for services, as we can suspend the DID by using Closed. MOR will make it Free after the Closed period runs out. You can manually make it Free or Terminate this DID. | * '''Closed''' – the DID is no longer functional, so that all calls going to this DID will get Hangup. One important feature of this state: when a DID is Closed, it will be closed for a set time (the default is 90 days) in case the user changes his mind and decides to use this DID again. This is useful when a user is not paying for services, as we can suspend the DID by using Closed. MOR will make it Free after the Closed period runs out. You can manually make it Free or Terminate this DID. | ||
* '''Terminated''' – the DID is no longer used in MOR. It | * '''Terminated''' – the DID is no longer used in MOR. It remains only for historical purposes. You can make it Free if you want. | ||
= Settings = | = Settings = | ||
If you want to edit | If you want to edit a DID's settings, click on [[Image:edit.png]] icon: | ||
[[Image:dids3.png]] | [[Image:dids3.png]] | ||
| Line 43: | Line 43: | ||
# Terminate a DID. | # Terminate a DID. | ||
When a DID is assigned to a Device (Reserve for User first), you have | When a DID is assigned to a Device (Reserve for User first), you have a few different choices: | ||
[[Image:dids4.png]] | [[Image:dids4.png]] | ||
| Line 49: | Line 49: | ||
Here you can: | Here you can: | ||
# Change provider/language | # Change provider/language. | ||
# Assign DID to different device (for same user) | # Assign DID to a different device (for the same user). | ||
# [[Assign DID to Trunk]] | # [[Assign DID to Trunk]]. | ||
# Stop DID subscription and reserve | # Stop a DID subscription and reserve the DID for 90 days (by default) to this user in case he changes his mind and wants to get the DID back. | ||
When DID is assigned to Dial Plan choices are almost identical. | When DID is assigned to Dial Plan, the choices are almost identical. | ||
= Add new DID(s) = | = Add new DID(s) = | ||
In the main DIDs window if you want to add new DID(s) | In the main DIDs window, if you want to add new DID(s), click on [[Image:add.png]] '''New DID''': | ||
[[Image:dids5.png]] | [[Image:dids5.png]] | ||
In this window you can add one DID or series of DIDs. Also you should select provider which sold you this DID. | In this window, you can add one DID or series of DIDs. Also, you should select the provider which sold you this DID. | ||
= Delete DID = | = Delete DID = | ||
At first mark it as not used ( | At first, mark it as "not used" (Free). Then terminate it. When you do, you will see [[Image:delete.png]] next to the DID in the main DID window. By clicking on it, you can delete the DID. | ||
= Edit | = Edit a DID's number = | ||
It is not possible to edit DID number. You can only delete old one and create new one. | It is not possible to edit a DID number. You can only delete an old one and create new one. | ||
= DID bulk management = | = DID bulk management = | ||
In main DIDs window | In the main DIDs window, click [[Image:edit.png]] Bulk Management and you will be able to perform various actions with series of DIDs: | ||
[[Image:dids6.png]] | [[Image:dids6.png]] | ||
Revision as of 02:02, 16 May 2010
Description
What is DID?
In short – it is an external number to have incoming calls to your VoIP network reach a particular device. (This is a very simplified explanation that will serve for the moment. For a more extensive explanation, please check here).
VERY IMPORTANT RULE: DIDs in MOR MUST be in E.164 format.
You can reach the DIDs window in SETTINGS – Billing – DIDs:
Here you can see all DIDs and their info.
User/Dial Plan and Device show who will answer when dialing this DID.
Clicking on User or Device brings you to their DID settings. If you click on the ![]() icon, you will go to the device's Call Flow window.
icon, you will go to the device's Call Flow window.
Status
Status is very important. For every just-created DID, the status is Free.
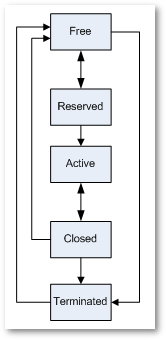
A DID can have several statuses:
- Free – this status means that the DID is free to be reserved for any user/device. You can also Terminate it.
- Reserved – the DID is reserved but NOT actually used for a user. "Reserved" is useful at the negotiation stage before signing a contract. When a user decides to sign up, we Activate the DID. We can also make the DID Free.
- Active – the DID is assigned to a Device and is functional. We can Close it.
- Closed – the DID is no longer functional, so that all calls going to this DID will get Hangup. One important feature of this state: when a DID is Closed, it will be closed for a set time (the default is 90 days) in case the user changes his mind and decides to use this DID again. This is useful when a user is not paying for services, as we can suspend the DID by using Closed. MOR will make it Free after the Closed period runs out. You can manually make it Free or Terminate this DID.
- Terminated – the DID is no longer used in MOR. It remains only for historical purposes. You can make it Free if you want.
Settings
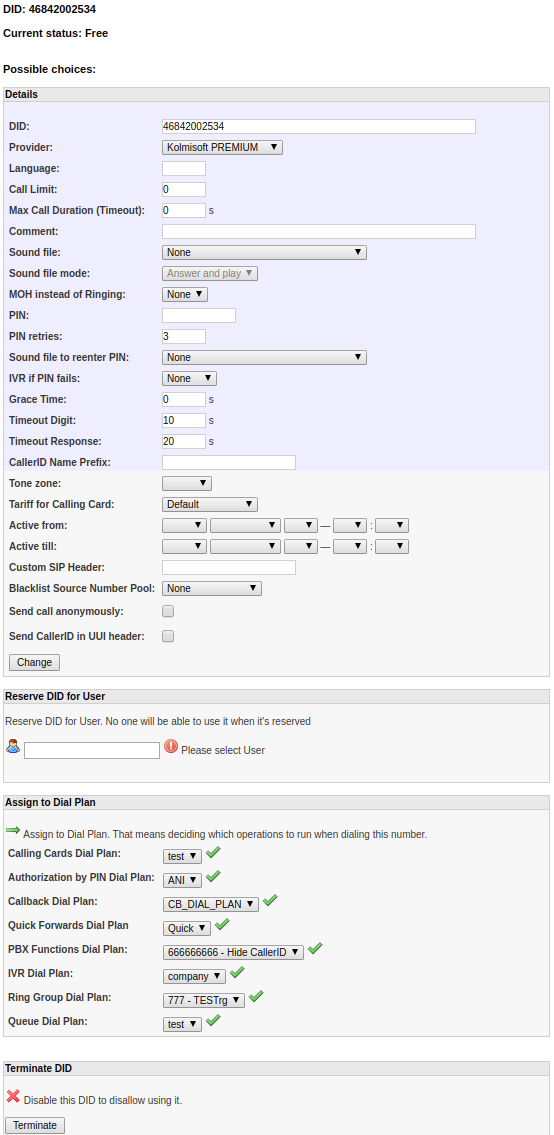
If you want to edit a DID's settings, click on ![]() icon:
icon:
This window is for Free DID. You can:
- Change Provider and language for this DID. "Language" is for voice prompts in the Asterisk dialplan.
- Reserve a DID for a user.
- Assign to Dial Plan.
- Terminate a DID.
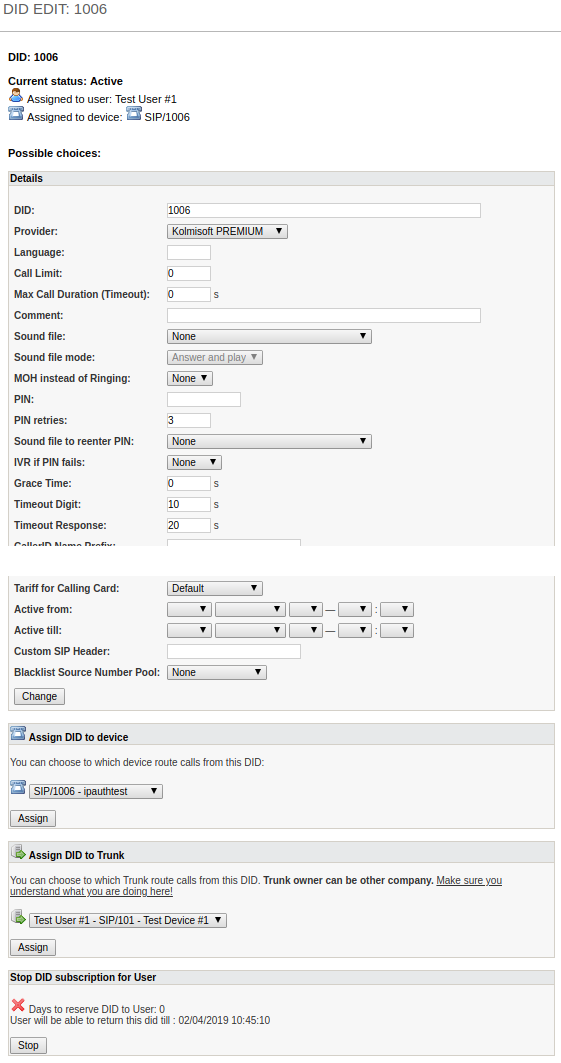
When a DID is assigned to a Device (Reserve for User first), you have a few different choices:
Here you can:
- Change provider/language.
- Assign DID to a different device (for the same user).
- Assign DID to Trunk.
- Stop a DID subscription and reserve the DID for 90 days (by default) to this user in case he changes his mind and wants to get the DID back.
When DID is assigned to Dial Plan, the choices are almost identical.
Add new DID(s)
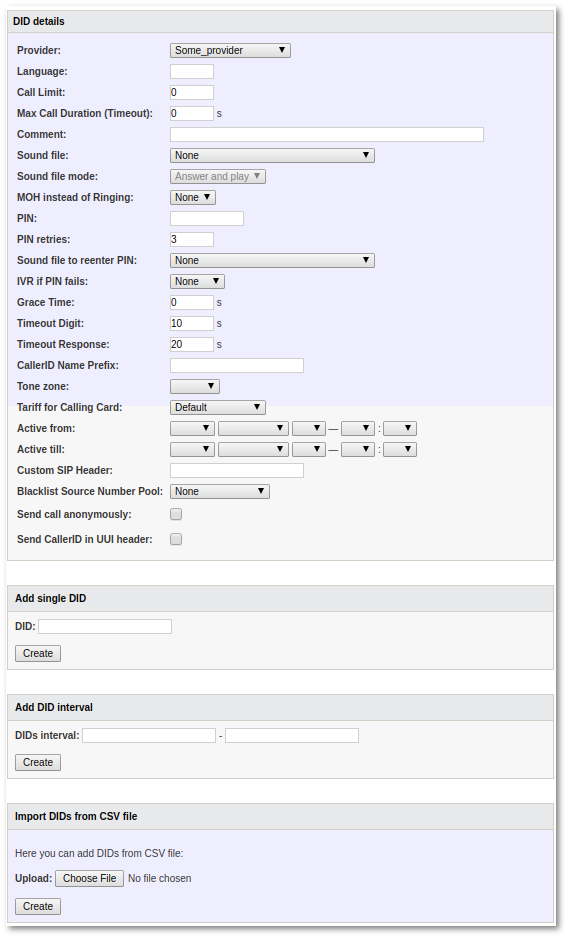
In the main DIDs window, if you want to add new DID(s), click on ![]() New DID:
New DID:
In this window, you can add one DID or series of DIDs. Also, you should select the provider which sold you this DID.
Delete DID
At first, mark it as "not used" (Free). Then terminate it. When you do, you will see ![]() next to the DID in the main DID window. By clicking on it, you can delete the DID.
next to the DID in the main DID window. By clicking on it, you can delete the DID.
Edit a DID's number
It is not possible to edit a DID number. You can only delete an old one and create new one.
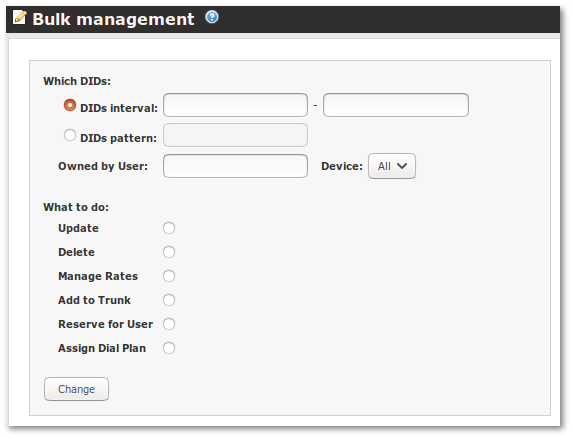
DID bulk management
In the main DIDs window, click ![]() Bulk Management and you will be able to perform various actions with series of DIDs:
Bulk Management and you will be able to perform various actions with series of DIDs:

