Whitelisted IPs
Whitelisted IPs can be used from Admin account and from Accountant account with Monitoring permissions enabled.
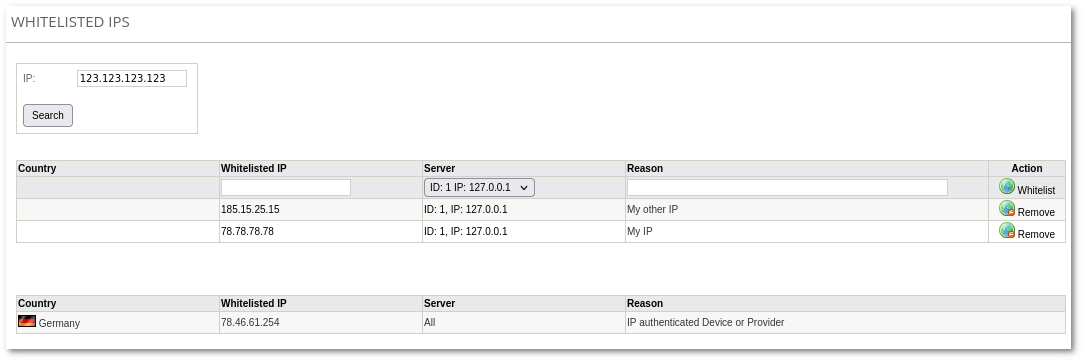
From the Admin account, go to ADDONS -> Monitorings -> Whitelisted IPs to manage Whitelisted IPs.
An IP can be whitelisted by entering valid input values and by clicking the Whitelist icon.
The range of IPs can be added in a format like 192.168.0.1-5, which would result in multiple entries being created (192.168.0.1, 192.168.0.2, 192.168.0.3, 192.168.0.4 and 192.168.0.5).
All the Whitelisted changes will be active in one minute after they have been applied. Country information (flag) can take up to one hour to appear.

The Comment can be added to the Reason field. If the Reason is not specified, then it will be set to "MOR-WHITELIST-GUI".
If the country, to which IP belongs, is blocked in Blocked Countries, but IP is added to Whitelisted IPs, it means that the whole country is blocked except that whitelisted IP.
Blocked IP format
It is possible to block IPs in such format:
- Single IP, for example, 2.2.2.2
- Subnet in CIDR notation, for example, 2.2.2.0/24. Please note that CIDR notation will be converted into the canonical format automatically. For example, if you enter 2.2.2.1/24, it will be converted to 2.2.2.0/24. This is because 2.2.2.0/24 denotes the range 2.2.2.1 - 2.2.2.254, so any subnet from 2.2.2.1/24 to 2.2.2.254/24 means exactly the same range, and a canonical way to represent this is range is with 2.2.2.0/24
- IP range in format x.x.x-xx, for example 2.2.2.1-125. Please note that all IPs in the range will be blocked as separate IPs, so entering 2.2.2.1-125 would create 125 single IP entries. For this reason, we strongly recommend using subnets if possible.
