Device settings
General
- Registration Status - available only for SIP devices. If device is assigned to server A but registers to server B - status will not be shown (devices must register to the server they are assigned to). If no status is displayed - device has not tried to register or noone called to that device.
- Accountcode – the unique ID of the device in the system.
- Description – for informational purposes.
- PIN – device PIN for authentication/authorization.
- Device group – to which group the device belongs (not used most of the time).
- Type – what type of device it is. Once the Device is created with one of the Types, it cannot be changed later.
- Extension – a short number by which this device can be reached; must be unique in the system.
- DTMF Mode – in which protocol phone button presses are sent over network. The available options are: inband, info, RFC2833, and auto. Choose which one your provider uses (RFC2833 is used most often). This setting applies to SIP, H.323 and IAX2 protocols. For ZAP devices edit the configuration files in /etc/asterisk.
- Location – the default is Global. Choose the appropriate location based on Localization needs.
- Ringing Timeout – allows to limit the ringing duration in seconds. Leave 0 for unlimited.
- Call Timeout – allows to limit answered call billsec. Leave 0 for unlimited.
- Trunk – No/Yes/Yes with ANI – Is this device Trunk with/without ANI?
- Call Limit – how many simultaneous calls can a user make?
- Server – allows to choose server in multiple servers system.
Authentication
For dahdi devices:
- Channel – which channel (or channel group) to use on PRI/BRI/PSTN card. Channels and groups should be configured in zapata.conf.
For SIP, H323 and IAX2 Devices:
IP Authentication:
- IP Address – Device IP address.
- Accept calls from any port – this option lets you receive calls from different Ports. This option is just on SIP (when Carrier Class Addon is on) and H323.
- Port – Device Port.
Dynamic:
- Username – username you enter in your Device.
- Password – password you enter in your Device.
- IP Address – shows Device IP address.
- Port – shows Device Port.
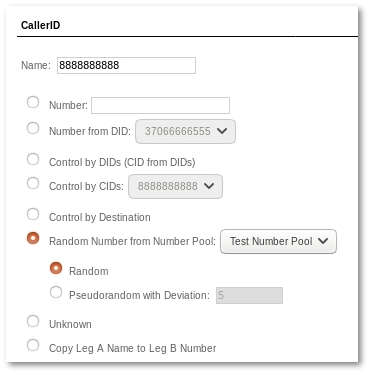
CallerID

A CallerID consists of two parts: Name and Number. The "Number" part is transferred by default by all technologies (GSM, PSTN, SIP etc), but the "Name" part is transferred only by some. The number you see on your mobile phone when someone is calling you is the "Number" part.
- Name – the "Name" part of the CallerID.
- Number – the "Number" part of the CallerID. Only numerical values can be entered in this field.
NOTE: if you leave these fields empty, the user can set the CallerID by himself. Usually it is not advisable to allow the user do it on his own.
- Number from DID - use the DID as the CallerID (only available when the device has DIDs), this option just sets CallerID Number to be equal to DID. Next time you will edit Device's settings, first option - Number will be checked
- Control by DIDs (CID from DIDs) – only available when the device has DIDs.
This setting lets you control what a CID user can enter in his devices. CID numbers should be from the set of the device's DIDs. They are mainly used when the user's PBX is connected over Trunk and many DIDs are routed to this Trunk. Calls coming out from this PBX must have a CallerID Number from the set of DIDs assigned to this Trunk (PBX). If "CID from DIDs" is checked, the system checks whether the device's CID number is from DIDs assigned to this device. If no DIDs are assigned, this value is ignored. In order for this setting to be active, CID Name/Number fields must be empty to allow the user to enter any CID number he wants. If "CID from DIDs" is checked and user enters any CID (not from his DIDs), the system will change his CID by his first available DID (selected from database by lowest ID).
- Control by CIDs - system checks incoming CallerID (Device's CallerID which is set on the Device). If CallerID matches one of the Device's CIDs - then such CallerID will be allowed. If it does not match - it will be changed to the selected CID.
- Control by Destination - This is advanced option which works by such algorithm:
- system checks Destination and checks DIDs assigned to calling Device. Then it finds 'nearest' DID to the Destination by subtracting DID from Destination in numerical form (Example, DID: 11111, Destination: 11112, |DID-Destination|=|1111-11112|=1) If Device has several DIDs - the lowest value is selected and this DID is set as CallerID.
- If Device has no DIDs - then User DIDs are used.
- If Device does not have DIDs and User has no DIDs, then CallerID set in Number field will be used.
- If nothing is set here - CallerID coming from Device will be used.
- Unknown - This option lets you set CallerID number to unknown.
Network Related
For H323:
- Fast start – option for faster H.245.
- h245 Tunneling – use H.245 without opening a second TCP/IP channel.
More info you can find here.
For SIP and IAX2
- Media control – can reinvite/transfer. Do you want your server to stay in media path between your clients and your provider? Please note that this option will work only if it is supported from both, device and provider, sides and it allows to handle SIP packets only. Moreover, no codec mismatch between device and provider is available. Default value is No. WARNING: This option can cause incorrect billing.
- NAT – the available options are: yes, no, never, force_rport, comedia. For a detailed explanation of these settings, refer to here.
- Qualify – how often to "ask" the device about availability. More details here for SIP devices and here for IAX2 devices.
- IAX2 Trunking Mode – enable/disable trunking mode, which allows multiple voice streams to share a single "trunk" to another server, reducing overhead created by IP packets. Only on IAX2.
Groups
- Call Group – to which Call Group this device belongs.
- Pickup Group – which Call Groups this device can pick up.
Voicemail
- Email – where to send received Voicemail.
- Password – the digital password the user enters when he calls the Voicemail number to hear his messages.
Codecs
Choose the codecs your provider uses.
NOTES:
- When no fields are checked, all codecs are available – for example, settings in sip.conf or iax.conf are effective.
- If the Provider and the Device do not have similar codecs, no call can be established.
Allowed Addresses
IP, MASK – permits traffic from this IP only. You can find a detailed explanation here.
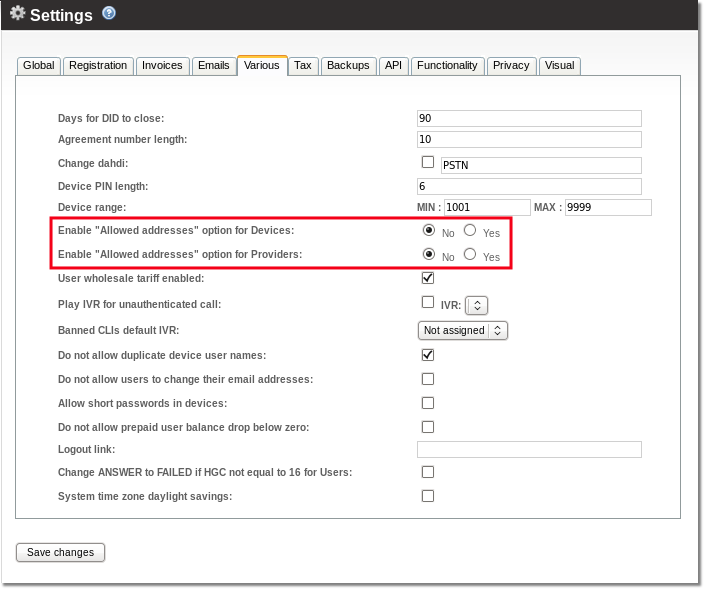
You can enable multiple allowed addresses however this option should be turned on to be visible in main device settings window. Go to SETTINGS -> Setup -> Settings -> Various tab and choose Yes for Enable "Allowed addresses" option for Devices:.

And click Save changes.
Now you will see an additional section in SIP and IAX2 Devices edit window:

If you do not clearly understand what these settings are used for, leave them with default values.
Advanced
- Fromuser/Fromdomain – used when calling TO this peer FROM Asterisk. If you're using _register=>_ with another SIP proxy, this setting can come in handy since some SIP networks only allow users in the right domain with the correct user name.
- Trustrpid – defines whether or not Remote-Party-ID is trusted. It's defined in http://tools.ietf.org/id/draft-ietf-sip-privacy-04.txt.
- Sendrpid – defines whether a Remote-Party-ID SIP header should be sent. The default setting is "no". This field is often used by wholesale VoIP providers to provide calling party identity regardless of the privacy settings (the From SIP header).
- Insecure
- port: ignore the port number where request came from.
- invite: don't require authentication of incoming INVITEs.
- port, invite: don't require initial INVITE to authenticate and ignore the port where the request came from.
- SIP 302 Reinvite support - SIP Reinvite support for the device. Disabled by default.
- Progressinband:
- yes - when "RING" event is requested, always send 180 Ringing (if it hasn't been sent yet) followed by 183 Session Progress and in-band audio.
- no - send 180 Ringing if 183 has not yet been sent, establishing an audio path. If the audio path is established already (with 183), then send in-band ringing (this is the way Asterisk historically behaved because of buggy phones like Polycom's).
- never - whenever ringing occurs, send "180 ringing" as long as "200 OK" has not yet been sent. This is the default behavior of Asterisk.
- Video support – does your provider support Video over IP? More info here.
- Allow duplicate calls - the default setting is "no".
- Language - sets IVR language
- Use ANI (if available) for CallerID: - When the call comes the information about who is calling is found in CallerID field. This field is used to determine who is calling. When the call comes through PRI/SS7 channels - then additional information is available who is calling in ANI field (in call's data channel) so sometimes CallerID might be empty or anonymous, but the caller can be found in ANI field. This option allows to use ANI field as CallerID to determine and recognize who is calling.
- Incoming Call CallerID Presentation - sets CallerID Presentation. Please note that this setting applies only for incoming calls. More information can be found here and here
- Change Failed Code To - if call fails change Hangup Cause Code to this value. This works only for outgoing calls from device. Not for Incoming
- Forward DID - it allows to forward call to DID which is assigned to Authorization by PIN or Calling Cards dial plan. After user enters PIN of any device or card, call gets connected with destination.
- Transport - lets you choose protocol(s) for data transfer. Appears only if device is SIP and when Asterisk 1.8 is enabled. Default value: udp.
- T.38 Support - should T.38 pass-through be supported
- SRTP Encryption - should SRTP protocol be used for calls
- Block callerid if (number) simultaneous calls come from it - blocks CallerID if the entered number of simultaneous calls come from it
Tell Options
- Tell rate before call - should MOR tell announce minute price (rounded to cents) before every call. Default value is "no".
- Tell balance before call – should MOR tell the user his balance every time he tries to dial? The default setting is "no".
- Tell time - should MOR tell the user his remaining time every time he tries to dial? The default setting is "no".
- Time is told in MINUTES only. Currently it is not possible to tell both in minutes and seconds.
- Tell remaining time when left – when some time is left, MOR will tell the remaining time to talk (in seconds).
- Repeat remaining time when left – repeats the remaining time when some time is left (in seconds).
Debug
- Process SIPCHANINFO - shows SIP channel info in Asterisk CLI and saves this information on database.
- Save Call Log - saves whole call log on database. Log can be overviewed by click
 in Last Calls.
NOTE: debug should be enabled only if you are experiencing any problems. It should be disable in any other cases, because it stores lot of information on database.
Recordings
This section is available when Recordings Addon is installed in the system.
