Difference between revisions of "PBX Time of day Routing"
(Blanked the page) |
|||
| Line 1: | Line 1: | ||
'''We will build callflow based on the Time-Periods.''' | |||
'''Example: 3 users with 1 Softphone,1 Mobile number and 1 Voicemail box per each.''' | |||
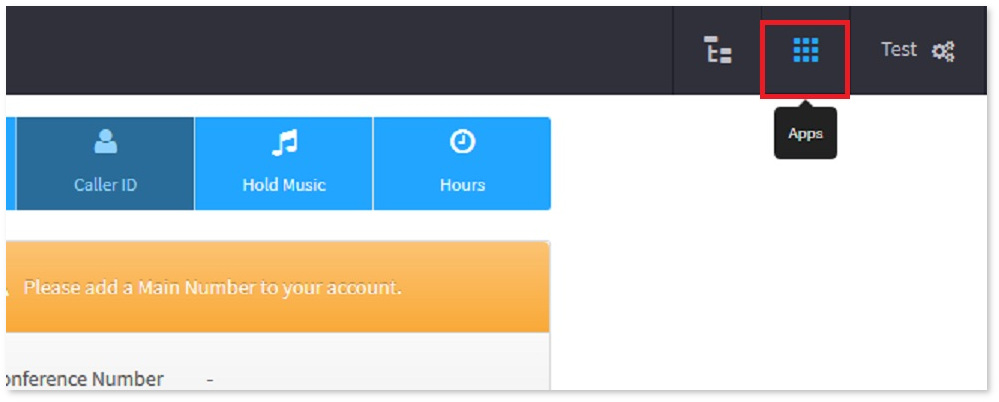
* '''1.Press button "Apps"''' | |||
[[File:App.jpg]] | |||
* '''2.Choose SmartPBX App''' | |||
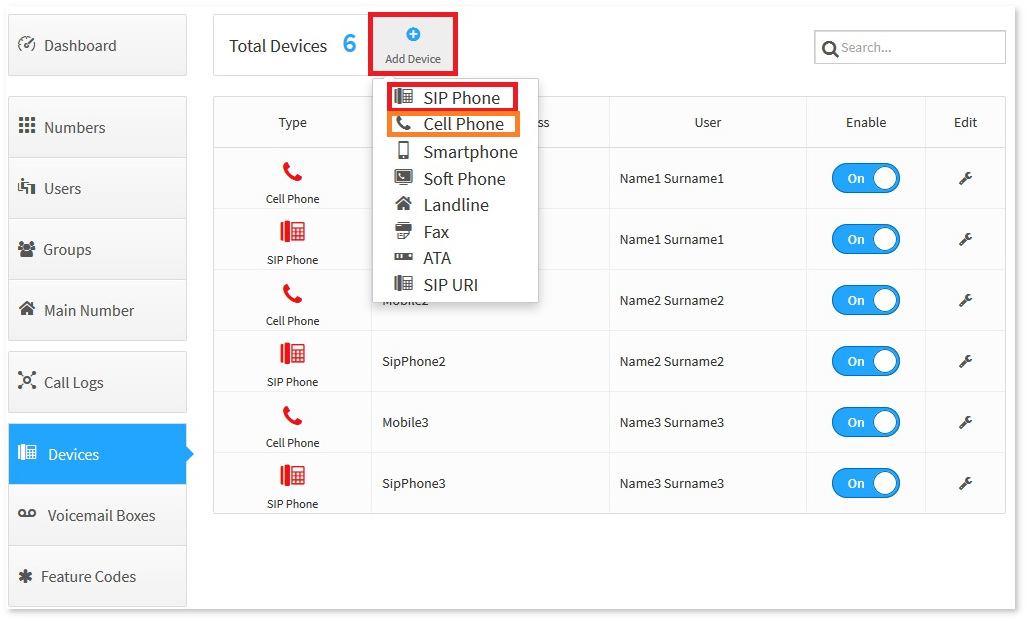
* '''3.Press button "Devices" and create 3 Softphones and 3 CellPhones.''' | |||
'''How to do it , you can find in our wiki''' | |||
* [[Cloud_PBX_Create_device | How to create device in Cloud PBX]] | |||
* [[Cloud_PBX_Create_user | How to create users in Cloud PBX]] | |||
* [[Cloud_PBX_assign_user_with_devices | How to assign users with devices in Cloud PBX]] | |||
[[File:Acftc1.jpg]] | |||
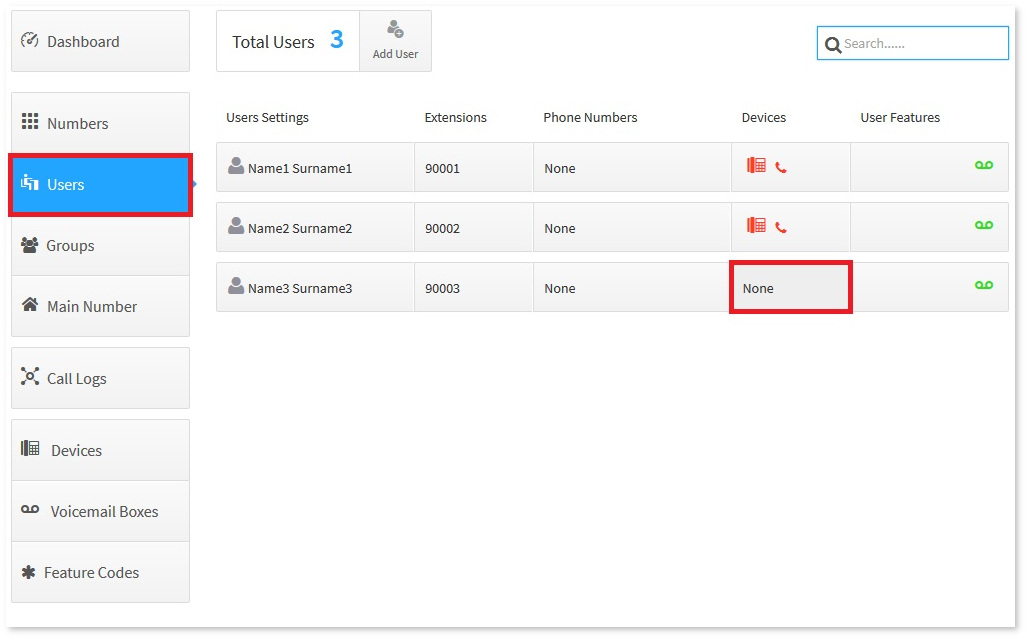
* '''4.Press button "Users".''' | |||
* '''5.Press on the user line in the device place''' | |||
[[File:Acftc2.jpg]] | |||
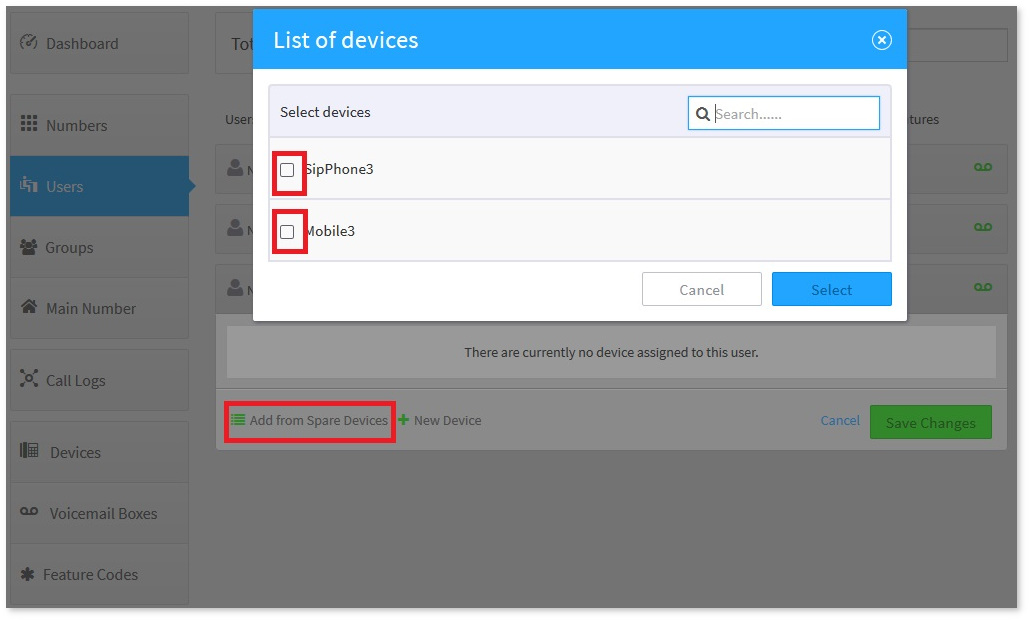
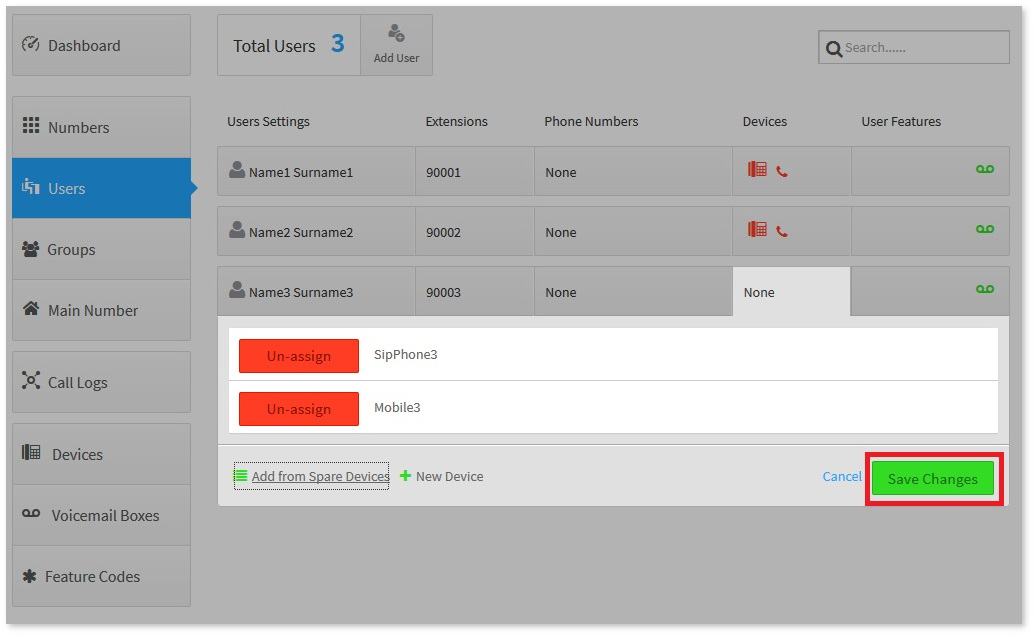
* '''6.Choose device which will be assigned with this user.''' | |||
[[File:Acftc3.jpg]] | |||
* '''7.Choose second device for this user and press "Save" button.''' | |||
[[File:Acftc4.jpg]] | |||
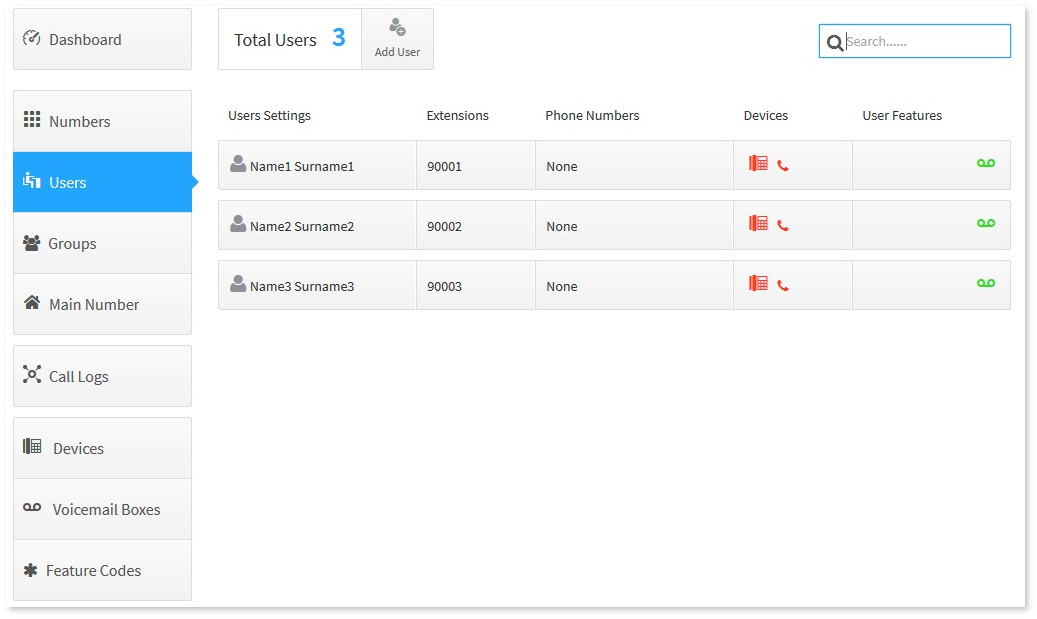
* '''8.You will have picture like ours.''' | |||
[[File:Acftc5.jpg]] | |||
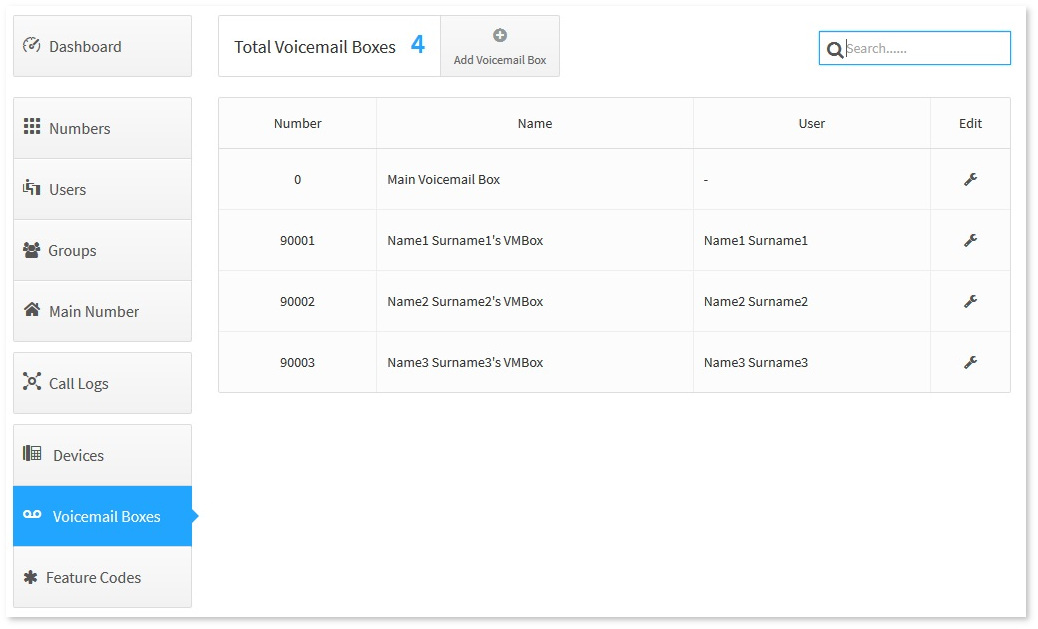
* '''9.Check, if voicemail boxes created for each user.''' | |||
[[File:Acftc6.jpg]] | |||
* '''10.Congratulations , now we can create callflow based on time period.''' | |||
* '''11.Now Press button "Apps".''' | |||
[[File:App.jpg]] | |||
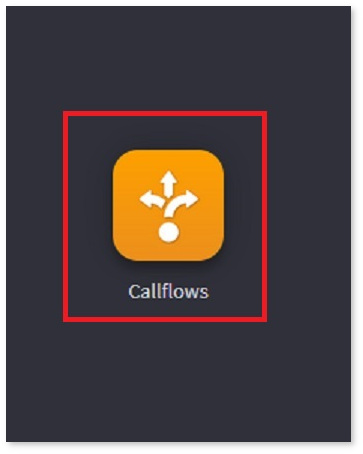
* '''12.Choose CallFlows App.''' | |||
[[File:Callflow1.jpg]] | |||
* '''13.Press button "Time of day".''' | |||
[[File:Acftc7.jpg]] | |||
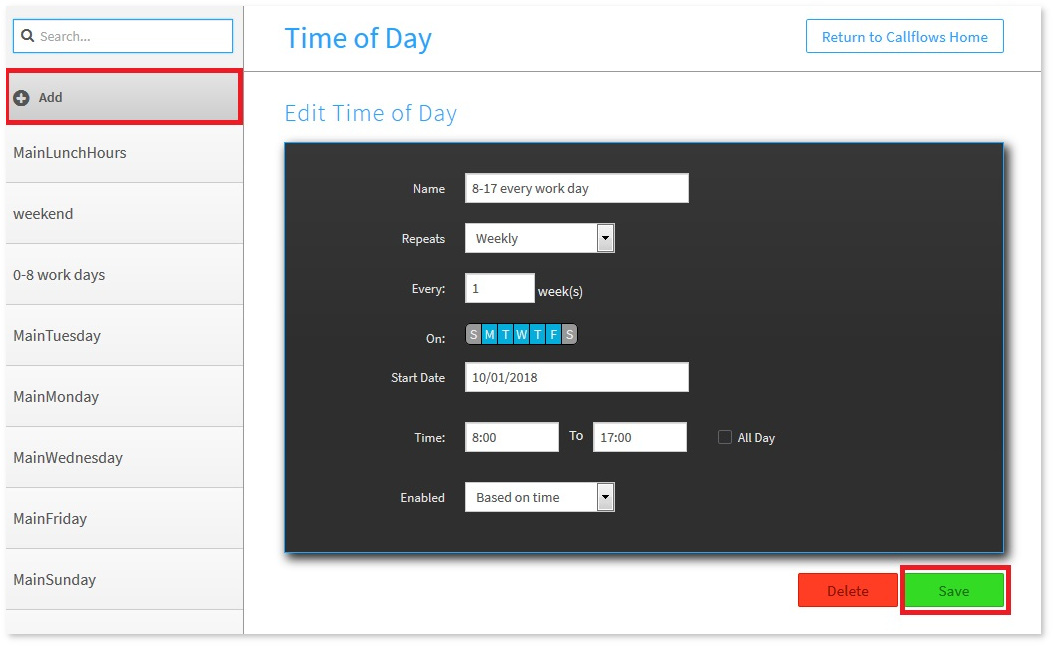
* '''14.On the left side press button "Add".''' | |||
'''Give the name for this time period , choose specifications and press button "Save".''' | |||
[[File:Acftc8.jpg]] | |||
* '''15. Repeat step 14 for every Time Period which you want to create.''' | |||
* '''16. Press button "Return to Callflows Home" and press button "Time of Day sets".''' | |||
[[File:Acftc9.jpg]] | |||
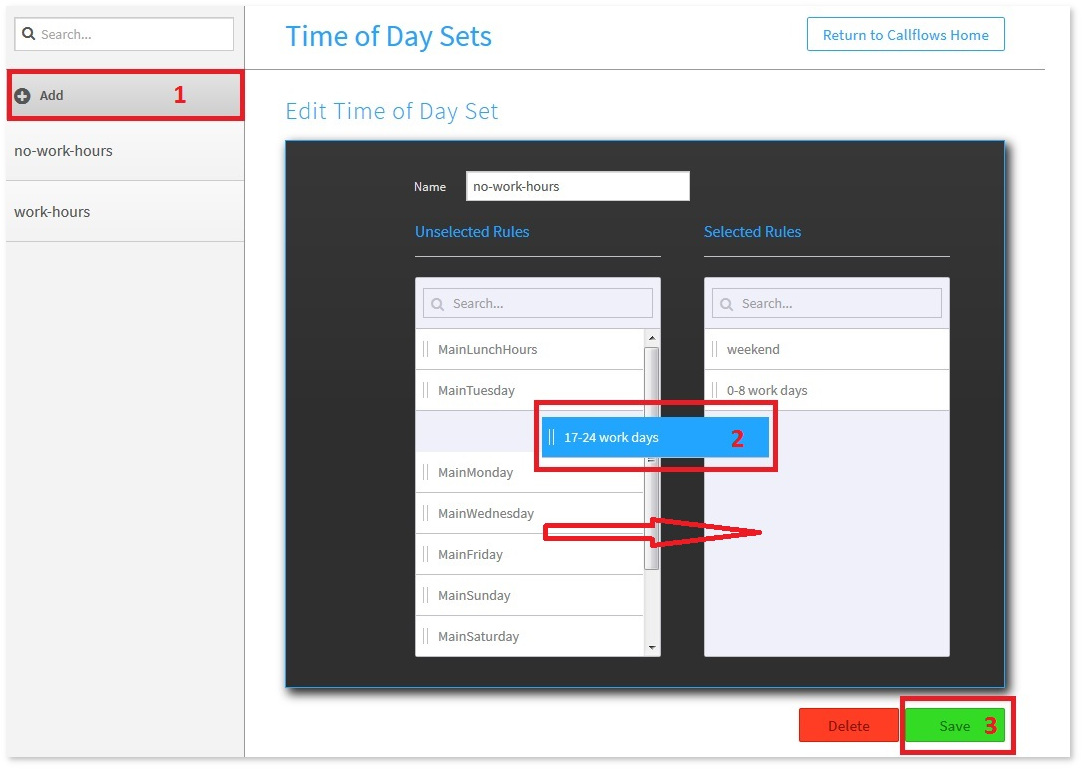
* '''17.Here you cam make sets(groups) of the several time periods.''' | |||
'''Press button "add" and in the pop-up window drag and drop fromleft side to the right time periods, which you want to group.''' | |||
'''After press button "Save".''' | |||
[[File:Acftc10.jpg]] | |||
* '''18.Press button "Return to Callflows Home" and press button "Callflows".''' | |||
[[File:Acftc11.jpg]] | |||
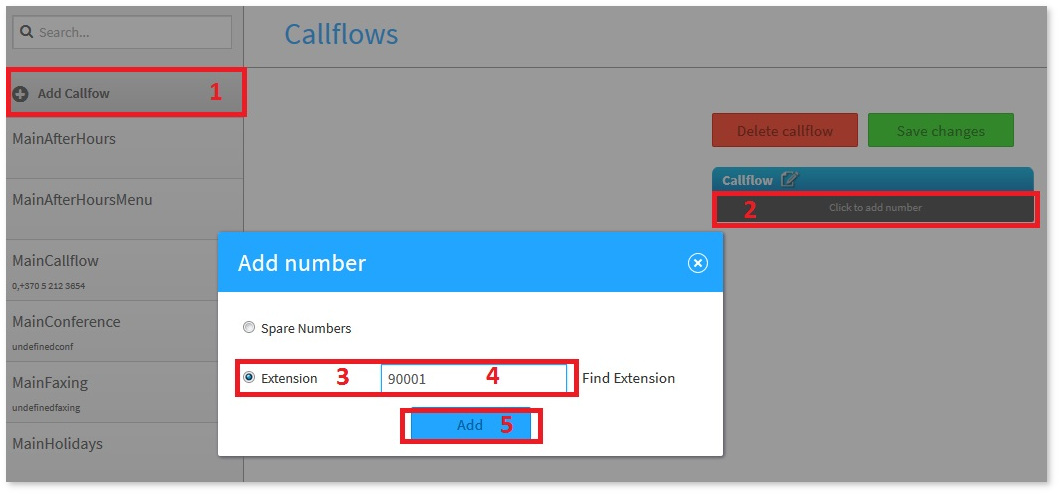
* '''19.Press button "Add Callflow" after press "Click to add number"''' | |||
'''in the pop-up window check "extension" type extension number (in our case it 90001)and press "Add" button.''' | |||
[[File:Acftc12.jpg]] | |||
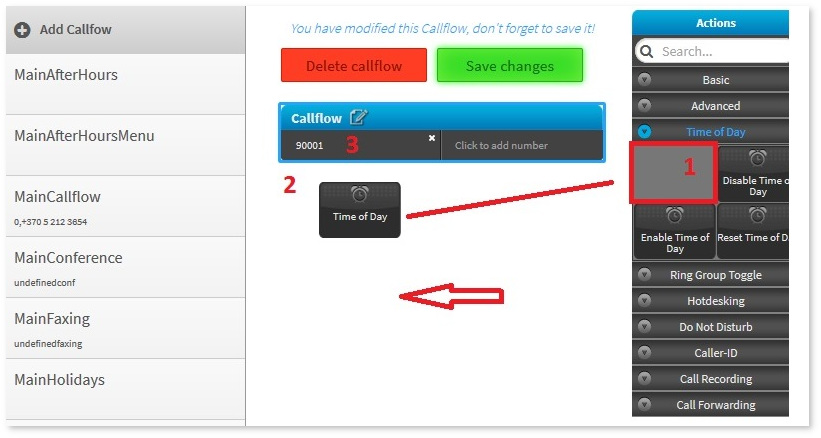
* '''20.Now from right menu , choose "time of day" icon and drag and drop it on the number 90001.''' | |||
[[File:Acftc13.jpg]] | |||
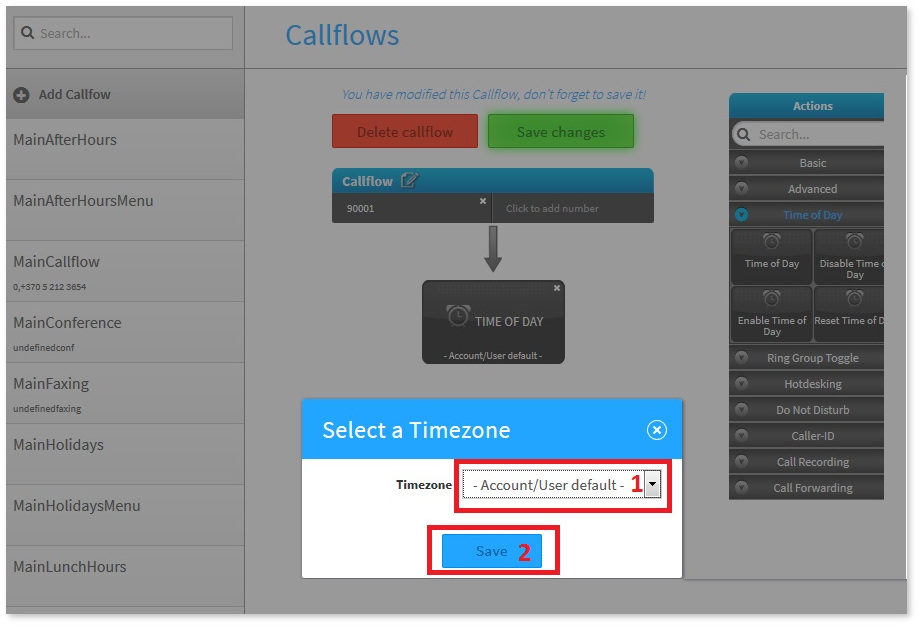
* '''21.Will be open pop up window with asking you to select timezone''' | |||
'''you can leave it default for this user or choose another.''' | |||
'''After press button "Save".''' | |||
[[File:Acftc14.jpg]] | |||
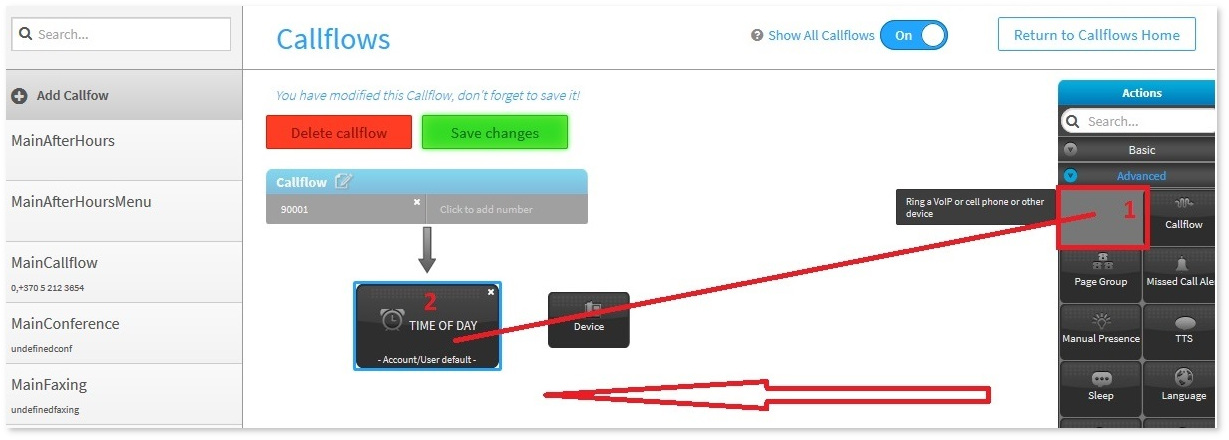
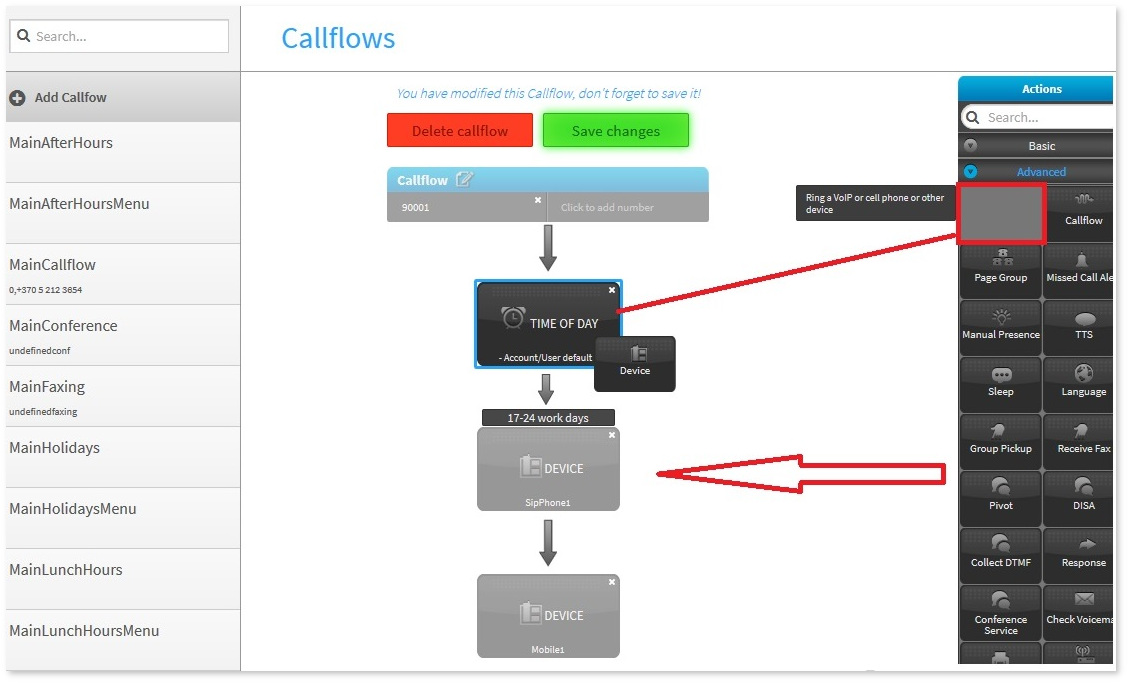
* '''22.Now from right menu , from advanced section choose "Device" icon and drag and drop it on the "time of day" from callflow.''' | |||
[[File:Acftc15.jpg]] | |||
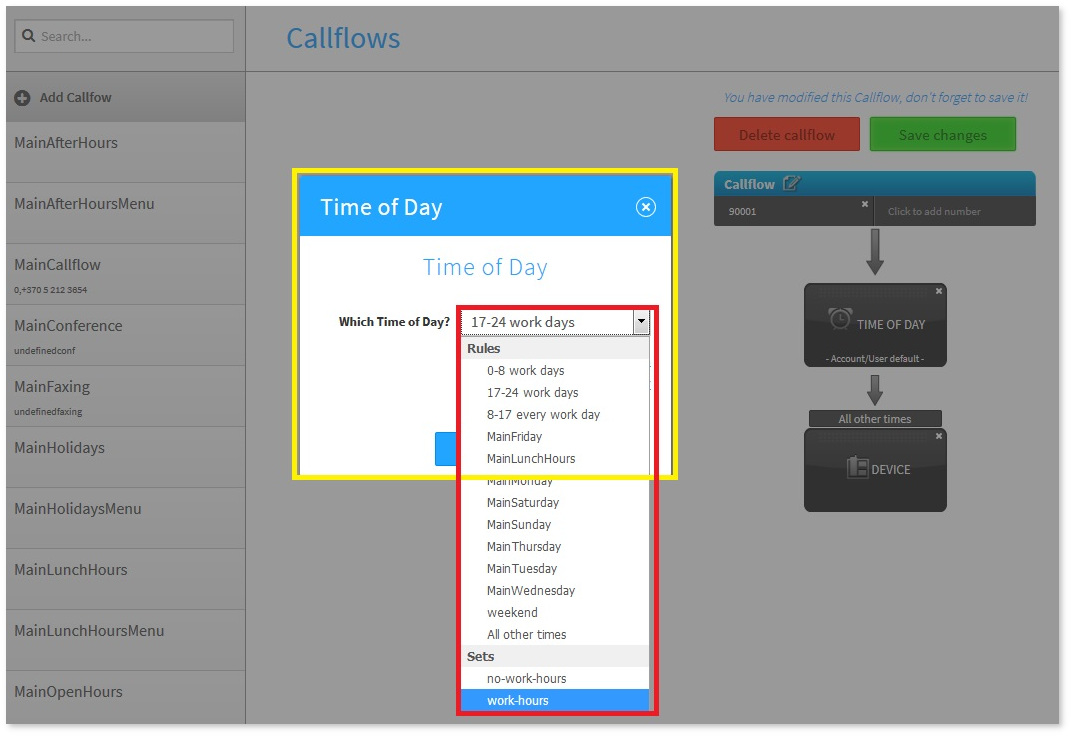
* '''23.Will be open pop up window, where you must to choose time period, which was created in the 14,15 and 17, and after press button "Save".''' | |||
[[File:Acftc16.jpg]] | |||
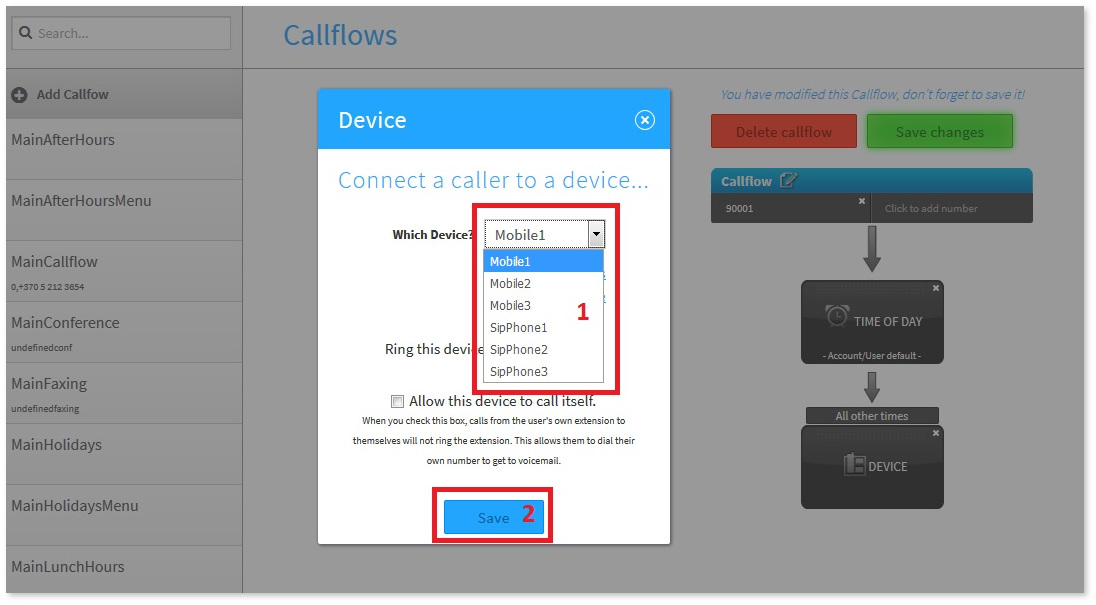
* '''24.After saving time period will be open pop up window with asking you to choose device.''' | |||
'''In our case we will choose SipPhone1.''' | |||
'''Do not forget to press button "Save".''' | |||
[[File:Acftc17.jpg]] | |||
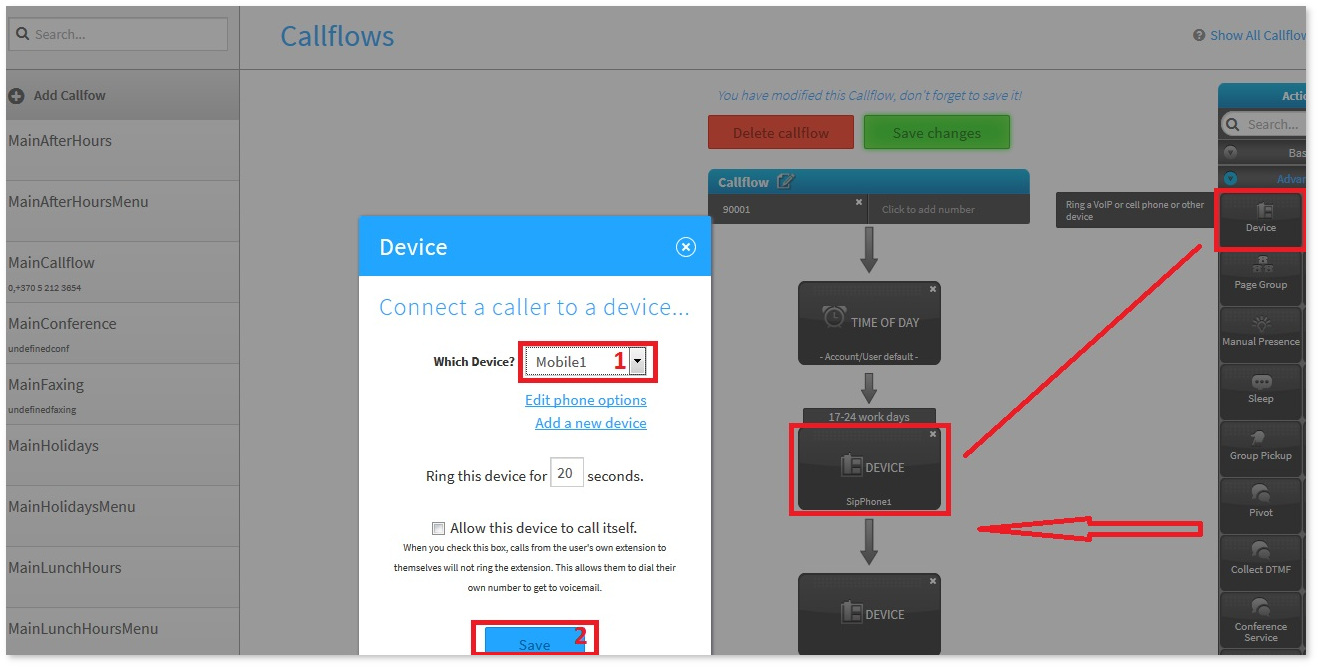
* '''25.Do it 22 position once more, but drag and drop "Device" on the previously created device "SipPhone1".''' | |||
'''Choose Mobile1 from dropdown menu and press button "Save".''' | |||
[[File:Acftc18.jpg]] | |||
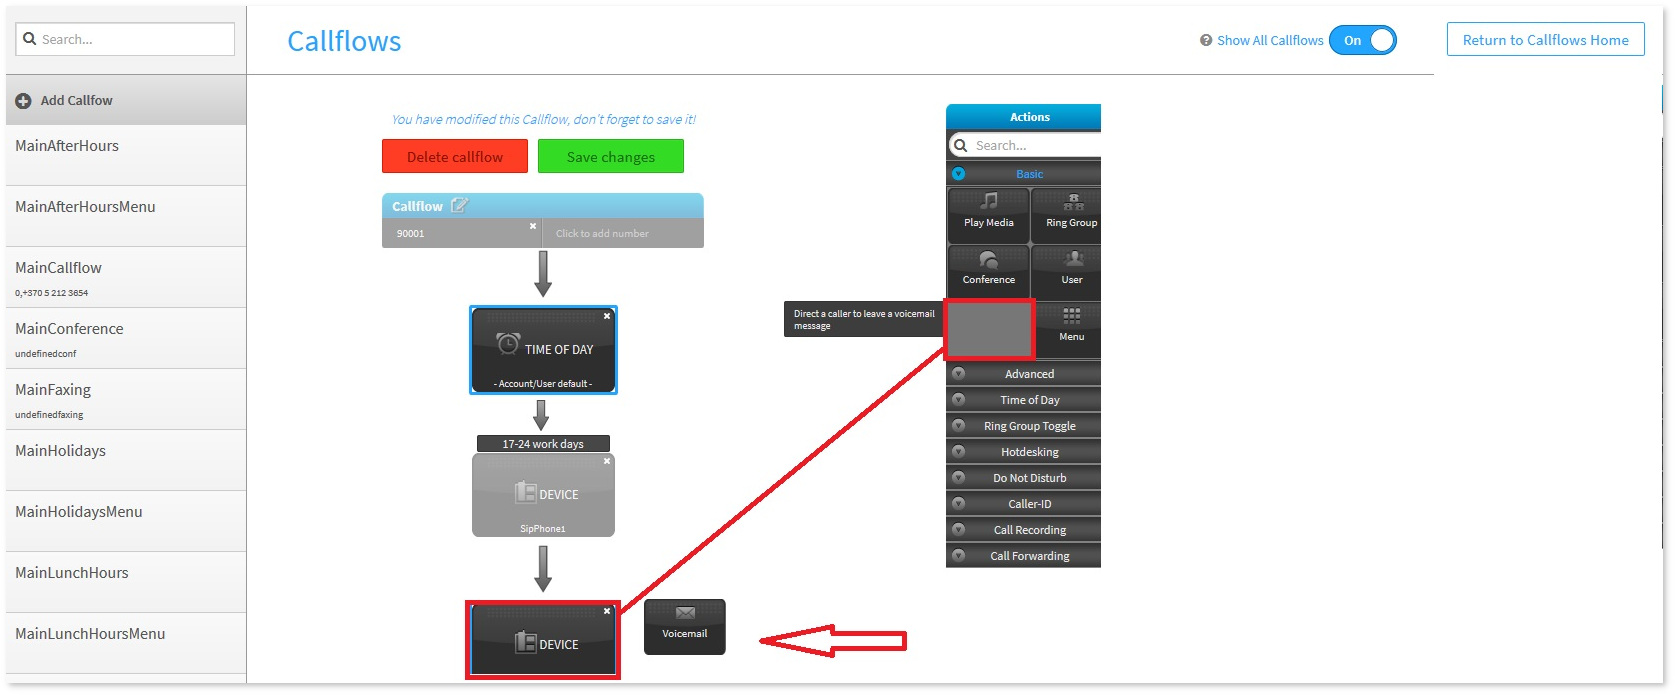
* '''26.Do it 22 position once more, but drag and drop "Voicemail" icon on the previously created device "Mobile1".''' | |||
[[File:Acftc19.jpg]] | |||
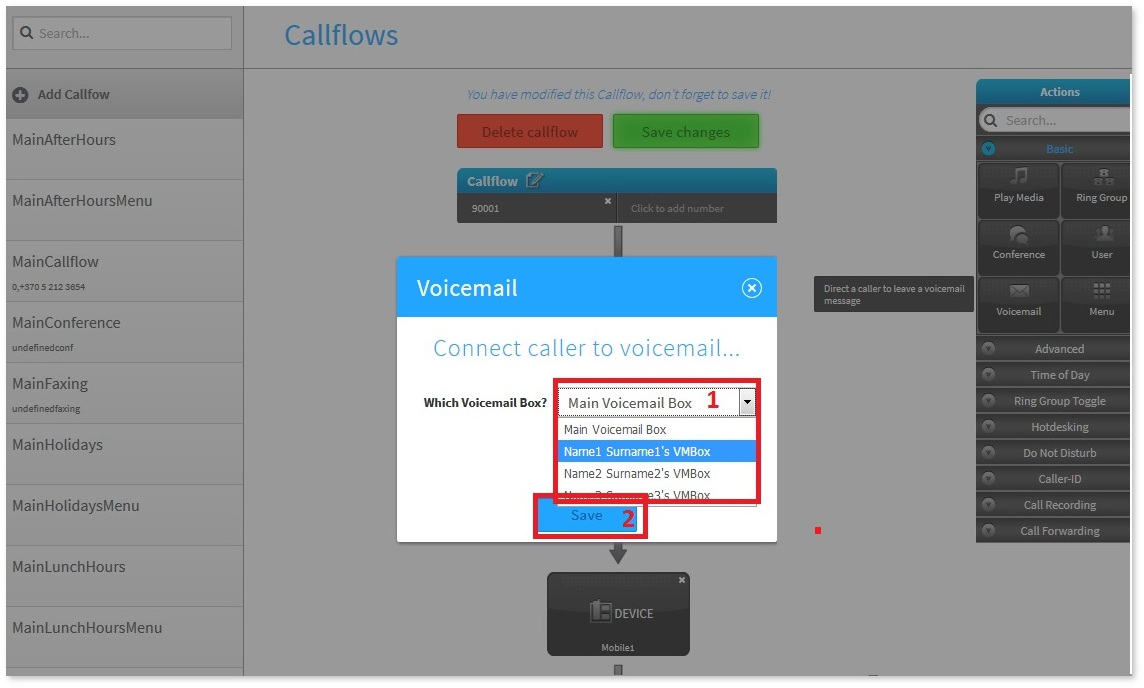
* '''27.Choose Voicemail from dropdown menu for User1 and press button "Save".''' | |||
[[File:Acftc20.jpg]] | |||
* '''28.Repeat steps 22,23,24,25,26,27 but choose another time period,''' | |||
[[File:Acftc21.jpg]] | |||
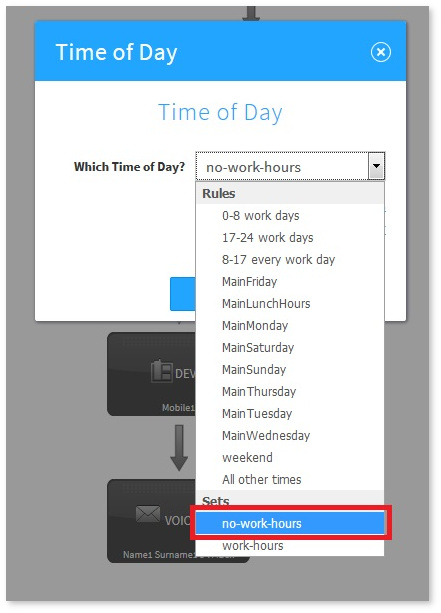
'''in our case it set named "no-work-hours".''' | |||
[[File:Acftc22.jpg]] | |||
* '''29.Do not forget to save callflow !!!''' | |||
[[File:Acftc23.jpg]] | |||
'''Depends what you need , using this example , you can create any time periods or groups of time periods,''' | |||
'''and make any logic of routing based on time and date.''' | |||
Revision as of 22:11, 15 October 2018
We will build callflow based on the Time-Periods.
Example: 3 users with 1 Softphone,1 Mobile number and 1 Voicemail box per each.
- 1.Press button "Apps"
- 2.Choose SmartPBX App
- 3.Press button "Devices" and create 3 Softphones and 3 CellPhones.
How to do it , you can find in our wiki
- How to create device in Cloud PBX
- How to create users in Cloud PBX
- How to assign users with devices in Cloud PBX
- 4.Press button "Users".
- 5.Press on the user line in the device place
- 6.Choose device which will be assigned with this user.
- 7.Choose second device for this user and press "Save" button.
- 8.You will have picture like ours.
- 9.Check, if voicemail boxes created for each user.
- 10.Congratulations , now we can create callflow based on time period.
- 11.Now Press button "Apps".
- 12.Choose CallFlows App.
- 13.Press button "Time of day".
- 14.On the left side press button "Add".
Give the name for this time period , choose specifications and press button "Save".
- 15. Repeat step 14 for every Time Period which you want to create.
- 16. Press button "Return to Callflows Home" and press button "Time of Day sets".
- 17.Here you cam make sets(groups) of the several time periods.
Press button "add" and in the pop-up window drag and drop fromleft side to the right time periods, which you want to group.
After press button "Save".
- 18.Press button "Return to Callflows Home" and press button "Callflows".
- 19.Press button "Add Callflow" after press "Click to add number"
in the pop-up window check "extension" type extension number (in our case it 90001)and press "Add" button.
- 20.Now from right menu , choose "time of day" icon and drag and drop it on the number 90001.
- 21.Will be open pop up window with asking you to select timezone
you can leave it default for this user or choose another.
After press button "Save".
- 22.Now from right menu , from advanced section choose "Device" icon and drag and drop it on the "time of day" from callflow.
- 23.Will be open pop up window, where you must to choose time period, which was created in the 14,15 and 17, and after press button "Save".
- 24.After saving time period will be open pop up window with asking you to choose device.
In our case we will choose SipPhone1.
Do not forget to press button "Save".
- 25.Do it 22 position once more, but drag and drop "Device" on the previously created device "SipPhone1".
Choose Mobile1 from dropdown menu and press button "Save".
- 26.Do it 22 position once more, but drag and drop "Voicemail" icon on the previously created device "Mobile1".
- 27.Choose Voicemail from dropdown menu for User1 and press button "Save".
- 28.Repeat steps 22,23,24,25,26,27 but choose another time period,
in our case it set named "no-work-hours".
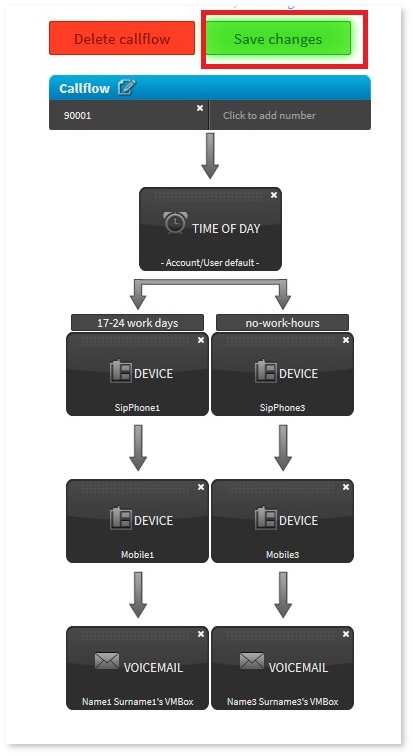
- 29.Do not forget to save callflow !!!
Depends what you need , using this example , you can create any time periods or groups of time periods,
and make any logic of routing based on time and date.
