Difference between revisions of "Entering Rates for Retail Tariff"
| (2 intermediate revisions by one other user not shown) | |||
| Line 1: | Line 1: | ||
=Usage= | |||
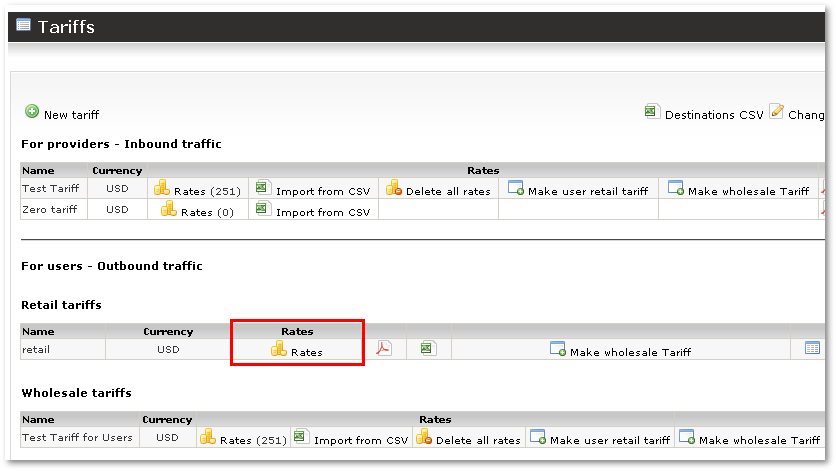
In order to manage rates for Retail [[Tariffs | Tariff]], click the Rates icon [[Image:coins.png]] next to Tariff: | |||
<br><br> | |||
[[Image:entering_rates_for_retail_tariff1.png]] | [[Image:entering_rates_for_retail_tariff1.png]] | ||
<br><br> | |||
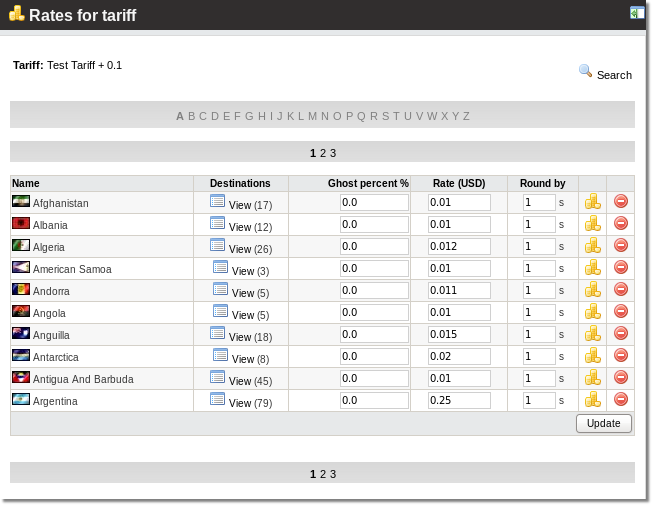
You will see list of all Rates: | |||
<br><br> | |||
[[Image:retail_rates_page.png]] | |||
<br><br> | |||
Here you can enter '''[[Does Ghost Percents effects billing? | Ghost percent]]''', '''Rate''' and '''Round by''' values for every rate. If you finished entering what you want, click '''Update''' at the bottom of the page. All rates will be updated. | |||
'''View''' shows you the Destinations which belongs to this particular group. | |||
'''View''' | |||
Click on [[Image:coins.png]] and you will be able to edit rates in Advanced mode. | Click on [[Image:coins.png]] and you will be able to edit rates in Advanced mode. | ||
<br><br> | |||
[[Image:retail_rates_advanced_mode.png]] | |||
<br><br> | |||
Here you can click on '''Split to Work Days and Free Days''' to split the rate into two parts - for Work Days and Free Days. | Here you can click on '''Split to Work Days and Free Days''' to split the rate into two parts - for Work Days and Free Days. | ||
Now we have control over different types of days: '''Work Days''' and '''Free Days'''. We can enter different rates for these days. | Now we have control over different types of days: '''Work Days''' and '''Free Days'''. We can enter different rates for these days. | ||
We can also set different rates for different times in the day. For this, we need to create hour intervals. To do so, select a time | We can also set different rates for different times in the day. For this, we need to create hour intervals. To do so, select a time in the column '''End Time''' and click on [[Image:edit.png]]. | ||
In order to manage Rate, click on the Details icon [[Image:view_icon.png]]. | In order to manage Rate, click on the Details icon [[Image:view_icon.png]]. | ||
And here you should add/edit/delete Advanced rates as described in [[Advanced Rates]]. | And here you should add/edit/delete Advanced rates as described in [[Advanced Rates]]. | ||
<br><br> | |||
=See also= | |||
* [[Tariffs]] | |||
* [[Entering Rates for Wholesale Tariff]] | |||
* [[Advanced Rates]] | |||
* [[Rate import from CSV]] | |||
Latest revision as of 14:47, 30 May 2013
Usage
In order to manage rates for Retail Tariff, click the Rates icon ![]() next to Tariff:
next to Tariff:

You will see list of all Rates:

Here you can enter Ghost percent, Rate and Round by values for every rate. If you finished entering what you want, click Update at the bottom of the page. All rates will be updated.
View shows you the Destinations which belongs to this particular group.
Click on ![]() and you will be able to edit rates in Advanced mode.
and you will be able to edit rates in Advanced mode.

Here you can click on Split to Work Days and Free Days to split the rate into two parts - for Work Days and Free Days.
Now we have control over different types of days: Work Days and Free Days. We can enter different rates for these days.
We can also set different rates for different times in the day. For this, we need to create hour intervals. To do so, select a time in the column End Time and click on ![]() .
.
In order to manage Rate, click on the Details icon ![]() .
.
And here you should add/edit/delete Advanced rates as described in Advanced Rates.
