Difference between revisions of "M4 How to make first call"
| (50 intermediate revisions by 2 users not shown) | |||
| Line 1: | Line 1: | ||
This small guide will show how to make your first call after system installation. | This small guide will show how to make your first call after system installation. | ||
Before making configurations, please read the [[M4 Routing Logic]] to see the bigger picture. | |||
[[Image:warning.png|15px]]'''IMPORTANT!''' The configuration will allow any CallerID to dial any Destination from the set IP. Adjust settings accordingly to suit your needs. | |||
<br><br> | |||
=Create a Tariff= | |||
'' | ''Read more about [[M4 Tariffs|M4 Tariffs]].'' | ||
<br><br> | |||
[[M4 Tariffs|Tariffs]] are a set of [[M4 Rates|Rates]] (prices) to different destinations. | |||
Go to '''Billing > Tariffs''' and here you will see all tariffs grouped by Buy and Sell Tariffs: | |||
* Buy Tariff is your self-cost. Usually, you get the Buy Tariff from your Supplier in a CSV format. | |||
* Sell Tariff is a Tariff for your Users. It’s your Buy Tariff + your profit margin. | |||
<br> | |||
A Tariff consists of Rates (prices to a particular prefix). | |||
To make a call, Supplier and User [[M4 Tariffs|Tariffs]] must be created and [[M4 Rates|Rates]] added at least for one prefix. | |||
''' | Go to '''Billing > Tariffs''' and click on '''ADD NEW TARIFF''' | ||
Create | <br> | ||
[[File:M4 Add New Tariff.png|1000px]] | |||
<br><br> | |||
* Choose a name, for example ''Test_Buy_Tariff'' | |||
* Select a currency from a dropdown menu | |||
* Select Terminator | |||
* Click on '''Create'''. | |||
<br> | |||
[[File:M4_New_Tariff.png|1000px]] | |||
<br> | |||
After clicking on '''Create''' you'll see a message '''TARIFF SUCCESSFULLY CREATED'''. | |||
<br><br> | |||
[[File:M4 Tariff successfully created.png|1000px]] | |||
<br><br> | |||
Repeat the same process to create a '''Sell Tariff''' for your Clients. | |||
<br><br> | |||
=Add Rates= | |||
''Read more about [[M4 Rates|M4 Rates]]''. | |||
<br><br> | |||
You've just created a Tariff with 0 Rates. The next step is to add Rates. In this simplified guide, we'll add just one rate. Click on '''RATES (0)'''. | |||
If you want to upload a complete rate sheet, please follow this guide: [[M4_Rates#Import_Rates_from_CSV|Import Rates from CSV]]. | |||
<br><br> | |||
[[File:M4 Tariff with 0 Rates.png|1000px]] | |||
<br><br> | |||
Add a rate to your selected prefix/destination that you plan to dial and click on '''ADD RATE'''. | |||
In this example, we'll use the prefix '''44''' that defines '''United Kingdom - Fixed'''. | |||
<br><br> | |||
[[File:M4 Add Rate.png|1000px]] | |||
<br><br> | |||
Repeat the same process to add rates to your '''Sell Tariff''' for your Clients. Just this time add a higher rate than your buying rate to make a profit. | |||
<br><br> | |||
=Create Terminator= | |||
''Read more about [[M4 Users|M4 Users]].'' | |||
<br><br> | |||
Terminator is your Supplier (Provider). Go to '''USERS''' and click [[file:icon add.png]]'''Add new'''. | |||
<br><br> | |||
[[File:M4 Users Add New.png|1000px]] | |||
<br><br> | |||
* Create a '''Username''' and select "Suggest strong password" | |||
* Set the '''Balance range''', for example, MIN: 0, MAX 1000. MAX refers to the credit limit that you have with your Supplier. MIN is not relevant here, unless you have a bilateral interconnection agreement with your Supplier and they can be your Client AND Supplier. If you have a bilateral interconnection agreement, then you can set MIN: -1000 which means that you give such a credit limit to them. | |||
* Scroll down and click '''Create'''. You'll see a message "USER SUCCESSFULLY CREATED". | |||
<br><br> | |||
[[File:M4 Create Terminator.png|1000px]] | |||
<br><br> | |||
=Create Termination Point= | |||
''Read more about [[M4 Connection Points|M4 Connection Points]].'' | |||
<br><br> | |||
Click the '''Connection Point''' icon and then the '''ADD NEW CONNECTION POINT''' button to create a new Connection Point for Terminator. | |||
<br><br> | |||
[[File:M4 Create Connection Point.png|1000px]] | |||
<br><br> | |||
[[File:Add New Connection Point.png|1000px]] | |||
<br><br> | <br><br> | ||
= | Fill in the details, choose '''YES''' in '''Act as Termination Point''' field and click '''Create'''. | ||
< | <br><br> | ||
[[File:Act as Termination Point.png|1000px]] | |||
< | <br><br> | ||
You'll get a confirmation '''CONNECTION POINT CREATED'''. | |||
<br><br> | |||
Next, fill in the details (you should get these details from your Supplier's interconnection form). | |||
<br><br> | |||
Enter the proper '''IP Address''' and '''Port''' in Authentication. | |||
<br><br> | |||
[[File:M4 Authentication.png|500px]] | |||
<br><br> | |||
Set '.*' (without quotes) in '''Source (CallerID) Allow''' field. This will allow any CallerID to dial. Read more about [[M4 Regexp Examples|M4 Regexp Examples]]. | |||
<br><br> | |||
[[File:Set Source (CallerID) Allow.png|500px]] | |||
<br><br> | |||
Set the '''Tariff''' that you previously created for it. Read more about [[M4 Tariffs|M4 Tariffs]]. | |||
<br><br> | |||
[[File:Set Tariff.png|500px]] | |||
<br><br> | |||
Enable the Codecs that you want to use. Scroll down and click '''Update'''. | |||
<br><br> | |||
=Create Dial Peer= | |||
Go to '''Routing -> Dial Peers -> ADD NEW DIAL PEER'''. | |||
<br><br> | |||
[[File:Add New Dial Peer.png|1000px]] | |||
<br><br> | |||
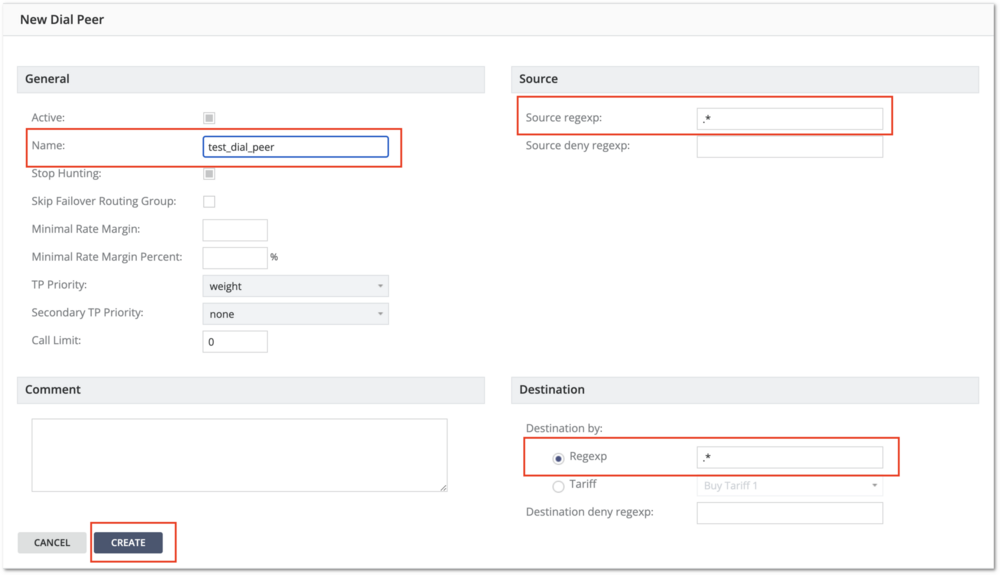
Set '.*' (without quotes) for '''Source''' and '''Destination''' regexp. This will allow any CallerID to dial any Destination. | |||
<br><br> | |||
[[File:Source and Destination regexp with name.png|1000px]] | |||
<br><br> | |||
Click the '''List''' icon, select your '''Termination Point''' from the dropdown menu and click '''ASSIGN'''. | |||
<br><br> | |||
[[File:List Icon.png|1000px]] | |||
<br><br> | |||
[[File:Assign termination point.png|1000px]] | |||
<br><br> | |||
=Create a Routing Group= | |||
Go to '''Routing -> Routing Groups -> ADD NEW ROUTING GROUP''' and fill in the details. | |||
Click the '''DP LIST -> ASSIGN DIAL PEER''', select your Dial Peer from the dropdown menu and click '''ASSIGN'''. | |||
You'll get a confirmation '''DIAL PEER SUCCESSFULLY ASSIGNED'''. | |||
<br><br> | |||
=Create Originator= | |||
Originator is your Client (Customer). Go to '''USERS''' and click [[file:icon add.png]]'''Add new'''. | |||
The steps are similar to creating Terminator: | |||
* Create a '''Username''' and select "Suggest strong password" | |||
* Set the '''Balance range''', for example, MIN: -1000, MAX 0. MAX refers to the credit limit that you give to your postpaid Customer. MAX is not relevant here, unless you have a bilateral interconnection agreement with your Customer and they can be your Customer AND Supplier. If you have a bilateral interconnection agreement, then you can set MAX: 1000 which means that they give such a credit limit. | |||
* Scroll down and click '''Create'''. You'll see a message "USER SUCCESSFULLY CREATED". | |||
<br><br> | |||
=Create Origination Point= | |||
The steps are similar to creating Termination Point, just this time choose '''YES''' in '''Act as Origination Point''' field. | |||
Select '''Automatically create Routing Group for this OP''' to make the further process faster, unless you prefer creating a Routing Group manually. | |||
You'll see more options in Authentication settings. | |||
You can choose '''Static IP''' and add some Tech. Prefix or '''Dynamic IP''' if you prefer Username/Password Authentication. | |||
Enable the Codecs that you want to use. | |||
Select the tariff (your '''Sell Tariff''') in the '''Origination Point Tariff''' settings. | |||
Scroll down and click '''Update'''. | |||
If you chose '''Automatically create Routing Group for this OP''', a Routing Group was created automatically. | |||
Then follow the same process to assign your Dial Peer to Routing Group. | |||
<br><br> | |||
=Make a Call= | |||
Try to use the [[M4 Call Tracing]] feature before making a real call. | |||
Call Tracing works by making fake calls in real-time so the result may be different every time. | |||
M4 will not try to ring any Terminators during Call Tracing. | |||
If Call Tracing is successful, you can make a call from a [[Softphones and Mobile dialers|SIP softphone]] or another SIP device. | |||
If you choose the Ekiga softphone, please follow this guide: [[M4 Make a call with Ekiga softphone]]. | |||
Enter a phone number in international (E.164) format into your softphone and try to dial. | |||
For example, the UK mobile phone number '07911 123456' in international format is '44 7911 123456', where '44' is the country code. | |||
After the call, you can check your call in the system. | |||
Go to: '''REPORTS -> Calls List''' and you will see your call. | |||
<br><br> | <br><br> | ||
=See Also= | =See Also= | ||
* [[M4 Routing Logic]] | |||
* [[M4 Tariffs]] | |||
* [[M4 Rates]] | |||
* [[M4 Users]] | |||
* [[M4 Connection Points]] | |||
* [[M4 Dial Peers]] | |||
* [[M4 Routing Groups]] | |||
* [[M4 Make a call with Ekiga softphone]] | * [[M4 Make a call with Ekiga softphone]] | ||
Latest revision as of 07:53, 20 March 2024
This small guide will show how to make your first call after system installation.
Before making configurations, please read the M4 Routing Logic to see the bigger picture.
![]() IMPORTANT! The configuration will allow any CallerID to dial any Destination from the set IP. Adjust settings accordingly to suit your needs.
IMPORTANT! The configuration will allow any CallerID to dial any Destination from the set IP. Adjust settings accordingly to suit your needs.
Create a Tariff
Read more about M4 Tariffs.
Tariffs are a set of Rates (prices) to different destinations.
Go to Billing > Tariffs and here you will see all tariffs grouped by Buy and Sell Tariffs:
- Buy Tariff is your self-cost. Usually, you get the Buy Tariff from your Supplier in a CSV format.
- Sell Tariff is a Tariff for your Users. It’s your Buy Tariff + your profit margin.
A Tariff consists of Rates (prices to a particular prefix).
To make a call, Supplier and User Tariffs must be created and Rates added at least for one prefix.
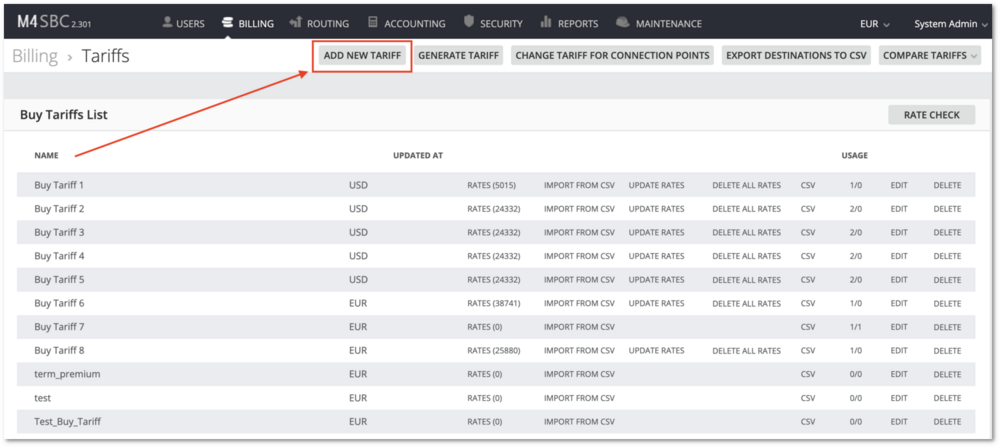
Go to Billing > Tariffs and click on ADD NEW TARIFF
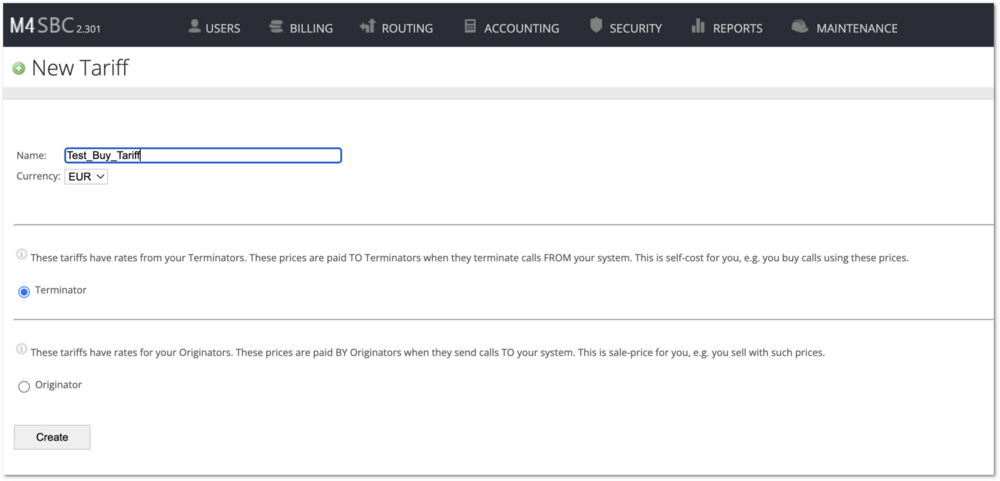
- Choose a name, for example Test_Buy_Tariff
- Select a currency from a dropdown menu
- Select Terminator
- Click on Create.
After clicking on Create you'll see a message TARIFF SUCCESSFULLY CREATED.

Repeat the same process to create a Sell Tariff for your Clients.
Add Rates
Read more about M4 Rates.
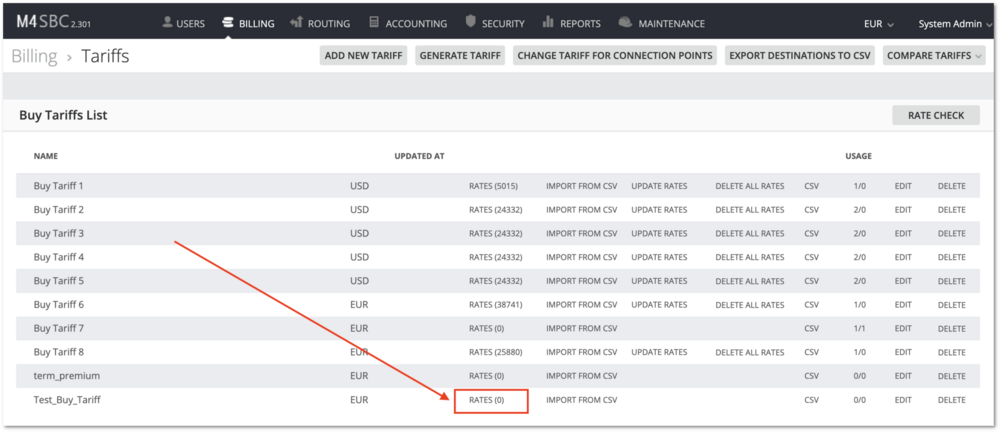
You've just created a Tariff with 0 Rates. The next step is to add Rates. In this simplified guide, we'll add just one rate. Click on RATES (0).
If you want to upload a complete rate sheet, please follow this guide: Import Rates from CSV.
Add a rate to your selected prefix/destination that you plan to dial and click on ADD RATE.
In this example, we'll use the prefix 44 that defines United Kingdom - Fixed.

Repeat the same process to add rates to your Sell Tariff for your Clients. Just this time add a higher rate than your buying rate to make a profit.
Create Terminator
Read more about M4 Users.
Terminator is your Supplier (Provider). Go to USERS and click ![]() Add new.
Add new.

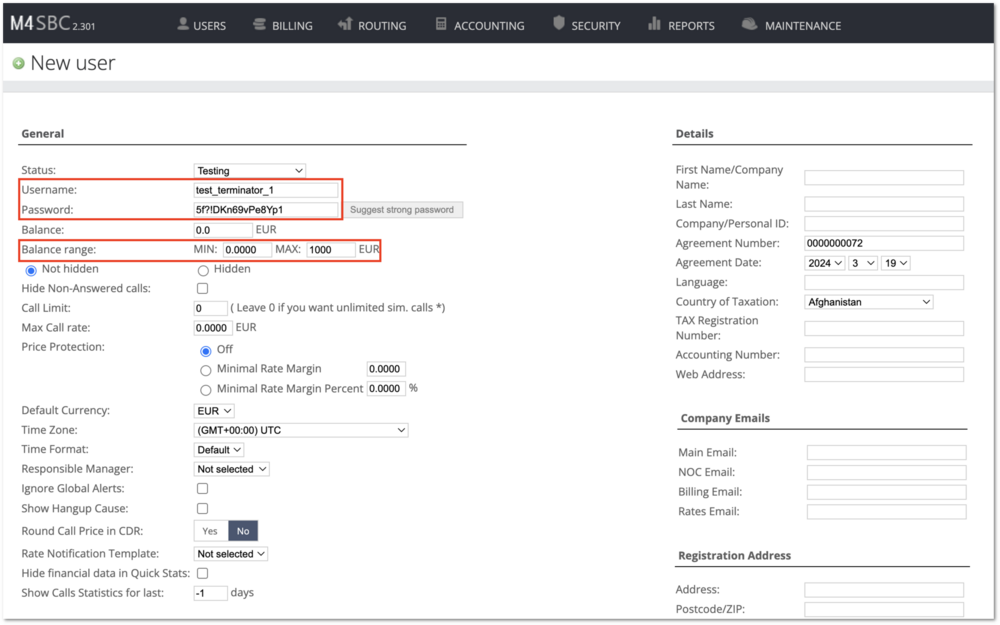
- Create a Username and select "Suggest strong password"
- Set the Balance range, for example, MIN: 0, MAX 1000. MAX refers to the credit limit that you have with your Supplier. MIN is not relevant here, unless you have a bilateral interconnection agreement with your Supplier and they can be your Client AND Supplier. If you have a bilateral interconnection agreement, then you can set MIN: -1000 which means that you give such a credit limit to them.
- Scroll down and click Create. You'll see a message "USER SUCCESSFULLY CREATED".
Create Termination Point
Read more about M4 Connection Points.
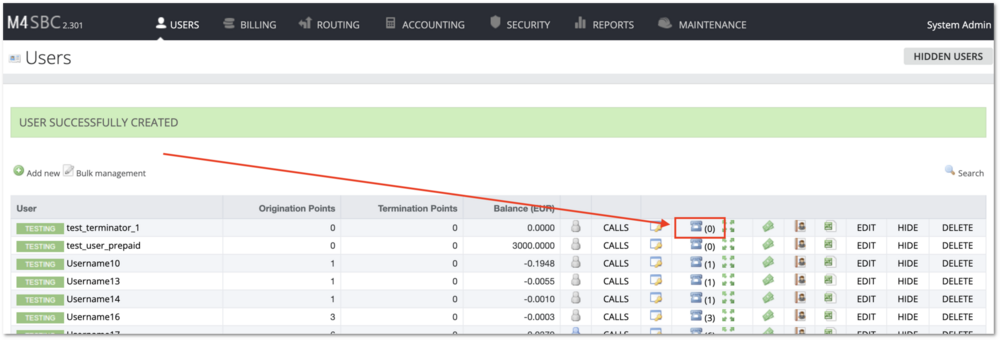
Click the Connection Point icon and then the ADD NEW CONNECTION POINT button to create a new Connection Point for Terminator.

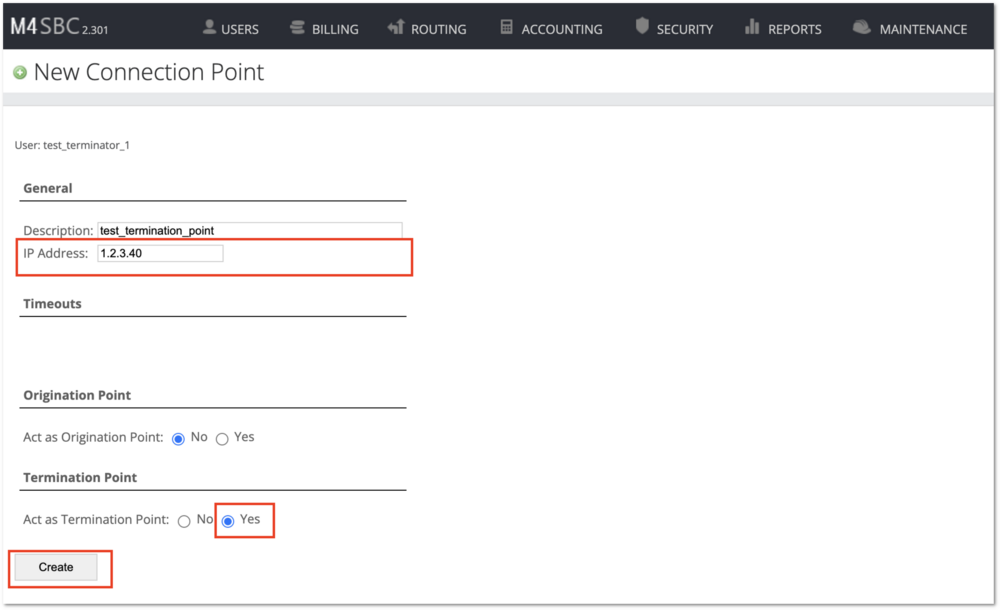
Fill in the details, choose YES in Act as Termination Point field and click Create.
You'll get a confirmation CONNECTION POINT CREATED.
Next, fill in the details (you should get these details from your Supplier's interconnection form).
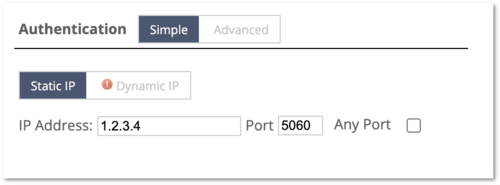
Enter the proper IP Address and Port in Authentication.
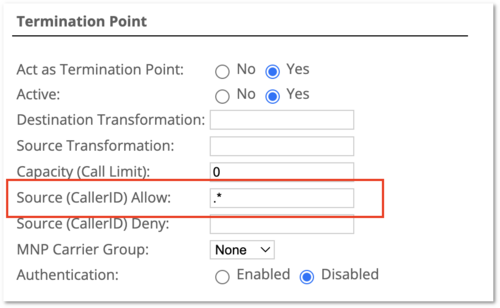
Set '.*' (without quotes) in Source (CallerID) Allow field. This will allow any CallerID to dial. Read more about M4 Regexp Examples.
Set the Tariff that you previously created for it. Read more about M4 Tariffs.

Enable the Codecs that you want to use. Scroll down and click Update.
Create Dial Peer
Go to Routing -> Dial Peers -> ADD NEW DIAL PEER.

Set '.*' (without quotes) for Source and Destination regexp. This will allow any CallerID to dial any Destination.
Click the List icon, select your Termination Point from the dropdown menu and click ASSIGN.
![]()

Create a Routing Group
Go to Routing -> Routing Groups -> ADD NEW ROUTING GROUP and fill in the details.
Click the DP LIST -> ASSIGN DIAL PEER, select your Dial Peer from the dropdown menu and click ASSIGN.
You'll get a confirmation DIAL PEER SUCCESSFULLY ASSIGNED.
Create Originator
Originator is your Client (Customer). Go to USERS and click ![]() Add new.
Add new.
The steps are similar to creating Terminator:
- Create a Username and select "Suggest strong password"
- Set the Balance range, for example, MIN: -1000, MAX 0. MAX refers to the credit limit that you give to your postpaid Customer. MAX is not relevant here, unless you have a bilateral interconnection agreement with your Customer and they can be your Customer AND Supplier. If you have a bilateral interconnection agreement, then you can set MAX: 1000 which means that they give such a credit limit.
- Scroll down and click Create. You'll see a message "USER SUCCESSFULLY CREATED".
Create Origination Point
The steps are similar to creating Termination Point, just this time choose YES in Act as Origination Point field.
Select Automatically create Routing Group for this OP to make the further process faster, unless you prefer creating a Routing Group manually.
You'll see more options in Authentication settings.
You can choose Static IP and add some Tech. Prefix or Dynamic IP if you prefer Username/Password Authentication.
Enable the Codecs that you want to use.
Select the tariff (your Sell Tariff) in the Origination Point Tariff settings.
Scroll down and click Update.
If you chose Automatically create Routing Group for this OP, a Routing Group was created automatically.
Then follow the same process to assign your Dial Peer to Routing Group.
Make a Call
Try to use the M4 Call Tracing feature before making a real call.
Call Tracing works by making fake calls in real-time so the result may be different every time.
M4 will not try to ring any Terminators during Call Tracing.
If Call Tracing is successful, you can make a call from a SIP softphone or another SIP device.
If you choose the Ekiga softphone, please follow this guide: M4 Make a call with Ekiga softphone.
Enter a phone number in international (E.164) format into your softphone and try to dial.
For example, the UK mobile phone number '07911 123456' in international format is '44 7911 123456', where '44' is the country code.
After the call, you can check your call in the system.
Go to: REPORTS -> Calls List and you will see your call.
