Difference between revisions of "PBX Time of day Routing"
(Created page with 'Currently doc is not ready , but you can use external link [https://2600hz.atlassian.net/wiki/spaces/docs/pages/4194422/Time+of+Day+Routing Time of day Routing]') |
|||
| (7 intermediate revisions by the same user not shown) | |||
| Line 1: | Line 1: | ||
We will build callflow based on the Time-Periods. | |||
[ | |||
Example: 3 users with 1 Sipphone,1 Mobile number and 1 Voicemail box per each. | |||
When dial extension 90001 in work hours (Mon-Fri 8:00-17:00) will be ring SipPhone1 20 sec | |||
after Mobile1 20 sec and in the end will go to the Voicemail1 | |||
When dial extension 90001 in no work hours (Mon-Fri 17:00-8:00 and weekend) will be ring | |||
SipPhone3 10 sec, after Mobile3 10 sec and in the end go to the Voicemail3 | |||
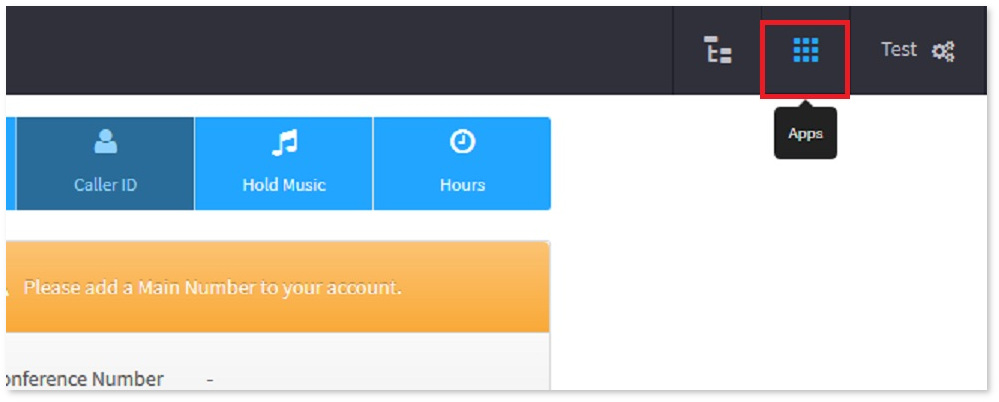
* 1.Press button "Apps" | |||
<br><br>[[File:App.jpg]]<br><br> | |||
* 2.Choose SmartPBX App | |||
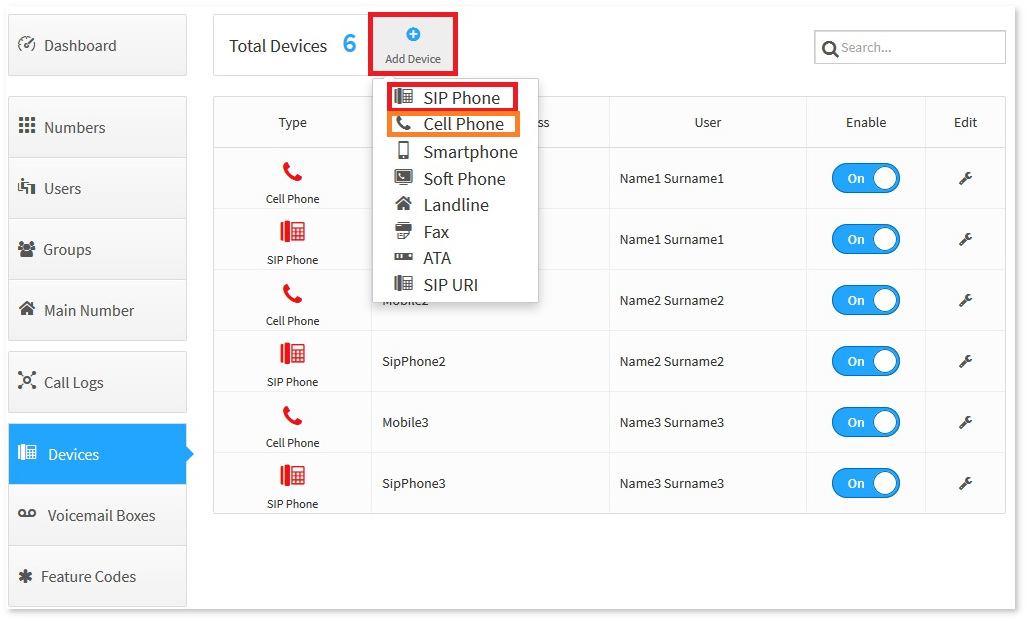
* 3.Press button "Devices" and create 3 Sipphones and 3 CellPhones. | |||
How to do it , you can find in our wiki | |||
* [[Cloud_PBX_Create_device | How to create device in Cloud PBX]] | |||
* [[Cloud_PBX_Create_user | How to create users in Cloud PBX]] | |||
* [[Cloud_PBX_assign_user_with_devices | How to assign users with devices in Cloud PBX]] | |||
<br><br>[[File:Acftc1.jpg]]<br><br> | |||
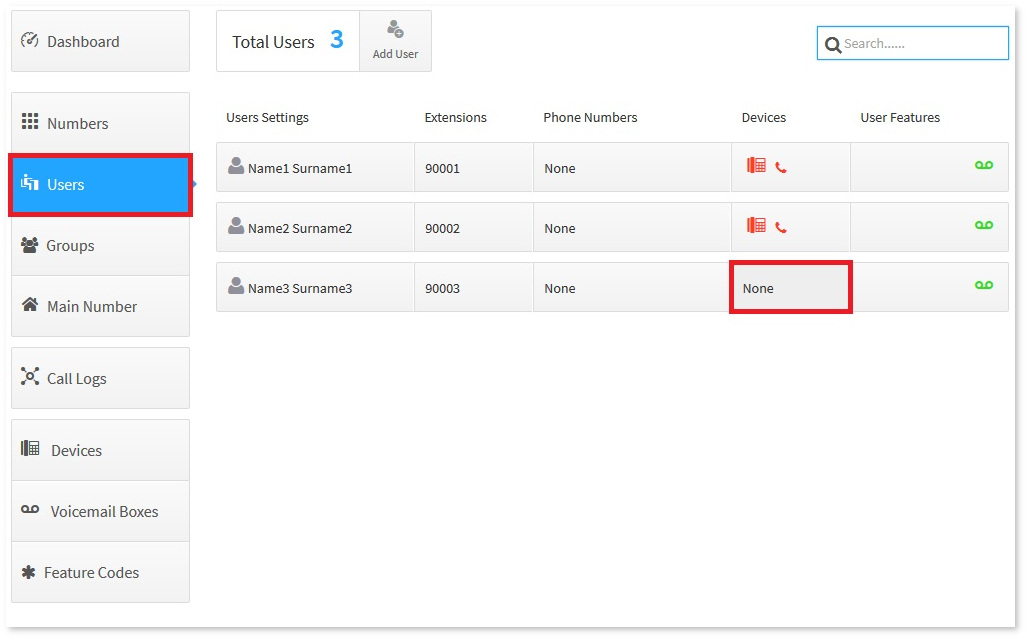
* 4.Press button "Users". | |||
* 5.Press on the user line in the device place. | |||
<br><br>[[File:Acftc2.jpg]]<br><br> | |||
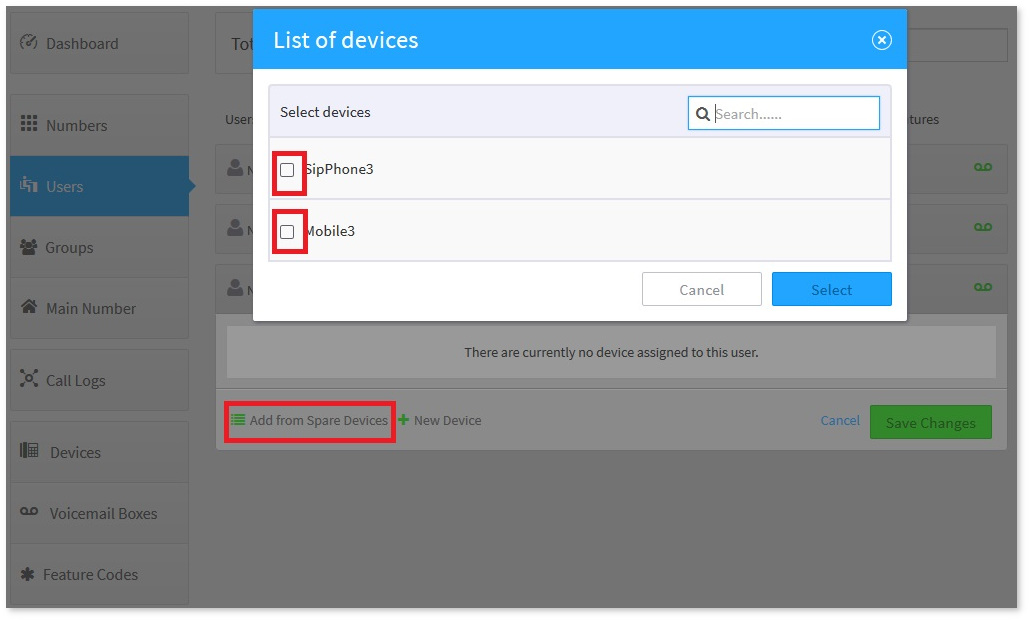
* 6.Choose device which will be assigned with this user. | |||
<br><br>[[File:Acftc3.jpg]]<br><br> | |||
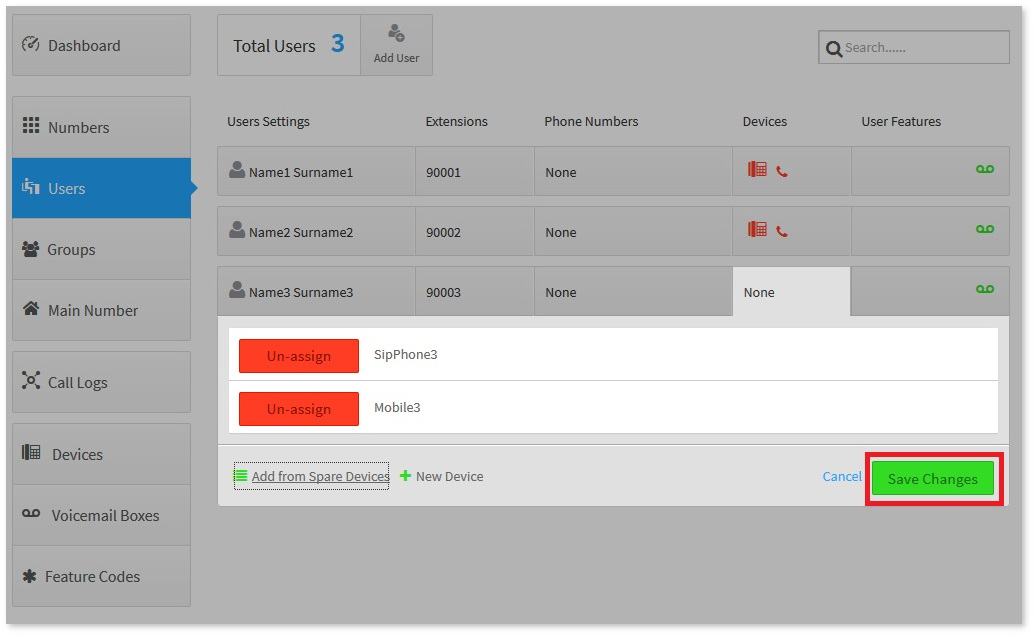
* 7.Choose second device for this user and press "Save" button. | |||
<br><br>[[File:Acftc4.jpg]]<br><br> | |||
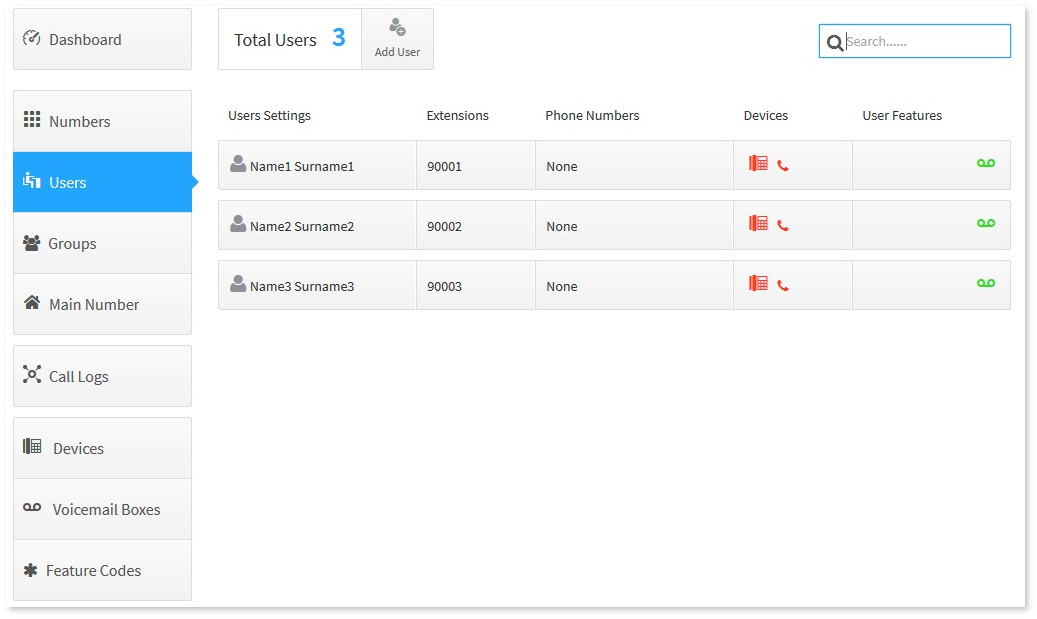
* 8.You will have picture like ours. | |||
<br><br>[[File:Acftc5.jpg]]<br><br> | |||
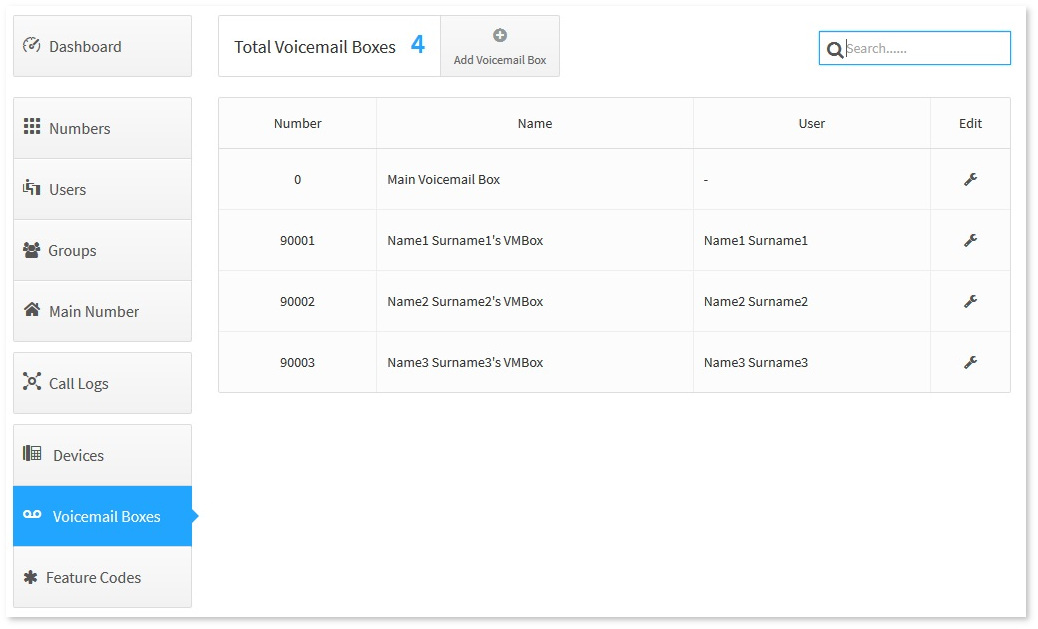
* 9.Check, if voicemail boxes created for each user. | |||
<br><br>[[File:Acftc6.jpg]]<br><br> | |||
* 10.Congratulations , now we can create callflow based on time period. | |||
* 11.Now Press button "Apps". | |||
<br><br>[[File:App.jpg]]<br><br> | |||
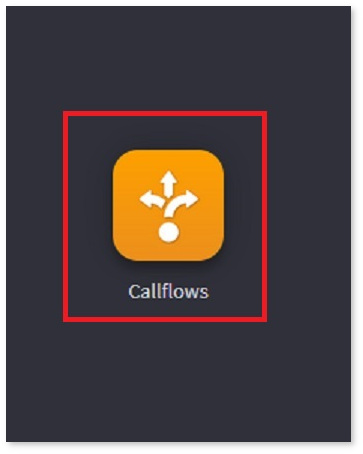
* 12.Choose CallFlows App. | |||
<br><br>[[File:Callflow1.jpg]]<br><br> | |||
* 13.Press button "Time of day". | |||
<br><br>[[File:Acftc7.jpg]]<br><br> | |||
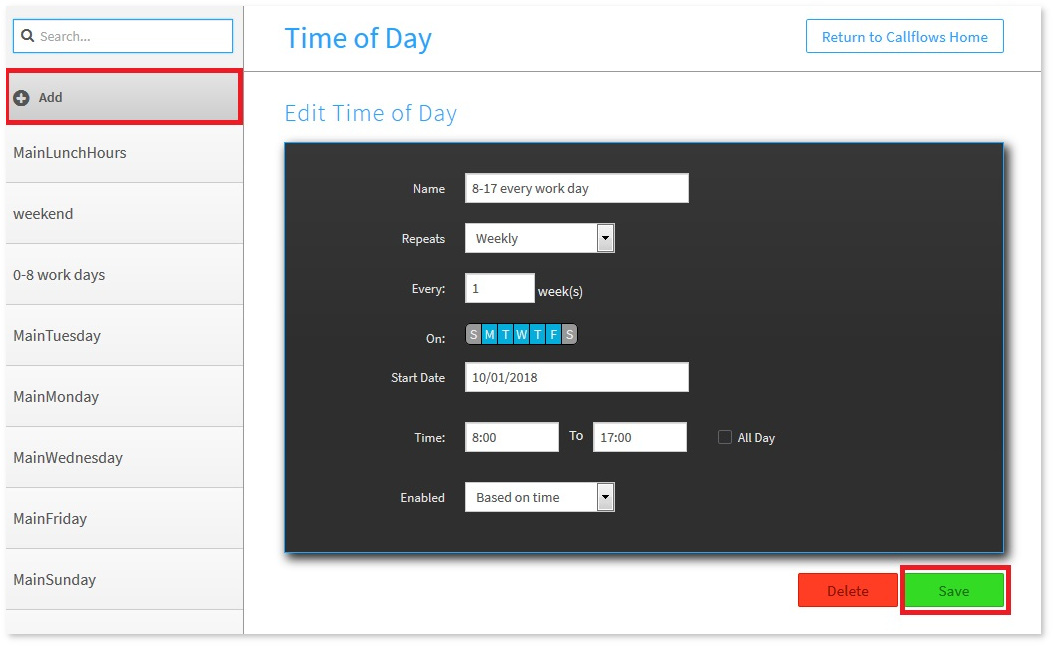
* 14.On the left side press button "Add". | |||
Give the name for this time period , choose specifications and press button "Save". | |||
<br><br>[[File:Acftc8.jpg]]<br><br> | |||
* 15. Repeat step 14 for every Time Period which you want to create. | |||
* 16. Press button "Return to Callflows Home" and after press button "Time of Day sets". | |||
<br><br>[[File:Acftc9.jpg]]<br><br> | |||
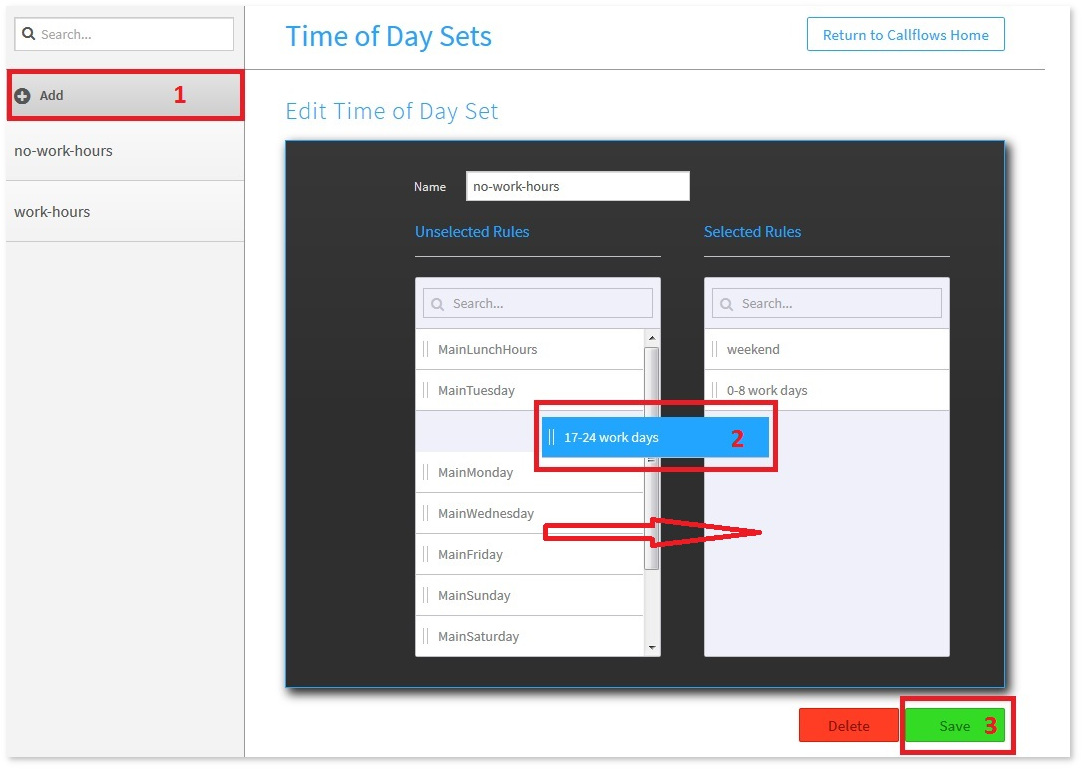
* 17.Here you can make sets(groups) of the several time periods. | |||
Press button "add" and in the pop-up window drag and drop fromleft side to the right time periods, which you want to group. | |||
After press button "Save". | |||
<br><br>[[File:Acftc10.jpg]]<br><br> | |||
* 18.Press button "Return to Callflows Home" and press button "Callflows". | |||
<br><br>[[File:Acftc11.jpg]]<br><br> | |||
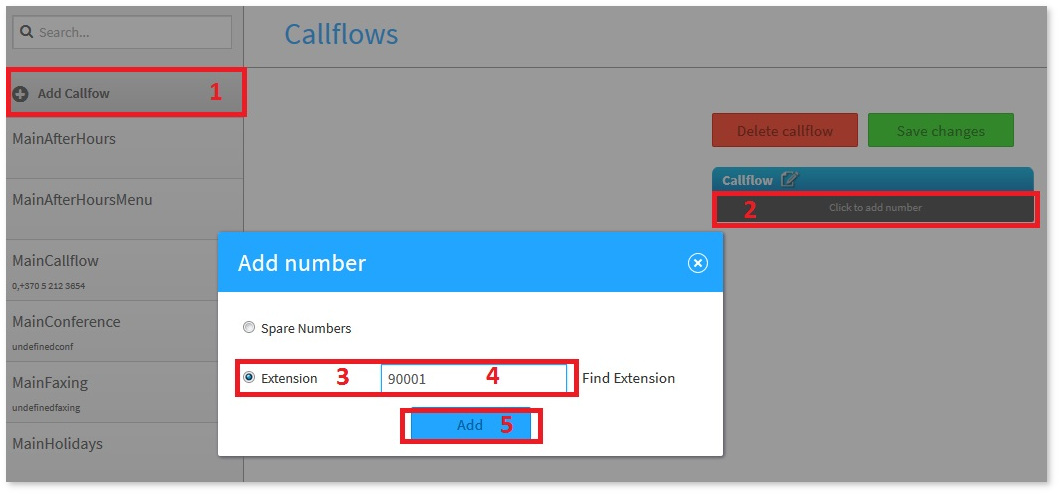
* 19.Press button "Add Callflow" after press "Click to add number" | |||
in the pop-up window check "extension" type extension number (in our case it 90001)and press "Add" button. | |||
<br><br>[[File:Acftc12.jpg]]<br><br> | |||
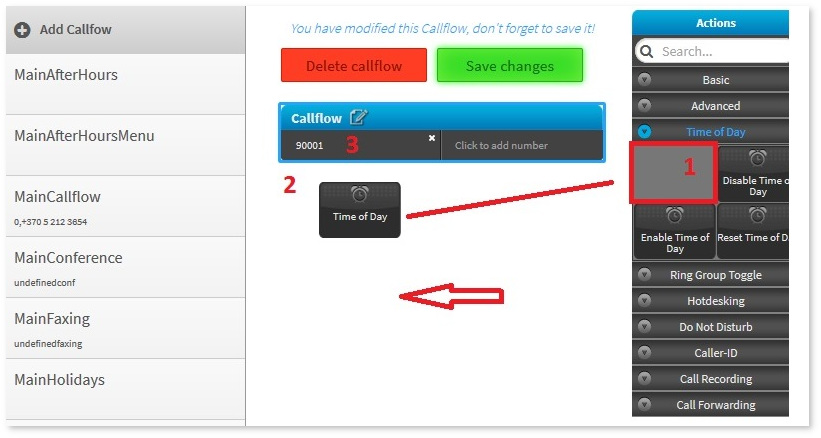
* 20.Now from right menu , choose "time of day" icon and drag and drop it on the number 90001. | |||
<br><br>[[File:Acftc13.jpg]]<br><br> | |||
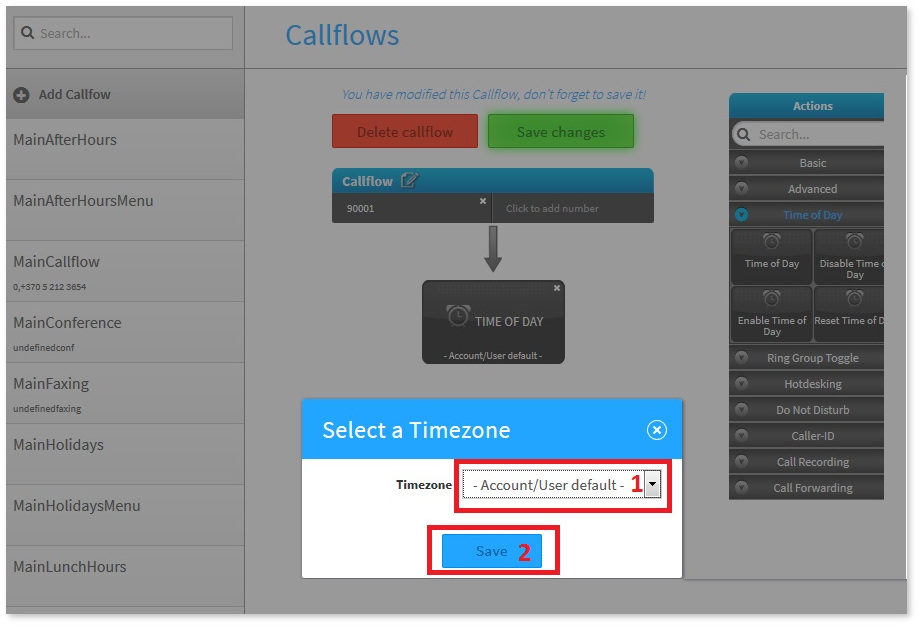
* 21.Will be open pop up window with asking you to select timezone | |||
you can leave it default for this user or choose another. | |||
After press button "Save". | |||
<br><br>[[File:Acftc14.jpg]]<br><br> | |||
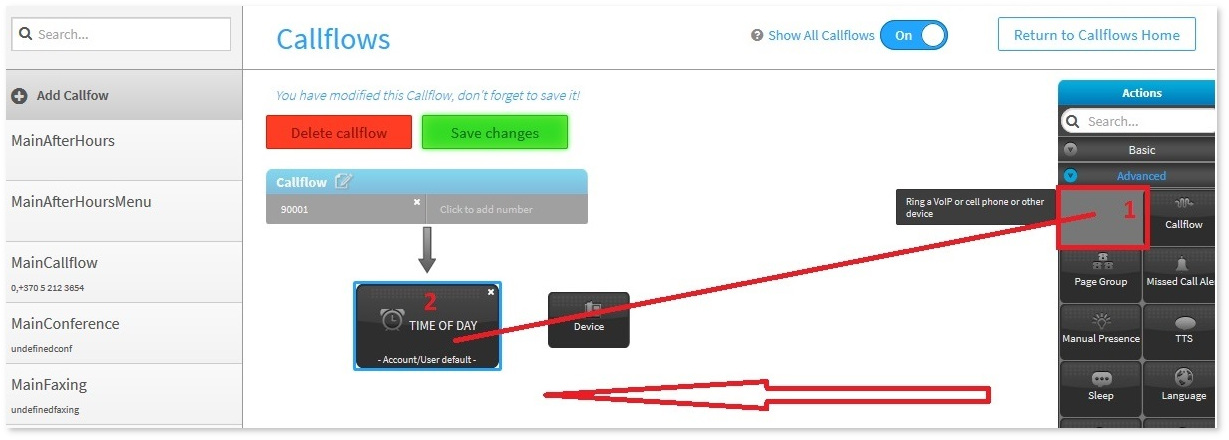
* 22.Now from right menu , from advanced section choose "Device" icon and drag and drop it on the "time of day" from callflow. | |||
<br><br>[[File:Acftc15.jpg]]<br><br> | |||
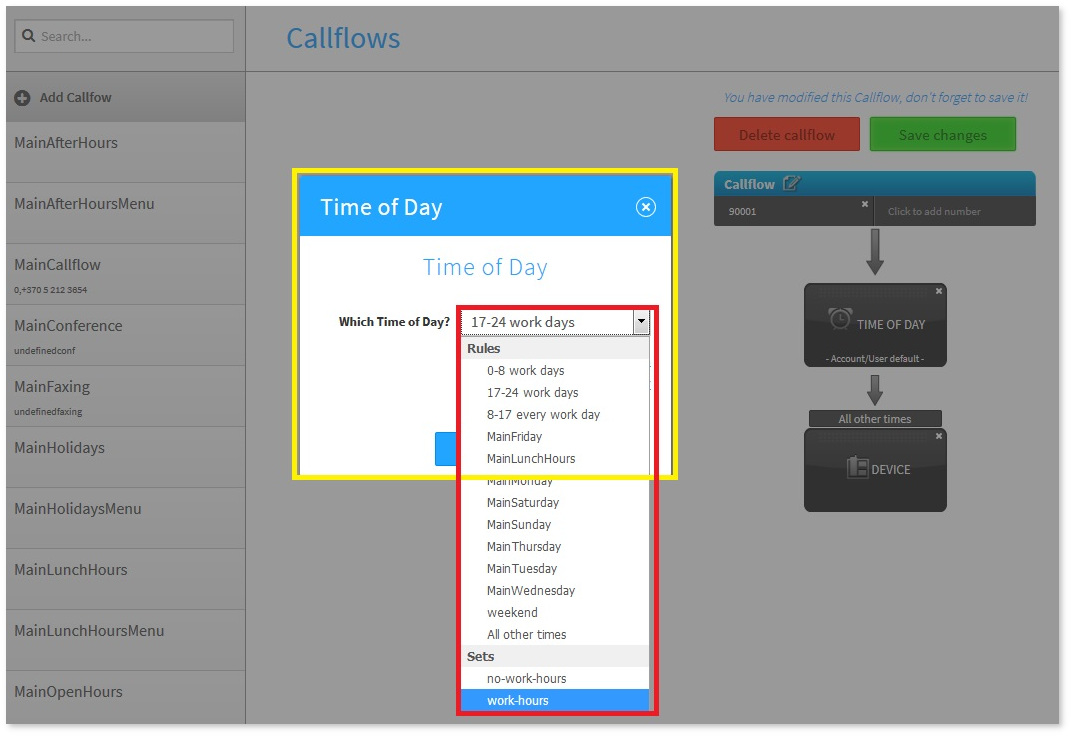
* 23.Will be open pop up window, where you must to choose time period, which was created in the 14,15 and 17, and after press button "Save". | |||
<br><br>[[File:Acftc16.jpg]]<br><br> | |||
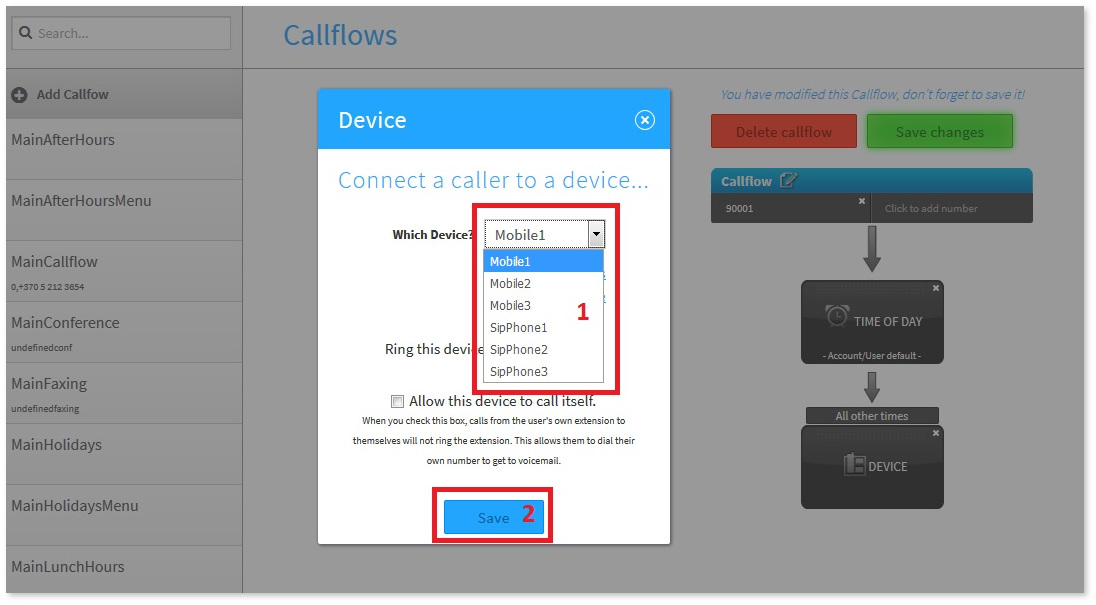
* 24.After saving time period will be open pop up window with asking you to choose device. | |||
In our case we will choose SipPhone1. | |||
You can set ringtime in seconds for how long will be ringing , till call will go to the another device or voicemail. | |||
Do not forget to press button "Save".''' | |||
<br><br>[[File:Acftc17.jpg]]<br><br> | |||
* 25.Do it 22 position once more, but drag and drop "Device" on the previously created device "SipPhone1". | |||
Choose Mobile1 from dropdown menu and press button "Save". | |||
<br><br>[[File:Acftc18.jpg]]<br><br> | |||
* 26.Do it 22 position once more, but drag and drop "Voicemail" icon on the previously created device "Mobile1". | |||
If you press button "edit mailbox options", in that place you can setup unavailable message (test-to-speech or upload file). | |||
<br><br>[[File:Acftc19.jpg]]<br><br> | |||
* 27.Choose Voicemail from dropdown menu for User1 and press button "Save". | |||
<br><br>[[File:Acftc20.jpg]]<br><br> | |||
* 28.Repeat steps 22,23,24,25,26,27 but choose another time period, and other devices and voicemail. | |||
<br><br>[[File:Acftc21.jpg]]<br><br> | |||
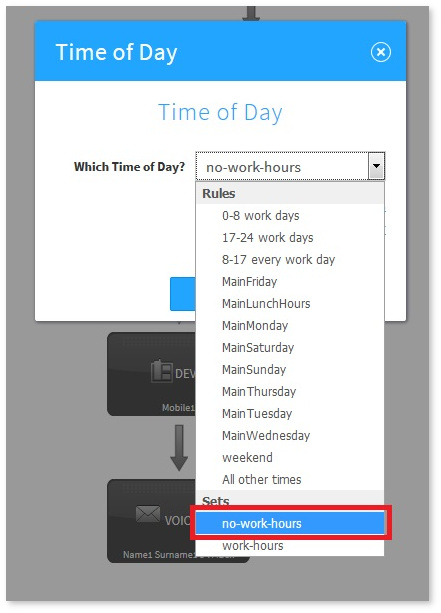
in our case it set named "no-work-hours",and devices Siphone3 ,Mobile3 and Voicemail3. | |||
<br><br>[[File:Acftc22.jpg]]<br><br> | |||
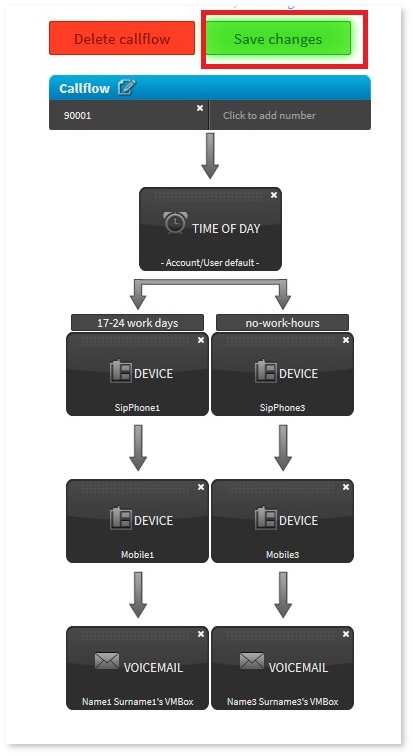
* 29.Do not forget to save callflow !!! | |||
<br><br>[[File:Acftc23.jpg]]<br><br> | |||
Depends what you need , using this example , you can create any time periods or groups of time periods, | |||
and make any logic of routing based on time and date. | |||
Latest revision as of 15:21, 16 October 2018
We will build callflow based on the Time-Periods.
Example: 3 users with 1 Sipphone,1 Mobile number and 1 Voicemail box per each.
When dial extension 90001 in work hours (Mon-Fri 8:00-17:00) will be ring SipPhone1 20 sec
after Mobile1 20 sec and in the end will go to the Voicemail1
When dial extension 90001 in no work hours (Mon-Fri 17:00-8:00 and weekend) will be ring
SipPhone3 10 sec, after Mobile3 10 sec and in the end go to the Voicemail3
- 1.Press button "Apps"
- 2.Choose SmartPBX App
- 3.Press button "Devices" and create 3 Sipphones and 3 CellPhones.
How to do it , you can find in our wiki
- How to create device in Cloud PBX
- How to create users in Cloud PBX
- How to assign users with devices in Cloud PBX
- 4.Press button "Users".
- 5.Press on the user line in the device place.
- 6.Choose device which will be assigned with this user.
- 7.Choose second device for this user and press "Save" button.
- 8.You will have picture like ours.
- 9.Check, if voicemail boxes created for each user.
- 10.Congratulations , now we can create callflow based on time period.
- 11.Now Press button "Apps".
- 12.Choose CallFlows App.
- 13.Press button "Time of day".
- 14.On the left side press button "Add".
Give the name for this time period , choose specifications and press button "Save".
- 15. Repeat step 14 for every Time Period which you want to create.
- 16. Press button "Return to Callflows Home" and after press button "Time of Day sets".
- 17.Here you can make sets(groups) of the several time periods.
Press button "add" and in the pop-up window drag and drop fromleft side to the right time periods, which you want to group.
After press button "Save".
- 18.Press button "Return to Callflows Home" and press button "Callflows".
- 19.Press button "Add Callflow" after press "Click to add number"
in the pop-up window check "extension" type extension number (in our case it 90001)and press "Add" button.
- 20.Now from right menu , choose "time of day" icon and drag and drop it on the number 90001.
- 21.Will be open pop up window with asking you to select timezone
you can leave it default for this user or choose another.
After press button "Save".
- 22.Now from right menu , from advanced section choose "Device" icon and drag and drop it on the "time of day" from callflow.
- 23.Will be open pop up window, where you must to choose time period, which was created in the 14,15 and 17, and after press button "Save".
- 24.After saving time period will be open pop up window with asking you to choose device.
In our case we will choose SipPhone1.
You can set ringtime in seconds for how long will be ringing , till call will go to the another device or voicemail.
Do not forget to press button "Save".
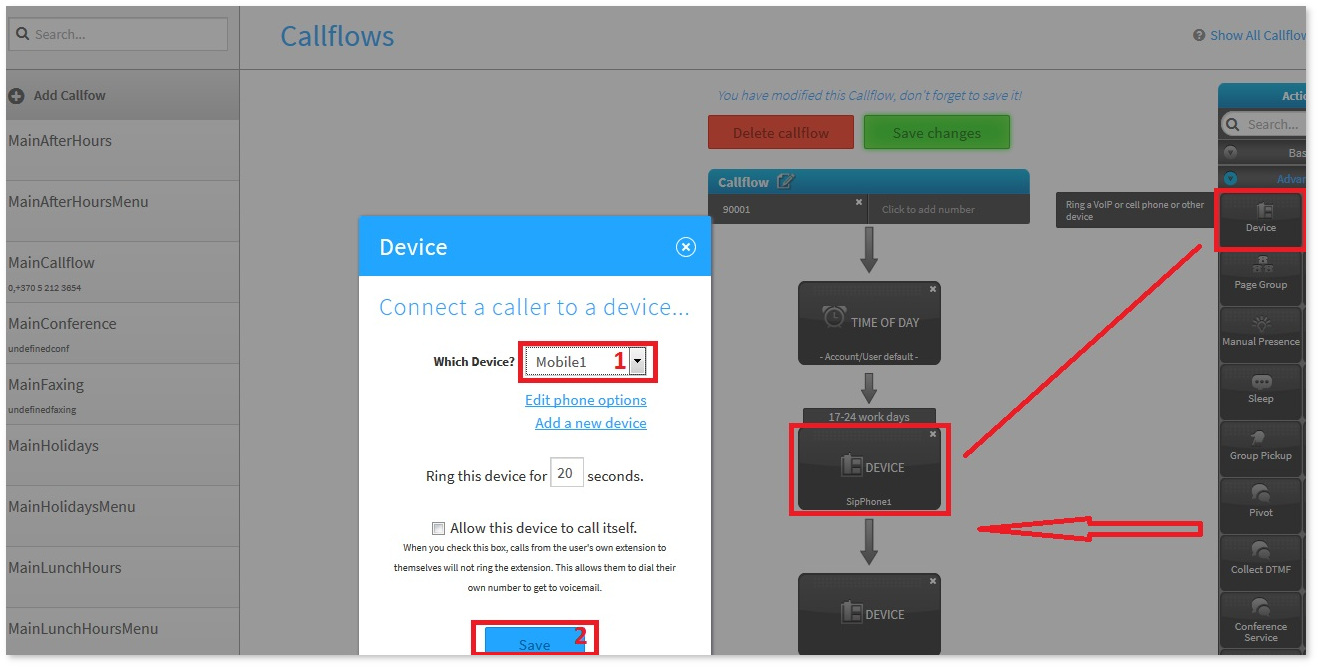
- 25.Do it 22 position once more, but drag and drop "Device" on the previously created device "SipPhone1".
Choose Mobile1 from dropdown menu and press button "Save".
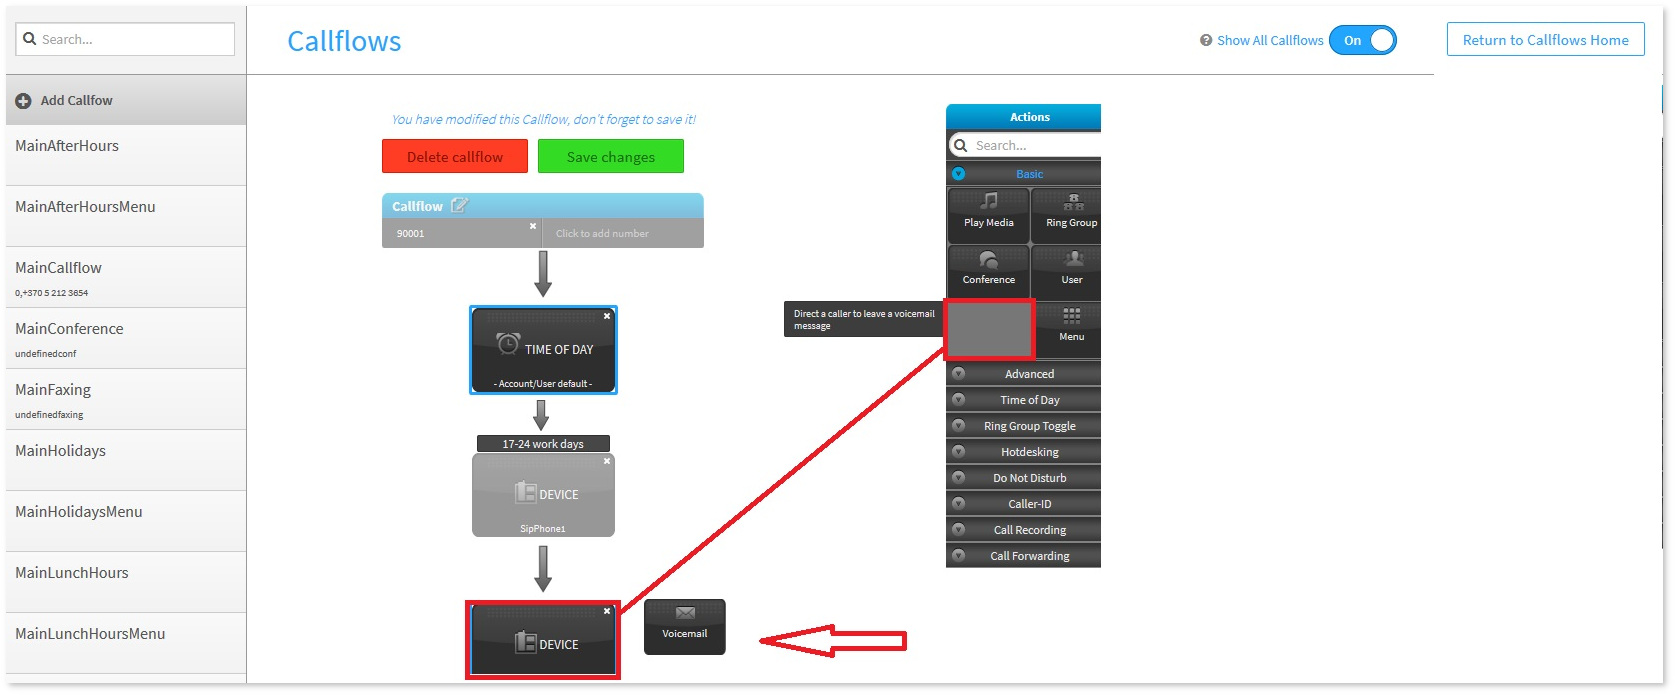
- 26.Do it 22 position once more, but drag and drop "Voicemail" icon on the previously created device "Mobile1".
If you press button "edit mailbox options", in that place you can setup unavailable message (test-to-speech or upload file).
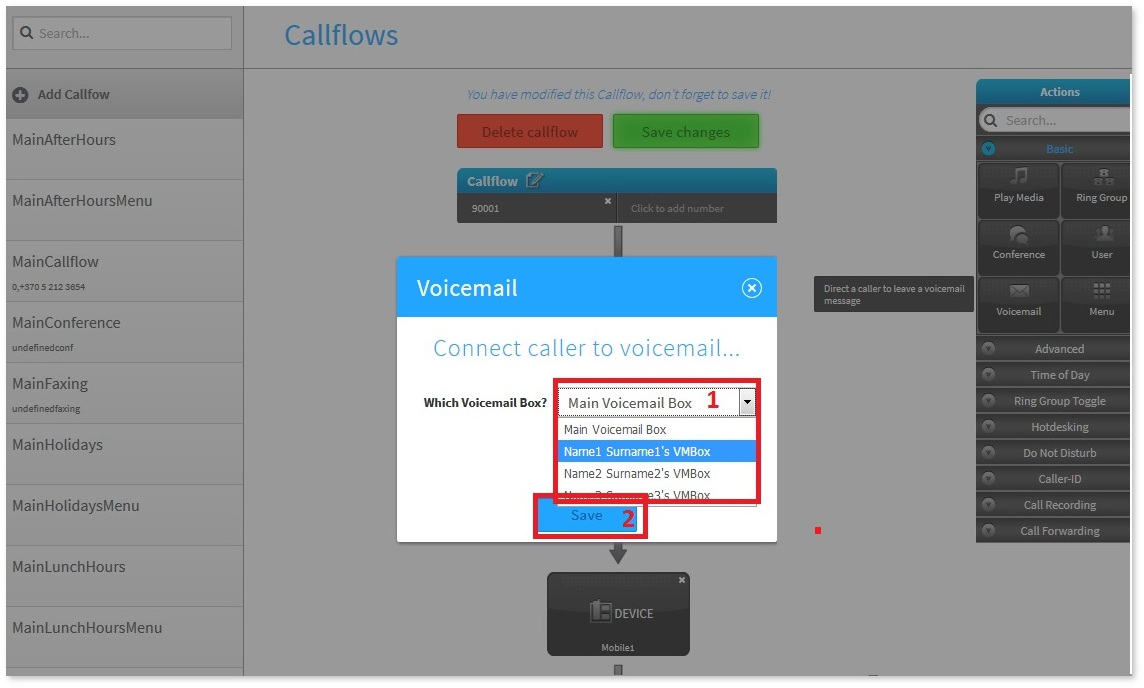
- 27.Choose Voicemail from dropdown menu for User1 and press button "Save".
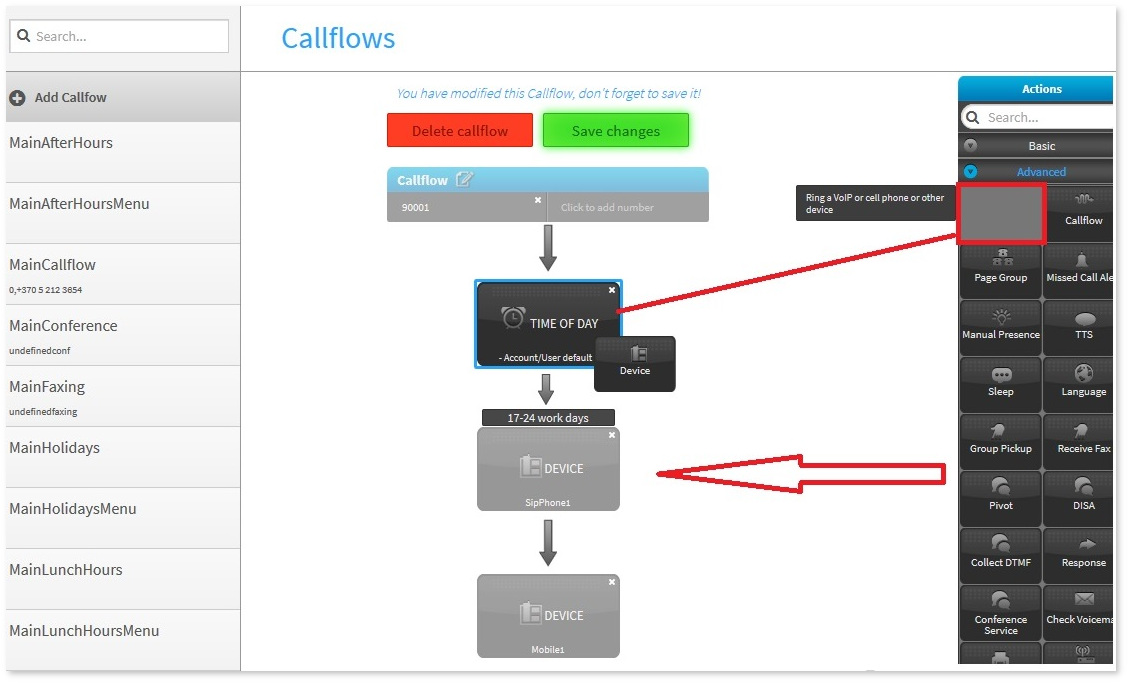
- 28.Repeat steps 22,23,24,25,26,27 but choose another time period, and other devices and voicemail.
in our case it set named "no-work-hours",and devices Siphone3 ,Mobile3 and Voicemail3.
- 29.Do not forget to save callflow !!!
Depends what you need , using this example , you can create any time periods or groups of time periods,
and make any logic of routing based on time and date.
