Difference between revisions of "SMS Addon Mass SMS"
| (7 intermediate revisions by 4 users not shown) | |||
| Line 17: | Line 17: | ||
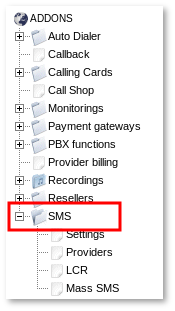
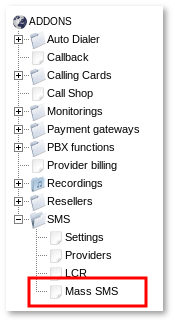
After you prepare [[SMS_Addon_-_Providers | Providers]] go to '''ADDONS –> SMS''': | After you prepare [[SMS_Addon_-_Providers | Providers]] go to '''ADDONS –> SMS''': | ||
<br><br> | <br><br> | ||
[[File: | [[File:Sms_from_menu.png]] | ||
<br><br> | <br><br> | ||
You will reach list of subscribed to SMS service Users: | You will reach list of subscribed to SMS service Users: | ||
| Line 41: | Line 41: | ||
[[Image:mass_sms_main_admin.png]] | [[Image:mass_sms_main_admin.png]] | ||
<br><br> | <br><br> | ||
You can also check actions by clicking on the action [[Image: | You can also check actions by clicking on the action [[Image:Icon_actions.png]] icon and sms being sent by selected campaign. | ||
<br><br> | <br><br> | ||
[[Image:admin-view-actions.png]] | [[Image:admin-view-actions.png]] | ||
| Line 54: | Line 54: | ||
The main window shows the user's campaigns. Here is more information and available settings that admin/reseller has: | The main window shows the user's campaigns. Here is more information and available settings that admin/reseller has: | ||
<br><br> | <br><br> | ||
[[Image: | [[Image:user-main-mass-sms.png]] | ||
<br><br> | <br><br> | ||
The user can Activate or Stop the Campaign by clicking the [[Image:icon_play.png]] or [[Image:icon_stop.png]] button near the Campaign's status. | The user can Activate or Stop the Campaign by clicking the [[Image:icon_play.png]] or [[Image:icon_stop.png]] button near the Campaign's status. | ||
| Line 72: | Line 72: | ||
* '''Start/Stop Times''' – time when sms will be sent. | * '''Start/Stop Times''' – time when sms will be sent. | ||
* '''Device''' – each Campaign should be assigned to a Device in order for MOR to bill the call. | * '''Device''' – each Campaign should be assigned to a Device in order for MOR to bill the call. | ||
* '''CallerID''' | * '''CallerID''' – what CallerID to put on SMS. If CallerID is not set, CallerID from SMS Provider settings will be taken in its place. If SMPP Provider will be used and CallerID is not set, CallerID from User Primary Device will be taken. | ||
<br><br> | <br><br> | ||
=== Numbers === | === Numbers === | ||
| Line 80: | Line 81: | ||
[[Image:User-main-mass-sms-import-numbers.png]] | [[Image:User-main-mass-sms-import-numbers.png]] | ||
<br><br> | <br><br> | ||
The user can import phone numbers from a | The user can import phone numbers from a CSV file. Numbers should be in correct dialing format and not duplicated. | ||
Example of numbers file: | Example of numbers file: | ||
| Line 101: | Line 102: | ||
If a number is Completed, it is possible to reactivate it (tell the system to call it again) by clicking the [[Image:icon_reactivate.png]] icon near the number. | If a number is Completed, it is possible to reactivate it (tell the system to call it again) by clicking the [[Image:icon_reactivate.png]] icon near the number. | ||
<br><br> | <br><br> | ||
=== Actions === | === Actions === | ||
| Line 107: | Line 109: | ||
[[Image:User-mass-sms-actions.png]] | [[Image:User-mass-sms-actions.png]] | ||
<br><br> | <br><br> | ||
Here user can choose actions for the campaign. | |||
There is currently one type of action for Mass SMS: | There is currently one type of action for Mass SMS: | ||
* '''SEND SMS''' – the specified sms will be sent to all numbers in the campaign. | * '''SEND SMS''' – the specified sms will be sent to all numbers in the campaign. | ||
<br><br> | <br><br> | ||
===Resend all failed SMS=== | ===Resend all failed SMS=== | ||
<!---This functionality is available from MOR 9---> | <!---This functionality is available from MOR 9---> | ||
| Line 117: | Line 119: | ||
<br><br> | <br><br> | ||
[[File:Resend.png]] | [[File:Resend.png]] | ||
<br><br> | |||
===SMS Campaign statistics=== | |||
To view the Autodialer Campaign statistics, click on the bar chart icon in the '''Stats''' column. | |||
<br><br> | |||
[[File:Autodialer_Stats_icon.png]] | |||
<br><br> | |||
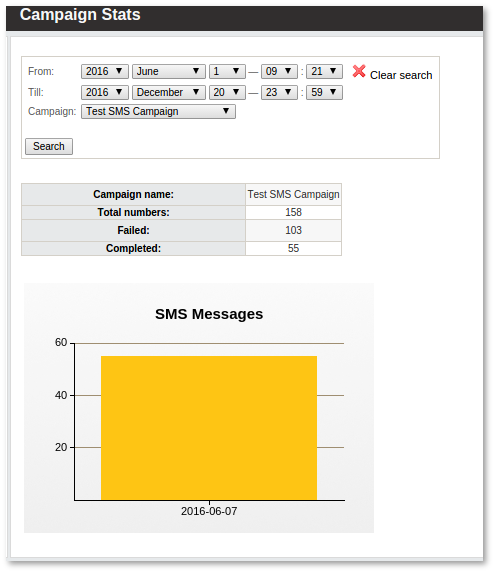
On the newly opened page you will be able to see the desired SMS Campaign statistics with a search filter and a visual representation of data. | |||
<br><br> | |||
[[File:SMS campaign.png]] | |||
<br><br> | <br><br> | ||
<!--==From Admin== | <!--==From Admin== | ||
| Line 201: | Line 213: | ||
* [[I have a problem with Auto Dialer]] | * [[I have a problem with Auto Dialer]] | ||
<br><br>--> | <br><br>--> | ||
=See also= | =See also= | ||
* [[SMS Addon]] | * [[SMS Addon]] | ||
Latest revision as of 09:15, 19 July 2016
Description
Mass SMS addon lets you send one or more sms to an array of numbers automatically.
This functionality can be used in telemarketing.
Who can configure and use Mass SMS?
- Only end users can create Mass SMS campaigns, actions, edit, delete them and import numbers.
- Admin and reseller can check their users' campaigns and view actions, but cannot edit them.
Configuration
For user to be able to use Mass SMS, he first has to be subscribed to SMS Addon.
After you prepare Providers go to ADDONS –> SMS:
You will reach list of subscribed to SMS service Users:
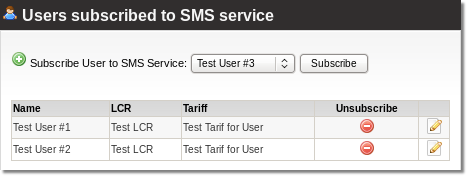
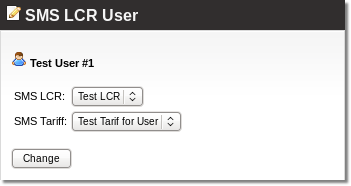
Here have to subscribe User to SMS Service, just select user from dropdown and press Subscribe. If you want unsubscribe user from SMS Service click ![]() icon. Click on
icon. Click on ![]() icon to change Users LCR or Tariff for SMS Service.
icon to change Users LCR or Tariff for SMS Service.
Reseller also has to have SMS Addon and SMS permission enabled.
Usage
From Admin/Reseller
Go to ADDONS -> SMS -> Mass SMS:
Here you can see the list of campaigns created by the end users. You can see the number of phone numbers imported, actions created, campaign status, profit from campaign and other information.

You can also check actions by clicking on the action ![]() icon and sms being sent by selected campaign.
icon and sms being sent by selected campaign.

From User
Go to PERSONAL MENU -> SMS -> Mass SMS:
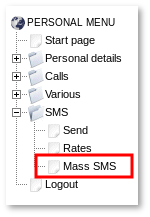
The main window shows the user's campaigns. Here is more information and available settings that admin/reseller has:

The user can Activate or Stop the Campaign by clicking the ![]() or
or ![]() button near the Campaign's status.
button near the Campaign's status.
A Campaign can only be Activated if it has free numbers AND some Actions.
So please, before activating a Campaign, import some Numbers and create Actions.
Campaigns
![]() Add campaign allows you to add a new campaign:
Add campaign allows you to add a new campaign:
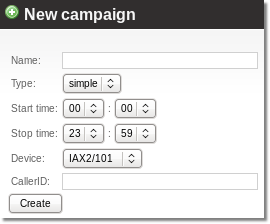
The important fields here are:
- Start/Stop Times – time when sms will be sent.
- Device – each Campaign should be assigned to a Device in order for MOR to bill the call.
- CallerID – what CallerID to put on SMS. If CallerID is not set, CallerID from SMS Provider settings will be taken in its place. If SMPP Provider will be used and CallerID is not set, CallerID from User Primary Device will be taken.
Numbers
Click on ![]() in the Numbers column to check numbers which will be dialed on campaign:
in the Numbers column to check numbers which will be dialed on campaign:

The user can import phone numbers from a CSV file. Numbers should be in correct dialing format and not duplicated.
Example of numbers file:
442012345678
442087654321
442054987123
In a new Campaign there are no numbers, so click on ![]() Import numbers from file and select the file to upload:
Import numbers from file and select the file to upload:

After uploading the file, you will see status of imported numbers:
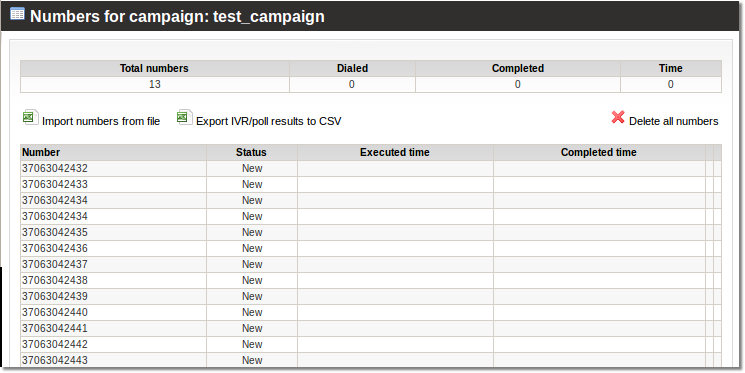
You can delete all numbers by clicking ![]() Delete all numbers. Also you can export details by clicking
Delete all numbers. Also you can export details by clicking ![]() Export IVR/poll results to CSV
Export IVR/poll results to CSV
If a number is Completed, it is possible to reactivate it (tell the system to call it again) by clicking the ![]() icon near the number.
icon near the number.
Actions
Click ![]() in the Actions column to access the Campaign's actions:
in the Actions column to access the Campaign's actions:

Here user can choose actions for the campaign.
There is currently one type of action for Mass SMS:
- SEND SMS – the specified sms will be sent to all numbers in the campaign.
Resend all failed SMS
You can resend all failed SMS:

SMS Campaign statistics
To view the Autodialer Campaign statistics, click on the bar chart icon in the Stats column.
![]()
On the newly opened page you will be able to see the desired SMS Campaign statistics with a search filter and a visual representation of data.
