Difference between revisions of "Automatic Tariff Import"
| (11 intermediate revisions by 3 users not shown) | |||
| Line 23: | Line 23: | ||
= Introduction = | = Introduction = | ||
An important task is the timely management of Provider Tariff Plans. While business practices differ somewhat, usually, each Provider will deliver an initial spreadsheet file detailing their prices to the range of Destination Codes that they are providing. This initial spreadsheet will be followed by | An important task is the timely management of Provider Tariff Plans. While business practices differ somewhat, usually, each Provider will deliver an initial spreadsheet file detailing their prices to the range of Destination Codes that they are providing. This initial spreadsheet will be followed by updated notification spreadsheets. These will be received at regular agreed-upon intervals, identifying amendments to the previous prices. The format and content of these notifications are not standardized and consequently differ from one Provider to another. This information is vital, from a commercial and financial management point of view. It is therefore important that the rating information received from a Provider is uploaded regularly, in order that the System can correctly calculate Provider rating costs for calls. It is also important to analyze Tariff/Rating Plan updates received from partners, in order to ensure that any errors are noticed early and resolved before causing Billing disputes. | ||
Doing all this by hand is a long and tedious process. It is possible to automate it with a human-in-between approach that requires confirming the final import step, to avoid potential misconfiguration problems. | Doing all this by hand is a long and tedious process. It is possible to automate it with a human-in-between approach that requires confirming the final import step, to avoid potential misconfiguration problems. | ||
| Line 47: | Line 47: | ||
=Initial (Manual) Setup for Automation= | =Initial (Manual) Setup for Automation= | ||
This sequence of steps is necessary to configure automatic import of the concrete tariff format received from any provider. Once configured, it can be used many times thereafter, until the provider decides to change the format. | This sequence of steps is necessary to configure the automatic import of the concrete tariff format received from any provider. Once configured, it can be used many times thereafter, until the provider decides to change the format. | ||
| Line 63: | Line 63: | ||
==Rate Import Rules created== | ==Rate Import Rules created== | ||
The Rate Import Rules feature enhances the analysis of the Providers‘ rates by identifying rates that do not meet a specific criterion (for example, a rate increase with fewer than seven days notice) and then either alerting the Administrator or rejecting the rate. | The Rate Import Rules feature enhances the analysis of the Providers‘ rates by identifying rates that do not meet a specific criterion (for example, a rate increase with fewer than seven days' notice) and then either alerting the Administrator or rejecting the rate. | ||
==Tariff Import Rules created== | ==Tariff Import Rules created== | ||
Tariff Import Rules assign each received Email/Attachment to the correct Provider/Tariff with appropriate Rate Import Rules, Notifications, and Template to properly convert received Tariffs and upload rates to the System. | Tariff Import Rules assign each received Email/Attachment to the correct Provider/Tariff with appropriate Rate Import Rules, Notifications, and a Template to properly convert received Tariffs and upload rates to the System. | ||
| Line 76: | Line 76: | ||
* Tariff is received | * Tariff is received | ||
* The tariff is analyzed and waiting for confirmation before import | * The tariff is analyzed and waiting for confirmation before the import | ||
* The tariff is imported or rejected | * The tariff is imported or rejected | ||
* Others | * Others | ||
| Line 88: | Line 88: | ||
==Rate file received from Provider via email== | ==Rate file received from Provider via email== | ||
One mailbox, usually named | One mailbox, usually named rates@companyname.com, is monitored by the system and all received emails are analyzed. | ||
| Line 103: | Line 103: | ||
==Notification for Review sent== | ==Notification for Review sent== | ||
If there are no major problems, the responsible person receives an email saying that the Tariff is converted with such and such notices or warnings, and waits for approval. It is possible to skip this step with 100% automation, but it is usually not recommended, due to possible errors that human intervention could help to avoid | If there are no major problems, the responsible person receives an email saying that the Tariff is converted with such and such notices or warnings, and waits for approval. It is possible to skip this step with 100% automation, but it is usually not recommended, due to possible errors that human intervention could help to avoid. | ||
| Line 118: | Line 118: | ||
==Tariff Imported== | ==Tariff Imported== | ||
The actual tariff import takes place, and old rates are replaced by | The actual tariff import takes place, and old rates are replaced by new ones. All of the preparation work culminates in this step. | ||
<br><br> | <br><br> | ||
| Line 137: | Line 137: | ||
** Failed Conversion - there was an error in rate conversion. | ** Failed Conversion - there was an error in rate conversion. | ||
** Converted - rates were successfully converted. | ** Converted - rates were successfully converted. | ||
** Importing into Temporary Table - rates are being uploaded from attachment to the system. | ** Importing into Temporary Table - rates are being uploaded from the attachment to the system. | ||
** Failed to Import into Temporary Table - there was an error in rates uploading process. | ** Failed to Import into Temporary Table - there was an error in the rates uploading process. | ||
** Imported into Temporary Table - rates have been loaded | ** Imported into Temporary Table - rates have been loaded into the system. | ||
** Analyzing - rates are being analyzed. | ** Analyzing - rates are being analyzed. | ||
** Failed Analysis - there was an error in the analysis. By lowering over Failed Analysis you can get more details. | ** Failed Analysis - there was an error in the analysis. By lowering over Failed Analysis you can get more details. | ||
***rate_with_multiple_ratedetails_found refers to Rate Details (where you can set rate for peak/off peak hours) being used on one or more rates on target tariff. Such rates are not supported by tariff import. | ***rate_with_multiple_ratedetails_found refers to Rate Details (where you can set rate for peak/off-peak hours) being used on one or more rates on target tariff. Such rates are not supported by a tariff import. | ||
** Analyzed - analysis process has been completed. | ** Analyzed - analysis process has been completed. | ||
** Rejected - rates did not match requirements and were rejected. | ** Rejected - rates did not match requirements and were rejected. | ||
| Line 167: | Line 167: | ||
Note: yellow-colored Tariff Jobs rows show that they are waiting for confirmation. | Note: yellow-colored Tariff Jobs rows show that they are waiting for confirmation. | ||
<br><br> | |||
Retry Failed Conversion | Retry Failed Conversion | ||
| Line 192: | Line 192: | ||
[[File:M2TIImage101.png]] | [[File:M2TIImage101.png]] | ||
<br><br> | <br><br> | ||
* To CSV: export analysis to | * To CSV: export analysis to CSV file. | ||
<br><br> | <br><br> | ||
| Line 249: | Line 249: | ||
Row colors: | Row colors: | ||
* If the row is red-colored, the rate is not importable. Non-Importable Reason can be found by moving mouse over the rate. | * If the row is red-colored, the rate is not importable. Non-Importable Reason can be found by moving the mouse over the rate. | ||
* If the row is yellow-colored, the rate analysis was successful but there were some warnings. In the tooltip, the word ‘alert’ will be next to the parameter which caused the alert. | * If the row is yellow-colored, the rate analysis was successful but there were some warnings. In the tooltip, the word ‘alert’ will be next to the parameter which caused the alert. | ||
* If the row is white-colored, the rate analysis was successful. | * If the row is white-colored, the rate analysis was successful. | ||
Analysis execution order: | Analysis execution order: | ||
If the analysis is being executed on several jobs which | If the analysis is being executed on several jobs which include the same tariff, these jobs will be resolved consistently and the oldest job will have the highest priority. The next analysis of the job will be started only after the previous one is completed. | ||
= Understanding and Working with Provider Import Templates = | = Understanding and Working with Provider Import Templates = | ||
| Line 288: | Line 288: | ||
Name | Name | ||
: | : The name of the Template can be set to any, but for better management suggested to be the name of Provider. | ||
Rate Sheet | Rate Sheet | ||
| Line 324: | Line 324: | ||
: Prefix/Code requires to be set to match the Tariff/Rating Plan Prefix column. | : Prefix/Code requires to be set to match the Tariff/Rating Plan Prefix column. | ||
: On some occasions, there may be two columns (like Country Code, City Code) which the System is also able to handle if Template settings are correct. | : On some occasions, there may be two columns (like Country Code, City Code) which the System is also able to handle if Template settings are correct. | ||
: Sometimes provided multiple Prefixes are displayed in singular cell format like “71-76”, “55,551,552,55257” or “370, 371, 372-376, 3772”, such formats are parsed automatically and | : Sometimes provided multiple Prefixes are displayed in singular cell format like “71-76”, “55,551,552,55257” or “370, 371, 372-376, 3772”, such formats are parsed automatically and do not require additional configuration. | ||
: Example 1: | : Example 1: | ||
| Line 342: | Line 342: | ||
Destination/Zone | Destination/Zone | ||
: The Zone drop-down list box identifies the Column in the Excel sheet that contains the Zone name. | : The Zone drop-down list box identifies the Column in the Excel sheet that contains the Zone name. | ||
: If there is only one Column containing this information then only one of the dropdown boxes needs to be completed. However, if the Zone is in two Columns then both of the drop-down boxes can be completed to identify this. In this scenario, the blank fields either side of the second box can be used to format the Zone name. | : If there is only one Column containing this information then only one of the dropdown boxes needs to be completed. However, if the Zone is in two Columns then both of the drop-down boxes can be completed to identify this. In this scenario, the blank fields on either side of the second box can be used to format the Zone name. | ||
: Example: A Rate Plan includes the following information: | : Example: A Rate Plan includes the following information: | ||
: [[File:M2TIImage59.png]] | : [[File:M2TIImage59.png]] | ||
: The Zone import is configured with | : The Zone import is configured with Columns A and B and the separator fields with space “Column B”, as shown: | ||
: [[File:M2TIImage5.png]] | : [[File:M2TIImage5.png]] | ||
<br><br> | <br><br> | ||
| Line 371: | Line 371: | ||
: The Effective Date options determine in which Column(s) the Date and Time information for the imported rates can be found. | : The Effective Date options determine in which Column(s) the Date and Time information for the imported rates can be found. | ||
: Multiple options are provided to support different Spreadsheet formats. | : Multiple options are provided to support different Spreadsheet formats. | ||
: Some Tariff/Rating Plan Providers split Effective Date data between two Worksheets, whereas in the first Worksheet there are Destinations with Effective Date and in the second Worksheet - Destination, Prefix, Rate data. Configuration of such cases is provided in Example 3. | : Some Tariff/Rating Plan Providers split Effective Date data between two Worksheets, whereas in the first Worksheet there are Destinations with the Effective Date, and in the second Worksheet - Destination, Prefix, and Rate data. Configuration of such cases is provided in Example 3. | ||
: Example 1: | : Example 1: | ||
| Line 388: | Line 388: | ||
: Example 3: | : Example 3: | ||
: Provided Tariff/Rating Plan below in the first Worksheet shows Destination (Column A) and Effective Date (Column D). | : Provided Tariff/Rating Plan below in the first Worksheet shows the Destination (Column A) and Effective Date (Column D). | ||
: In the second Worksheet, there | : In the second Worksheet, there is Destination (Column A), Prefix (Column B), and Rate/Price (Column C). | ||
: [[File:M2TIImage112.png]] | : [[File:M2TIImage112.png]] | ||
: The first dropdown configures from which Worksheet takes Effective Date data (which in this example’s case is Worksheet 1 (Rates)). | : The first dropdown configures from which Worksheet takes Effective Date data (which in this example’s case is Worksheet 1 (Rates)). | ||
: The second dropdown configures the Effective Date column from the secondary Worksheet. | : The second dropdown configures the Effective Date column from the secondary Worksheet. | ||
: The third dropdown configures by which secondary Worksheet column | : The third dropdown configures by which the secondary Worksheet column does the mapping with the primary Worksheet (which in this example’s case is Destination from Worksheet 1 (Rates) Column A). | ||
: The fourth dropdown configures by which the primary Worksheet column does the mapping with secondary Worksheet (which in this example’s case is Destination from Worksheet 2 (Numberplan) Column A). | : The fourth dropdown configures by which the primary Worksheet column does the mapping with the secondary Worksheet (which in this example’s case is Destination from Worksheet 2 (Numberplan) Column A). | ||
: Accordingly, Template’s Effective Date values can be set to 1, D, A = A. | : Accordingly, Template’s Effective Date values can be set to 1, D, A = A. | ||
: [[File:M2TIImage100.png]] | : [[File:M2TIImage100.png]] | ||
| Line 400: | Line 400: | ||
Effective Date Format | Effective Date Format | ||
: After selecting the Column, the Format field is used to specify the format the information | : After selecting the Column, the Format field is used to specify the format of the information held in the Rate Plan. | ||
: Some suggested formats already exist in the dropdown, which can be selected or used as an example to create a custom one if it is not present in the dropdown. | : Some suggested formats already exist in the dropdown, which can be selected or used as an example to create a custom one if it is not present in the dropdown. | ||
| Line 431: | Line 431: | ||
: Example 2: | : Example 2: | ||
: Provided Tariff/Rating Plan below has a Minimal Time column which is D and in the first place of “x/y/z/” fields. | : Provided Tariff/Rating Plan below has a Minimal Time column which is D and in the first place of the “x/y/z/” fields. | ||
: [[File:M2TIImage49.png]] | : [[File:M2TIImage49.png]] | ||
: Accordingly, Template’s Minimal Time value can be set to D and field 1. | : Accordingly, Template’s Minimal Time value can be set to D and field 1. | ||
| Line 448: | Line 448: | ||
: Example 2: | : Example 2: | ||
: Provided Tariff/Rating Plan below has an Increment column which is D and in the second place of “x/y/z/” fields. | : Provided Tariff/Rating Plan below has an Increment column which is D and in the second place of the “x/y/z/” fields. | ||
: [[File:M2TIImage49.png]] | : [[File:M2TIImage49.png]] | ||
: Accordingly, Template’s Increment value can be set to D and field 2. | : Accordingly, Template’s Increment value can be set to D and field 2. | ||
| Line 458: | Line 458: | ||
: [[File:Blocked and deleted rates.png]] | : [[File:Blocked and deleted rates.png]] | ||
If Providers send a Rates Sheet with price "-1", which means, that this Destination is blocked, the system will block a route to particular Destinations. | If Providers send a Rates Sheet with the price "-1", which means, that this Destination is blocked, the system will block a route to particular Destinations. | ||
<br><br> | <br><br> | ||
===Exceptions=== | ===Exceptions=== | ||
: Exceptions allow additional data manipulation when specific rules are defined separately in the provided Tariff/Rating Plan. Exceptions are set in Templates (BILLING > Tariff Import > Import Rules > Templates > EDIT). Mask field allows defining which Destinations/Zones should have exceptional values set. % can be used as a wild card to match part of a text in Destination/Zone. Mask looks for Destination/Zone values as they are within the tariff sheet file. See examples below: | : Exceptions allow additional data manipulation when specific rules are defined separately in the provided Tariff/Rating Plan. Exceptions are set in Templates (BILLING > Tariff Import > Import Rules > Templates > EDIT). The Mask field allows defining which Destinations/Zones should have exceptional values set. % can be used as a wild card to match part of a text in Destination/Zone. Mask looks for Destination/Zone values as they are within the tariff sheet file. See examples below: | ||
: Example 1: | : Example 1: | ||
| Line 488: | Line 488: | ||
Example: | Example: | ||
The first Rate Import Rule is the rate increase rule. The variable for this rule is | The first Rate Import Rule is the rate increase rule. The variable for this rule is the number of days, 7 days by default. | ||
What this means is that when a Provider Tariff/Rating Plan is uploaded and a rate increase is detected with an Effective Date less than 7 days into the future the action that has been configured will be triggered. The rate could be automatically rejected, or an alert about this rating entry was raised. | What this means is that when a Provider Tariff/Rating Plan is uploaded and a rate increase is detected with an Effective Date less than 7 days into the future the action that has been configured will be triggered. The rate could be automatically rejected, or an alert about this rating entry was raised. | ||
| Line 495: | Line 495: | ||
<br><br> | <br><br> | ||
Available Rate Import Rules with explanation | Available Rate Import Rules with an explanation of each one of them: | ||
<br><br> | <br><br> | ||
| Line 518: | Line 518: | ||
Maximum Effective Date | Maximum Effective Date | ||
: If updating existing or creating a new Rate, whose new Effective Date is later (by days) | : If updating existing or creating a new Rate, whose new Effective Date is later (by days) than set in Rule, then set action will be taken. | ||
: Value can be set to any integer between 0 and 365 which represents the day(s). | : Value can be set to any integer between 0 and 365 which represents the day(s). | ||
Max Increase | Max Increase | ||
: If updating existing Rate, whose Rate (Price) increased more by percentages than set in Rule, then set action will be taken. | : If updating the existing Rate, whose Rate (Price) increased more by percentages than set in Rule, then set action will be taken. | ||
: Value can be set to any decimal between 0 and 500 which represents Rate’s (Price’s) percentages. | : Value can be set to any decimal between 0 and 500 which represents Rate’s (Price’s) percentages. | ||
Max Decrease | Max Decrease | ||
: If updating existing Rate, whose Rate (Price) decreased more by percentages than set in Rule, then set action will be taken. | : If updating the existing Rate, whose Rate (Price) decreased more by percentages than set in Rule, then set action will be taken. | ||
: Value can be set to any decimal between 0 and 100 which represents Rate’s (Price’s) percentages. | : Value can be set to any decimal between 0 and 100 which represents Rate’s (Price’s) percentages. | ||
| Line 534: | Line 534: | ||
Zero Rate | Zero Rate | ||
: If updating existing or creating a new Rate, whose Rate (Price) is zero, then set action will be taken. | : If updating the existing or creating a new Rate, whose Rate (Price) is zero, then a set action will be taken. | ||
Min Times Not Equal | Min Times Not Equal | ||
: If updating existing or creating a new Rate, whose new Min Time value does not match any from set Rule, then set action will be taken. | : If updating existing or creating a new Rate, whose new Min Time value does not match any from the set Rule, then set action will be taken. | ||
: Acceptable value format is: “x,y,z,w” | : Acceptable value format is: “x,y,z,w” | ||
:: Where x, y, z, and w must be integer values between 0 and 7200. | :: Where x, y, z, and w must be integer values between 0 and 7200. | ||
:: Must be separated by comma (,). | :: Must be separated by a comma (,). | ||
:: Must not have any spaces. | :: Must not have any spaces. | ||
:: Must not have leading zeros, unless it is only a zero. | :: Must not have leading zeros, unless it is only a zero. | ||
:: Limited to max 10 values. | |||
: Examples: | : Examples: | ||
:: 0,100,60,7200 | :: 0,100,60,7200 | ||
| Line 550: | Line 551: | ||
Increment Not Equal | Increment Not Equal | ||
: If updating existing or creating a new Rate, whose new Increment value does not match any from set Rule, then set action will be taken. | : If updating existing or creating a new Rate, whose new Increment value does not match any from the set Rule, then set action will be taken. | ||
: If updating existing or creating a new Rate, whose new Min Time value does not match any from set Rule, then set action will be taken. | : If updating existing or creating a new Rate, whose new Min Time value does not match any from the set Rule, then set action will be taken. | ||
: Acceptable value format is: “x,y,z,w” | : Acceptable value format is: “x,y,z,w” | ||
:: Where x, y, z, and w must be integer values between 0 and 7200. | :: Where x, y, z, and w must be integer values between 0 and 7200. | ||
:: Must be separated by comma (,). | :: Must be separated by a comma (,). | ||
:: Must not have any spaces. | :: Must not have any spaces. | ||
:: Must not have leading zeros, unless it is only a zero. | :: Must not have leading zeros, unless it is only a zero. | ||
:: Limited to max 10 values. | |||
: Examples: | : Examples: | ||
:: 0,100,60,7200 | :: 0,100,60,7200 | ||
| Line 569: | Line 571: | ||
<br><br> | <br><br> | ||
The main Tariff Import Rules page shows all the Tariff Import specific rules in the system. Here you can add new rules by clicking the button at the upper-right corner. Also, you can Edit/Delete selected Rules with the relevant buttons. The first column '''ACTIVE?''' allows to activate or deactivate a specific Rule by clicking the YES/NO buttons. If you would like to change the order of the Rules, Drag&Drop functionality is available. | The main Tariff Import Rules page shows all the Tariff Import-specific rules in the system. Here you can add new rules by clicking the button at the upper-right corner. Also, you can Edit/Delete selected Rules with the relevant buttons. The first column '''ACTIVE?''' allows you to activate or deactivate a specific Rule by clicking the YES/NO buttons. If you would like to change the order of the Rules, Drag&Drop functionality is available. | ||
Follow the steps below to create Tariff Import Rules: | Follow the steps below to create Tariff Import Rules: | ||
By clicking the '''ADD NEW TARIFF IMPORT RULES | By clicking the '''ADD NEW TARIFF IMPORT RULES'' button, you are presented with the following settings: | ||
* '''Name''' - Name of the Rules | * '''Name''' - Name of the Rules | ||
| Line 579: | Line 581: | ||
* '''Target Tariff''' - The Tariff for which the changes will be applied. The target tariff in M4 can be Buy or Sell tariff. The target tariff in M4 can be any Wholesale tariff (Provider and Users). | * '''Target Tariff''' - The Tariff for which the changes will be applied. The target tariff in M4 can be Buy or Sell tariff. The target tariff in M4 can be any Wholesale tariff (Provider and Users). | ||
* '''Import Type''' - you can choose between 2 options: Add/Update and Replace All Rates | * '''Import Type''' - you can choose between 2 options: Add/Update and Replace All Rates | ||
** '''Add/Update''' - new rates will be added from file and existing ones will be updated | ** '''Add/Update''' - new rates will be added from the file and existing ones will be updated | ||
** '''Replace All Rates''' - existing rates will be deleted and new ones imported from the file | ** '''Replace All Rates''' - existing rates will be deleted and new ones imported from the file | ||
* '''Delete rates if not present''' - delete Rates for Prefixes | * '''Delete rates if not present''' - delete Rates for Prefixes that are not present in the imported file (available only with Import Type: Add/Update) | ||
* '''Import Template''' - Template to be used | * '''Import Template''' - Template to be used | ||
* '''Effective Date''' - Effective Date value to be used with Rates | * '''Effective Date''' - Effective Date value to be used with Rates | ||
| Line 588: | Line 590: | ||
** '''Email Body''' - Use Effective Date from Email's Body ([[Effective Date from Email's Body Example|Example]]) | ** '''Email Body''' - Use Effective Date from Email's Body ([[Effective Date from Email's Body Example|Example]]) | ||
** '''File Name''' - Use Effective Date from File (Attachment) Name | ** '''File Name''' - Use Effective Date from File (Attachment) Name | ||
* '''Prefix''' - the text after which Effective Date is specified. | * '''Prefix''' - the text after which the Effective Date is specified. | ||
* '''Date Format''' - date format in which Effective Date is specified. See available formats [[Automatic_Tariff_Import#Date_Format | here]]. | * '''Date Format''' - date format in which Effective Date is specified. See available formats [[Automatic_Tariff_Import#Date_Format | here]]. | ||
* '''Time Zone''' - used to convert Effective Date file timezone to system timezone. | * '''Time Zone''' - used to convert Effective Date file timezone to system timezone. | ||
* '''Manual Review''' - Import automatically or wait for manual confirmation | * '''Manual Review''' - Import automatically or wait for manual confirmation | ||
* '''Reject Import if errors found''' - Tariff Import will be rejected if at least one error will be found * '''after analyzing | * '''Reject Import if errors found''' - Tariff Import will be rejected if at least one error will be found * ''' after analyzing | ||
* '''Stop processing more Rules''' - Matching with Email Details and Active Tariff Import Rules will be in specific order (from Tariff Import Rules List, from top to bottom). Email assigning will be stopped on this Rule if this option is enabled | * '''Stop processing more Rules''' - Matching with Email Details and Active Tariff Import Rules will be in a specific order (from Tariff Import Rules List, from top to bottom). Email assigning will be stopped on this Rule if this option is enabled | ||
* '''Default Effective From''' - Effective From value in Rates, when invalid value supplied from file | * '''Default Effective From''' - Effective From value in Rates, when invalid value supplied from file | ||
* '''Default Connection Fee''' - Set Connection Fee for Rates if it is not present or invalid in Import File | * '''Default Connection Fee''' - Set Connection Fee for Rates if it is not present or invalid in Import File | ||
| Line 604: | Line 606: | ||
== Email/Attachment Validation == | == Email/Attachment Validation == | ||
Email/Attachment Validation section is used for specifying which emails where will be used by Tariff Import Rules. There are five fields. The first four are for email and the fifth is for attachment. | Email/Attachment Validation section is used for specifying which emails where will be used by Tariff Import Rules. There are five fields. The first four are for email and the fifth is for the attachment. | ||
<br><br> | <br><br> | ||
| Line 616: | Line 618: | ||
* '''File Name''' - Attachments file name. | * '''File Name''' - Attachments file name. | ||
Wildcard % is allowed, which substitutes any character with any length. | Wildcard % is allowed, which substitutes any character with any length. An example is shown in the image below | ||
<br><br> | <br><br> | ||
[[File:M2TIImage110.png]] | [[File:M2TIImage110.png]] | ||
| Line 626: | Line 628: | ||
# Sender Name J% any value That starts with uppercase J | # Sender Name J% any value That starts with uppercase J | ||
# Mail Subject %Rates Subject ends with word Rates | # Mail Subject %Rates Subject ends with word Rates | ||
# Mail Text Hello Mail Text Starts with word Hello | # Mail Text Hello Mail Text Starts with the word Hello | ||
# File Name %.csv filename ends with .csv | # File Name %.csv filename ends with .csv | ||
| Line 640: | Line 642: | ||
Follow the steps below to create and configure a notification Template. | Follow the steps below to create and configure a notification Template. | ||
# Create Email Template. Manual how to create Email Templates can be found here: [[ | # Create an Email Template. Manual on how to create Email Templates can be found here: [[M4 Emails]]. Additional Email variables: tariff_job_id, tariff_job_analysis_url, tariff_job_tariff_id, tariff_job_tariff_name. | ||
# Select created Email Template from Email Template dropdown. | # Select created Email Template from the Email Template dropdown. The subject field will fill in automatically. <br> [[File:M2TIImage112.png]] | ||
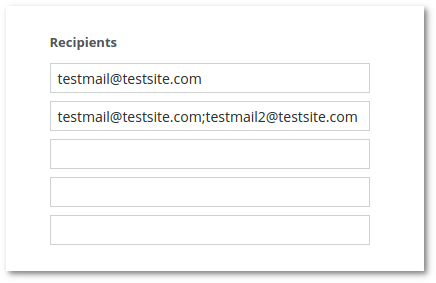
# Enter Email Address(es) in the Recipients field. Multiple Email Addresses must be separated by ;. <br> [[File:M2TIImage116.png]] | # Enter Email Address(es) in the Recipients field. Multiple Email Addresses must be separated by ;. <br> [[File:M2TIImage116.png]] | ||
# Repeat the same process for desired Import Triggers. <br> [[File:M2TIImage36.png]] | # Repeat the same process for desired Import Triggers. <br> [[File:M2TIImage36.png]] | ||
| Line 648: | Line 650: | ||
== Date Format == | == Date Format == | ||
Data Format should be written in | Data Format should be written in symbolic form, constructed from various elements. Could look like this %d-%m-%Y and this covers such date as 01-02-2021 (day-month-year). There are several ways how to describe it: | ||
'''YEAR''' | '''YEAR''' | ||
* %Y - year (2021) | * %Y - year (2021) | ||
* %y - last two digits of year (00..99) | * %y - last two digits of the year (00..99) | ||
'''MONTH''' | '''MONTH''' | ||
| Line 660: | Line 662: | ||
'''DAY''' | '''DAY''' | ||
* %d - day of month (e.g., 01) | * %d - day of the month (e.g., 01) | ||
<br><br> | <br><br> | ||
| Line 666: | Line 668: | ||
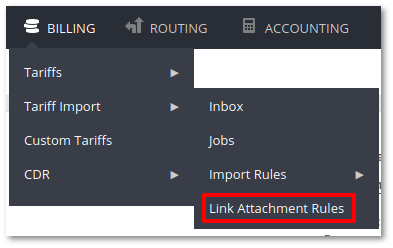
= Tariff Link Attachment Rules = | = Tariff Link Attachment Rules = | ||
Sometimes providers send emails with URL to download the rates list instead of the rates file. | Sometimes providers send emails with the URL to download the rates list instead of the rates file. | ||
Tariff Link Attachment Rules are for attachment extraction from the link only. | Tariff Link Attachment Rules are for attachment extraction from the link only. | ||
| Line 676: | Line 678: | ||
Here you can list, edit, or create new rules. | Here you can list, edit, or create new rules. | ||
To change rules priority just drag rule up or down. | To change rules priority just drag the rule up or down. | ||
<br><br> | <br><br> | ||
| Line 689: | Line 691: | ||
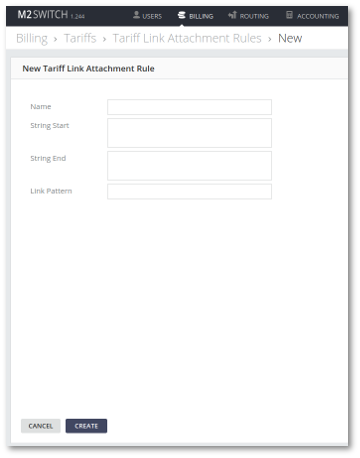
* '''Name''' - Rules name. | * '''Name''' - Rules name. | ||
* '''String Start''' - String Start defines where to start to search for attachment links in email text or web page. | * '''String Start''' - String Start defines where to start to search for attachment links in email text or a web page. | ||
'''Value:''' search word or phrase. Leave empty to start a search from the beginning. | '''Value:''' search word or phrase. Leave empty to start a search from the beginning. | ||
Example (String Start - '''can be downloaded'''): | Example (String Start - '''can be downloaded'''): | ||
| Line 695: | Line 697: | ||
Attachments '''can be downloaded''' from here: http://www.example.com | Attachments '''can be downloaded''' from here: http://www.example.com | ||
Thank you for using our services | Thank you for using our services | ||
* '''String End''' - String End defines where to stop to search for attachment links in email text or web page. | * '''String End''' - String End defines where to stop to search for attachment links in email text or a web page. | ||
'''Value:''' search word or phrase. Leave empty to search till the end. | '''Value:''' search word or phrase. Leave it empty to search till the end. | ||
Example (String End - '''Thank you'''): | Example (String End - '''Thank you'''): | ||
Hello, | Hello, | ||
| Line 714: | Line 716: | ||
Caution: | Caution: | ||
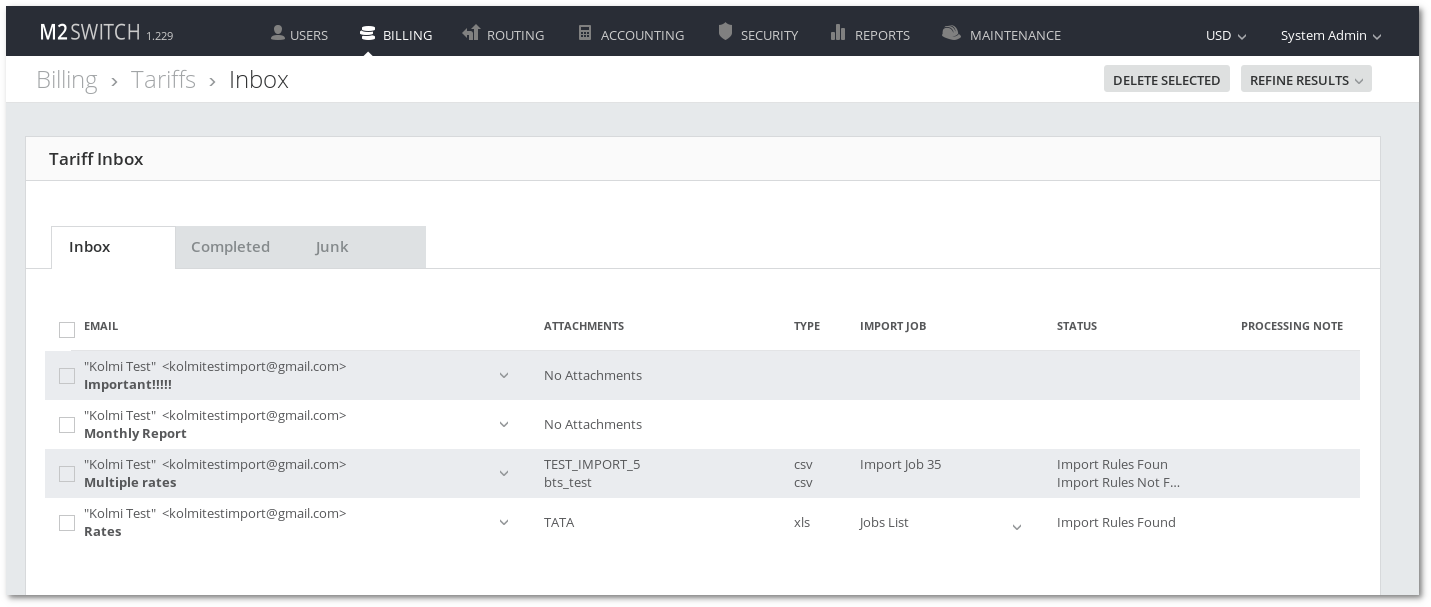
The Inbox functions in a similar way to the email inbox of your desktop or web-based email client, with emails sent to the platform’s email address being displayed and stored in the inbox. The | The Inbox functions in a similar way to the email inbox of your desktop or web-based email client, with emails sent to the platform’s email address being displayed and stored in the inbox. The Inbox also includes additional functionality to support Provider's Rate Import procedures and processes. | ||
However, it is important to understand that the Rate Inbox is designed to manage received emails and not to be a “full email client”. This means that it is not possible to Reply To or Forward emails that are received into the Rate Inbox. | However, it is important to understand that the Rate Inbox is designed to manage received emails and not to be a “full email client”. This means that it is not possible to Reply To or Forward emails that are received into the Rate Inbox. | ||
| Line 729: | Line 731: | ||
Emails will remain visible in the Action Required view until the associated rate update is committed, or they are manually completed or deleted. | Emails will remain visible in the Action Required view until the associated rate update is committed, or they are manually completed or deleted. | ||
'''Completed''' - Fully processed emails are shown in the completed tab. Fully processed means that all of the email attachments had been assigned to at least one of Tariff Import Rules and Tariff Job which is completed. | '''Completed''' - Fully processed emails are shown in the completed tab. Fully processed means that all of the email attachments had been assigned to at least one of the Tariff Import Rules and Tariff Job which is completed. | ||
'''Junk''' - Emails that are deleted from Junk will be removed permanently, not displayed in the deleted view. | '''Junk''' - Emails that are deleted from Junk will be removed permanently, not displayed in the deleted view. | ||
| Line 739: | Line 741: | ||
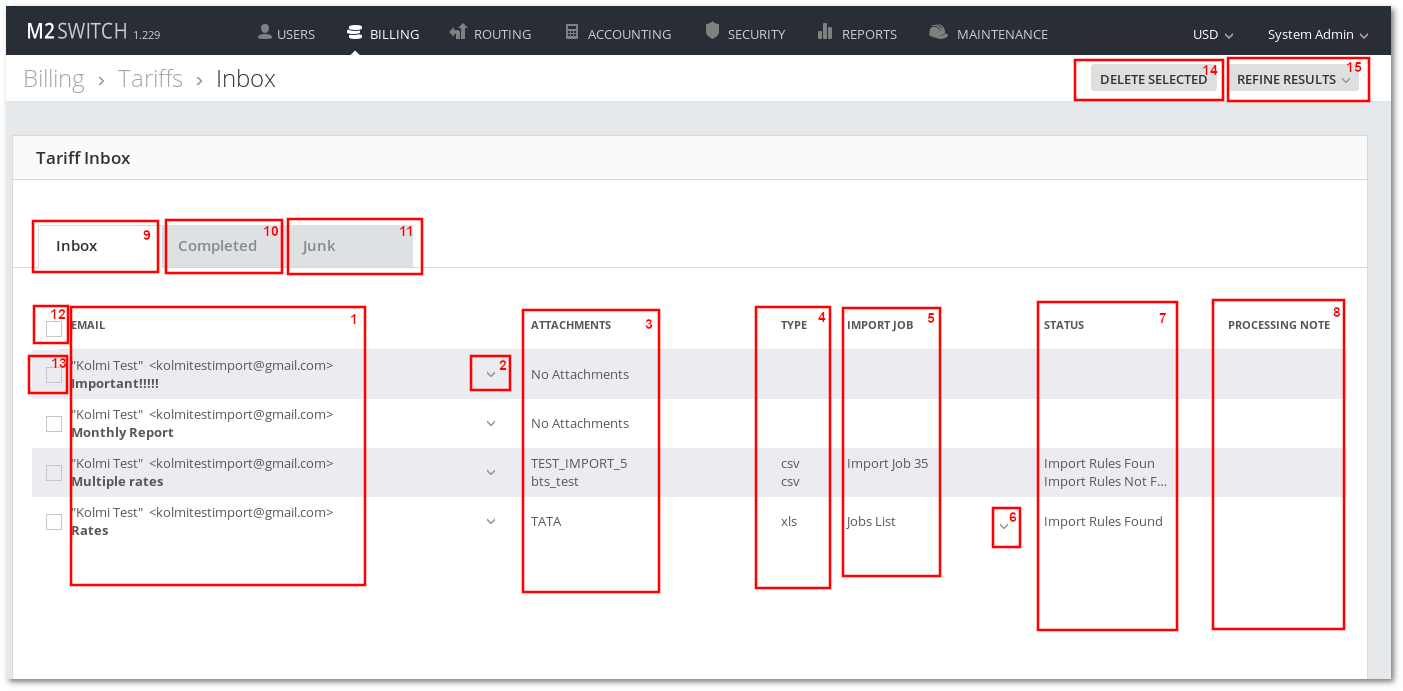
<br><br> | <br><br> | ||
# Email column - Sender name, email address and subject | # Email column - Sender name, email address, and subject | ||
# Email details button - toggles email details | # Email details button - toggles email details | ||
# Attachments list | # Attachments list | ||
| Line 751: | Line 753: | ||
# Junk view tab | # Junk view tab | ||
# Select all emails checkbox | # Select all emails checkbox | ||
# Select single email checkbox | # Select a single email checkbox | ||
# Delete Selected emails | # Delete Selected emails | ||
# Refine Results - shows fields to filter emails | # Refine Results - shows fields to filter emails | ||
| Line 761: | Line 763: | ||
* Message section contains emails message. | * Message section contains emails message. | ||
* Attachments section shows attachments associated with email. | * Attachments section shows attachments associated with email. | ||
* | * The Last Section represents three function buttons. | ||
<br><br> | <br><br> | ||
| Line 785: | Line 787: | ||
<br><br> | <br><br> | ||
Press Refine button to see results. | Press Refine button to see the results. | ||
<br><br> | <br><br> | ||
| Line 805: | Line 807: | ||
<br><br> | <br><br> | ||
Then press Delete Selected button on top right side of Tariff Inbox | Then press Delete Selected button on the top right side of the Tariff Inbox | ||
<br><br> | <br><br> | ||
| Line 819: | Line 821: | ||
<br><br> | <br><br> | ||
Also, email can be deleted by toggling Email Details and pressing Delete button | Also, email can be deleted by toggling Email Details and pressing the Delete button | ||
<br><br> | <br><br> | ||
| Line 844: | Line 846: | ||
<br><br> | <br><br> | ||
Note: It’s not possible to Retry Rules mapping if all email attachments will have at least one import rule assigned to | Note: It’s not possible to Retry Rules mapping if all email attachments will have at least one import rule assigned to them. | ||
== Attachment mapping status == | == Attachment mapping status == | ||
| Line 856: | Line 858: | ||
* '''Import Rules Found''' - attachment was mapped successfully with at least one of the Tariff Import Rules. | * '''Import Rules Found''' - attachment was mapped successfully with at least one of the Tariff Import Rules. | ||
* '''Import Rules Not Found''' - attachment was not mapped to any of the Tariff Import Rules or there were no Tariff Import Rules to map. | * '''Import Rules Not Found''' - attachment was not mapped to any of the Tariff Import Rules or there were no Tariff Import Rules to map. | ||
* '''Invalid Effective Date/Format for Tariff Import Rules''' - Invalid attachment date or | * '''Invalid Effective Date/Format for Tariff Import Rules''' - Invalid attachment date or its format compared to Tariff Import Rules settings. Numbers after the status text represent Tariff Import Rules IDs. | ||
<br> | <br> | ||
| Line 867: | Line 869: | ||
<br><br> | <br><br> | ||
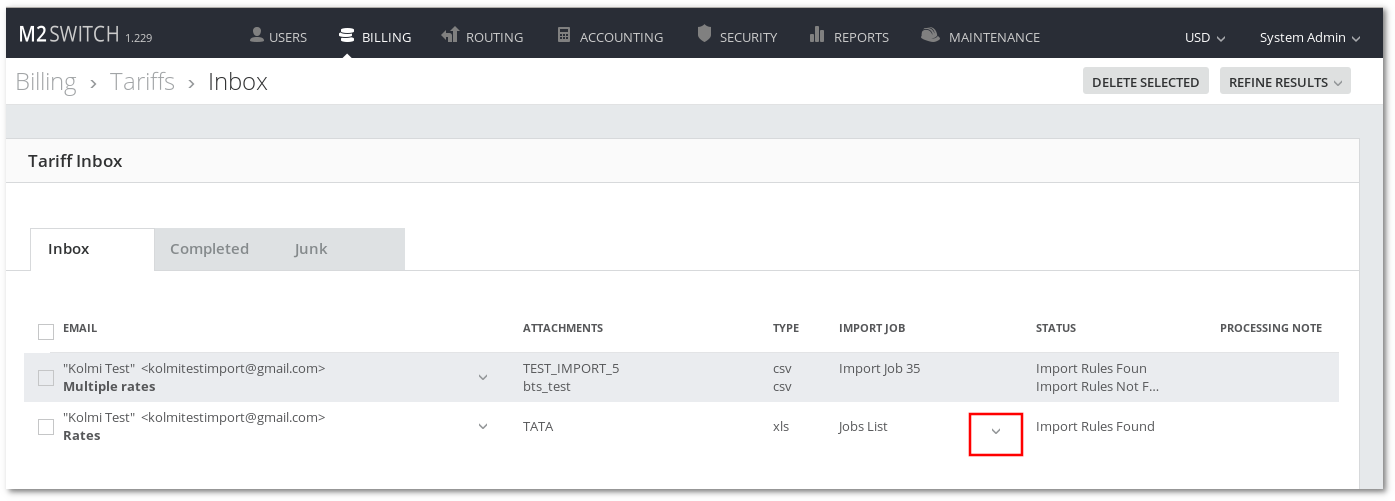
If there are multiple Tariff Jobs they will be shown as a toggle list. To toggle the list, simply press the arrow button next to Jobs list caption. | If there are multiple Tariff Jobs they will be shown as a toggle list. To toggle the list, simply press the arrow button next to the Jobs list caption. | ||
<br><br> | <br><br> | ||
| Line 879: | Line 881: | ||
<br><br> | <br><br> | ||
= Examples = | = Detailed Import Examples = | ||
* [[ATI - Voicetrading example]] | |||
* [[ATI - Tata example]] | |||
* [[ATI - Speedflow example]] | |||
[[ | |||
[[ | |||
<br><br> | <br><br> | ||
= Template Examples = | |||
* [[ATI - IDT Express Template]] | |||
* [[ATI - Voicetrading Template]] | |||
* [[ATI - Voxbeam Template]] | |||
* [[ATI - Tata Template]] | |||
<br><br> | <br><br> | ||
= See also = | = See also = | ||
* [[M4 Tariffs]] | |||
* [[Automatic Tariff Import - Email is not taken from the mailbox]] | * [[Automatic Tariff Import - Email is not taken from the mailbox]] | ||
Revision as of 14:41, 27 December 2022
NOTICE: this is an add-on. Its functionality is identical in M4/MOR softswitches. M4 screenshots are used in this guide. It looks similar in MOR.
Introduction
An important task is the timely management of Provider Tariff Plans. While business practices differ somewhat, usually, each Provider will deliver an initial spreadsheet file detailing their prices to the range of Destination Codes that they are providing. This initial spreadsheet will be followed by updated notification spreadsheets. These will be received at regular agreed-upon intervals, identifying amendments to the previous prices. The format and content of these notifications are not standardized and consequently differ from one Provider to another. This information is vital, from a commercial and financial management point of view. It is therefore important that the rating information received from a Provider is uploaded regularly, in order that the System can correctly calculate Provider rating costs for calls. It is also important to analyze Tariff/Rating Plan updates received from partners, in order to ensure that any errors are noticed early and resolved before causing Billing disputes.
Doing all this by hand is a long and tedious process. It is possible to automate it with a human-in-between approach that requires confirming the final import step, to avoid potential misconfiguration problems.
To solve this necessity Tariff Import system should be used. Let's start by defining the major terms used in this process.
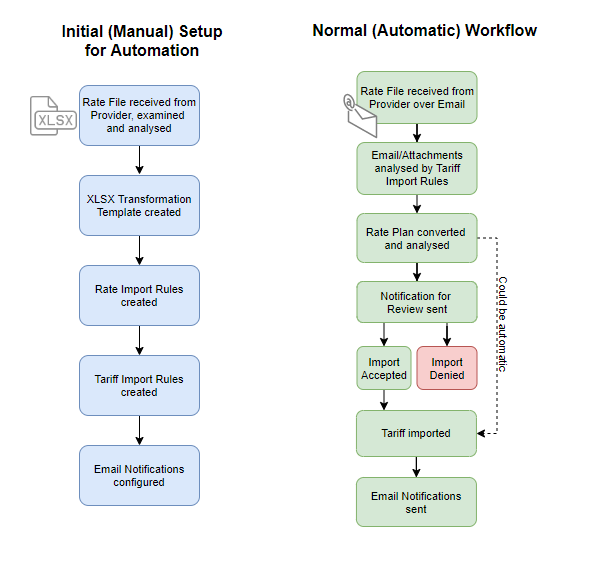
Workflow schema
The workflow can be visualized using the following schema:
As can be seen, there are two components to this process:
- The configuration component, which is done once for each tariff file received from the provider
- The actual working component, where an automated process takes care of the tariff import, based on the settings configured in the first component
Initial (Manual) Setup for Automation
This sequence of steps is necessary to configure the automatic import of the concrete tariff format received from any provider. Once configured, it can be used many times thereafter, until the provider decides to change the format.
Rate file received from Provider examined and analyzed
As every Provider sends different format files, their structure should be analyzed and necessary fields marked for Template creation.
XLSX file can be compressed to RAR or ZIP archive.
XLSX Transformation Template created
The Provider Import Template is the primary object that requires configuring before the Provider Rating Import can occur. The Provider Import Template contains the settings that the System uses to convert information from the Spreadsheet into the System.
Rate Import Rules created
The Rate Import Rules feature enhances the analysis of the Providers‘ rates by identifying rates that do not meet a specific criterion (for example, a rate increase with fewer than seven days' notice) and then either alerting the Administrator or rejecting the rate.
Tariff Import Rules created
Tariff Import Rules assign each received Email/Attachment to the correct Provider/Tariff with appropriate Rate Import Rules, Notifications, and a Template to properly convert received Tariffs and upload rates to the System.
Email Notifications configured
Notifications will generate an email to the desired recipient when configured for various events, such as:
- Tariff is received
- The tariff is analyzed and waiting for confirmation before the import
- The tariff is imported or rejected
- Others
Normal (Automatic) Workflow
Based on preconfigured settings in the first step, the Automatic Tariff Import could be carried out by using all the defined settings.
Rate file received from Provider via email
One mailbox, usually named rates@companyname.com, is monitored by the system and all received emails are analyzed.
Email/Attachments analyzed by Tariff Import Rules
When an email with a tariff attachment comes in, it is checked for address, email subject, attachment name, and other parameters to properly map the received Tariff file with the following procedures.
Rate Plan converted and analyzed
Based on the Tariff Import Rules, the Tariff file is converted to a standardized format (a process called Normalization) and then analyzed. During analysis, the Rate Import Rules are applied and necessary actions are taken based on the Rules.
Notification for Review sent
If there are no major problems, the responsible person receives an email saying that the Tariff is converted with such and such notices or warnings, and waits for approval. It is possible to skip this step with 100% automation, but it is usually not recommended, due to possible errors that human intervention could help to avoid.
Import Denied
The responsible person can deny the tariff import, based on the information received. The analysis could identify errors that can't be ignored or some other issues.
Import Accepted
If there are no major issues, the responsible person accepts the tariff import and the system is notified to continue the import.
Tariff Imported
The actual tariff import takes place, and old rates are replaced by new ones. All of the preparation work culminates in this step.
How it is implemented in the system
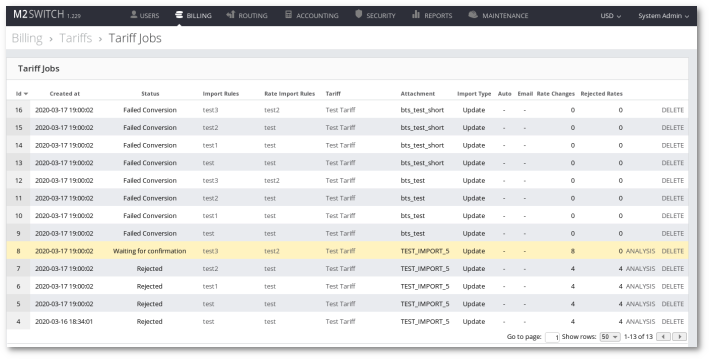
Tariff Jobs table columns:
- Id: Tariff job identification number.
- Created at: Date when the job was created.
- Status: The state of the import process. Can be:
- Assigned - import process was started.
- Converting - rates are being converted.
- Failed Conversion - there was an error in rate conversion.
- Converted - rates were successfully converted.
- Importing into Temporary Table - rates are being uploaded from the attachment to the system.
- Failed to Import into Temporary Table - there was an error in the rates uploading process.
- Imported into Temporary Table - rates have been loaded into the system.
- Analyzing - rates are being analyzed.
- Failed Analysis - there was an error in the analysis. By lowering over Failed Analysis you can get more details.
- rate_with_multiple_ratedetails_found refers to Rate Details (where you can set rate for peak/off-peak hours) being used on one or more rates on target tariff. Such rates are not supported by a tariff import.
- Analyzed - analysis process has been completed.
- Rejected - rates did not match requirements and were rejected.
- Waiting for confirmation - import is stopped until it will be confirmed by admin.
- Cancelled - import was canceled by admin.
- Imported - rates were successfully imported.
- Import Rules - the name of the Tariff Import Rule used in import and the link to its edit view.
- Rate Import Rules - the name of the Rate Import Rules used in import and the link to its edit view.
- Tariff - Tariff name which is being changed in import and the link to its edit view.
- Attachment - the name of the attachment that was used in import.
- Import Type - the type of import. Can be:
- Update - rates will be added or updated.
- Full - rates will be replaced.
- Auto:
- ‘Yes’ means that tariff import will be done without any request for confirmation.
- ‘-’ means that confirmation will be needed after the analysis.
- Email:
- ‘Yes’ email about Tariff Job creation has been sent successfully.
- ‘-’ email has not been sent.
- Rate Changes - number of how many rates were changed during analysis.
- Rejected Rates - number of how many rates were rejected during analysis.
- Analysis (only in analyzed jobs) - link to analysis details.
- Delete - button to delete one job.
Note: yellow-colored Tariff Jobs rows show that they are waiting for confirmation.
Retry Failed Conversion
If the conversion failed, click the button to retry.

Automatic Deletion
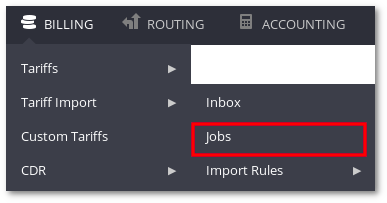
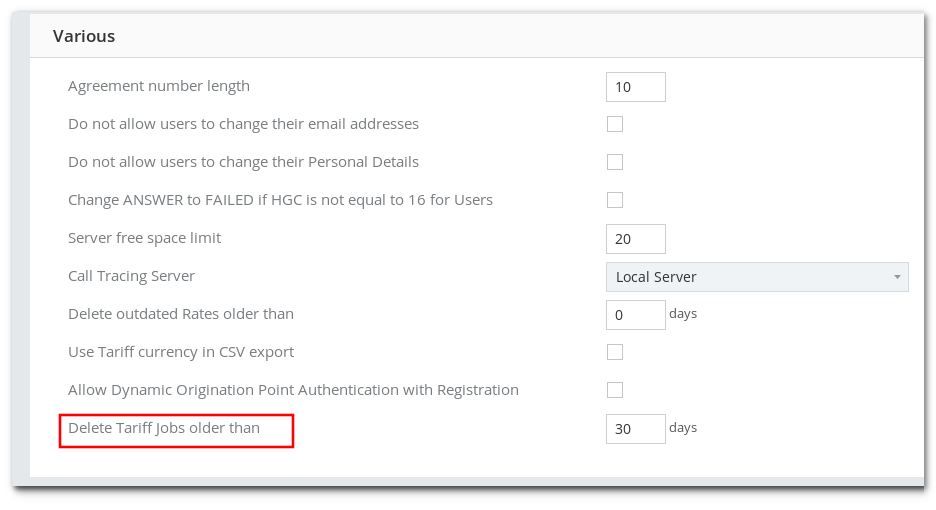
Old Tariff Jobs are periodically deleted by the system. The period of deletion can be found and changed in Settings -> Various -> Delete Tariff Jobs older than. The default value is 30 days. It means that Tariff Jobs which were created before 30 days or more will be deleted.
Analysis
Detailed Analysis can be reached from the Tariff Jobs table by pressing on the ANALYSIS link.
On the top right corner there are buttons:
- To CSV: export analysis to CSV file.
- Confirm: results of the analysis are confirmed and tariff import will continue to proceed.
- Canceled: tariff import will be canceled.
- Schedule: Schedule Import from. Rates will be imported by the selected time if there are no Jobs waiting for the same tariff.
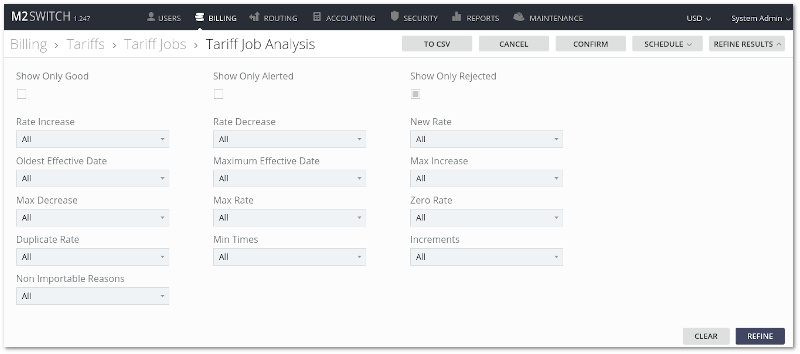
- Refine Results: allows filtering table by selected parameters.
Parameters:
- Rate Increase, Oldest Effective date, Max Decrease, Duplicate Rate, Date Decrease, Maximum Effective Date, Max Rate, Min Times, New Rate, Max Increase, Zero Rate, Increments - can be filtered by values: All (default), None, Alert, Rejected.
- Non Importable Reasons - can be filtered by values All (default), None, Any, Could not determine direction code, Rate price invalid, Effective from invalid.
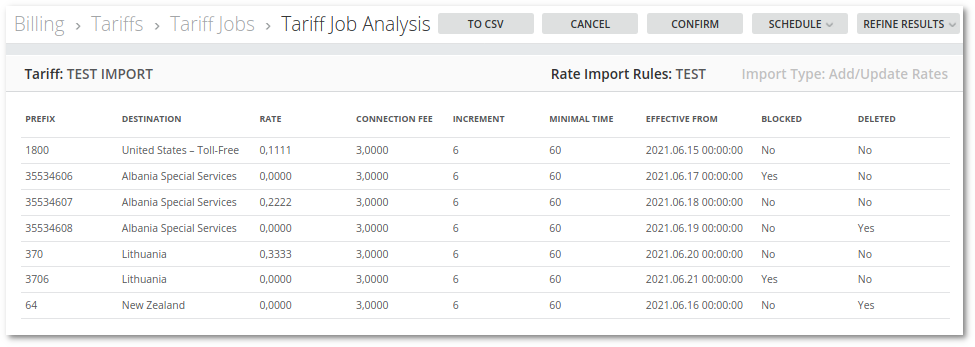
Tariff Job Analysis table:
Table columns:
- Prefix: prefix on which the rate will be applied.
- Destination: destination name.
- Rate: rate value.
- Connection fee: How the Connection fee works
- Increment: What is increment
- Minimal time: What is increment
- Effective from: Rate Effective From
- Blocked: Rate blocked Yes/No
- Deleted: Rate deleted Yes/No
Tooltip: If the mouse is on the table, additional import rule information will be presented.
Row colors:
- If the row is red-colored, the rate is not importable. Non-Importable Reason can be found by moving the mouse over the rate.
- If the row is yellow-colored, the rate analysis was successful but there were some warnings. In the tooltip, the word ‘alert’ will be next to the parameter which caused the alert.
- If the row is white-colored, the rate analysis was successful.
Analysis execution order: If the analysis is being executed on several jobs which include the same tariff, these jobs will be resolved consistently and the oldest job will have the highest priority. The next analysis of the job will be started only after the previous one is completed.
Understanding and Working with Provider Import Templates
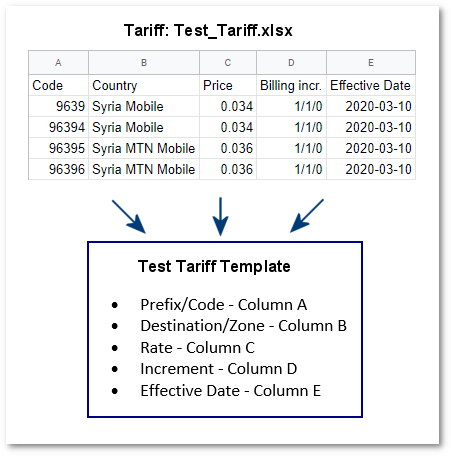
A Template is created when a Tariff/Rating Plan first needs importing, and can then be reused every time an update is required. Templates can also be amended at a later point if the format of the original file is altered. Import Templates are highly flexible and support many Rating Plan formats; they, therefore, include many options that may not need configuring for the more common simpler Tariffs/Rating Plans.
The Templates work by mapping the contents of an Excel sheet, and its format, to the information required in the Database. By configuring this information the data is then uploaded into the System and converted into the correct format.
This is illustrated in the diagram below:
Tip Before You Begin: Import Templates are specific to individual Tariffs/Rating Plans, so when creating a new Import Template for the first time it is important to have easy access to the Tariff/Rating Plan involved. A good tip for working with this - if you happen to have two monitors on your computer - is to display the Tariff/Rating Plan for which the Template is being constructed on one monitor, and System GUI on the other. Alternatively, if only one monitor is available, open the Tariff/Rating Plan in Excel and use Alt+Tab to switch directly between the applications.
The next section is going to describe each of the settings available for configuring an Import Template.
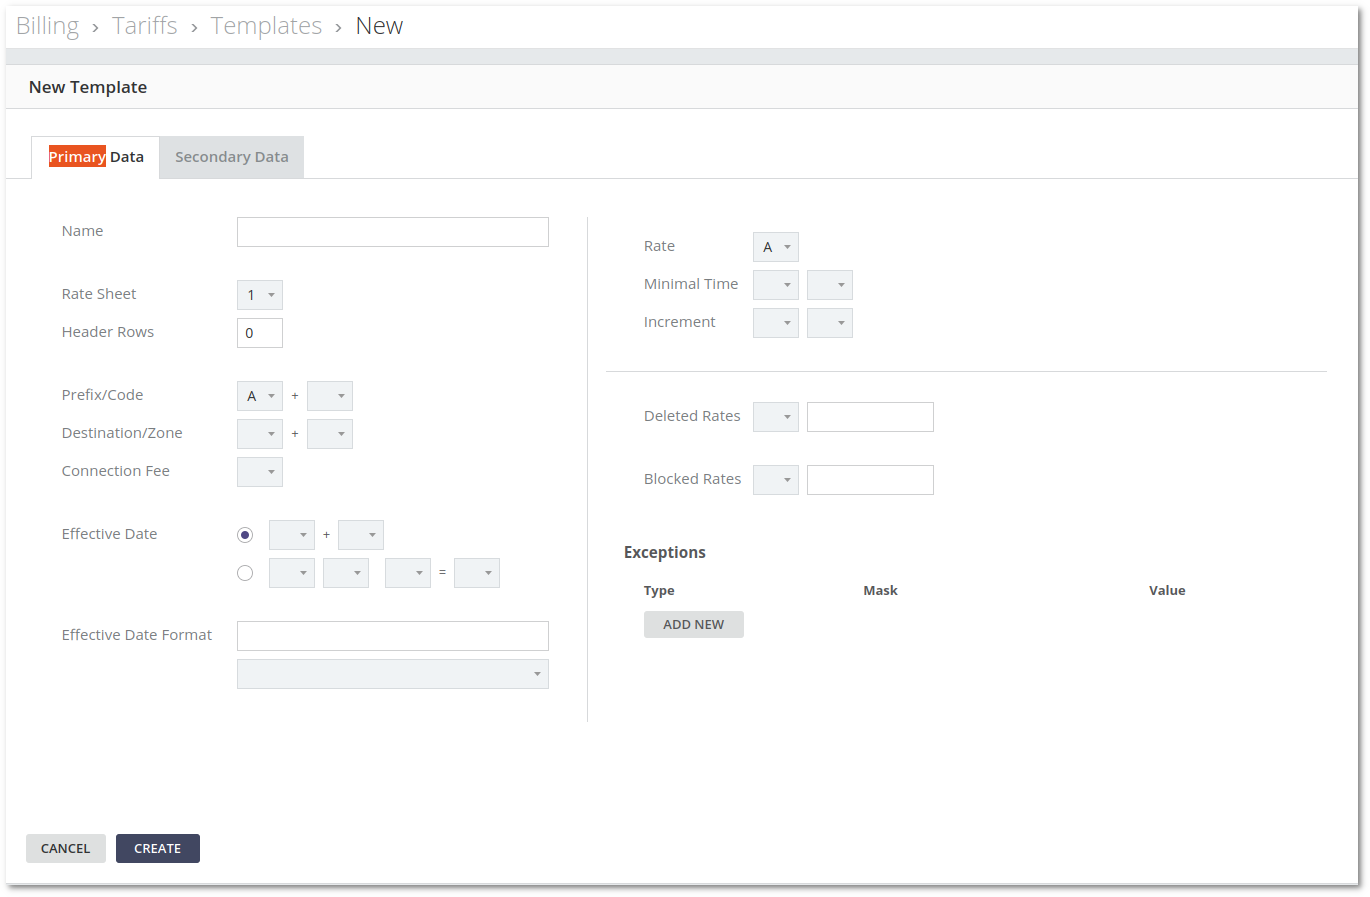
The screenshot below shows the Template Settings in the default basic view:
In this view, we can see the basic summary of the Template highlighting each of the sections that may be required to import the Tariff/Rating Plan.
Tip: Remember that if the Tariff/Rating Plan being imported does not include information relating to a particular section of the Template, then that section can simply be left blank. Many Import Templates will be very simple configuring only four or five settings from the available options.
Name
- The name of the Template can be set to any, but for better management suggested to be the name of Provider.
Rate Sheet
- The Rate Sheet field requires to be set to the corresponding Worksheet in Excel that the Rating Plan information is held on.
- This means that Rating Plans that contain multiple sheets can still be imported.
- Example:
- In provided Tariff/Rating Plan below - Destinations, Prefixes, and Rates are stored in the second (“Numberplan”) Worksheet.
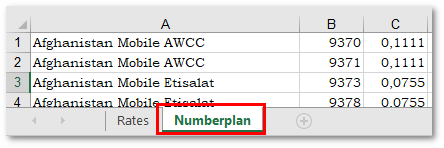
- Accordingly, Template’s Rate Sheet value must be set to 2.

Header Rows
- Header Rows setting requires to be set to inform the System of the rows at the top of the Tariff/Rating Plan that are to be ignored when importing meaningful data.
- If Header Rows are set incorrectly, there is a possibility that the Tariff/Rating Plan will not be imported at all or with errors because of wrongly processed data.
- Example 1:
- Provided Tariff/Rating Plan below meaningful data starts from Row 1.
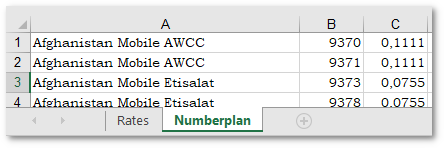
- This means there are no rows to skip/ignore for the Header Rows setting.
- Accordingly, Template’s Header Rows value must be set to 0.

- Example 2:
- Provided Tariff/Rating Plan below meaningful data starts from Row 23.
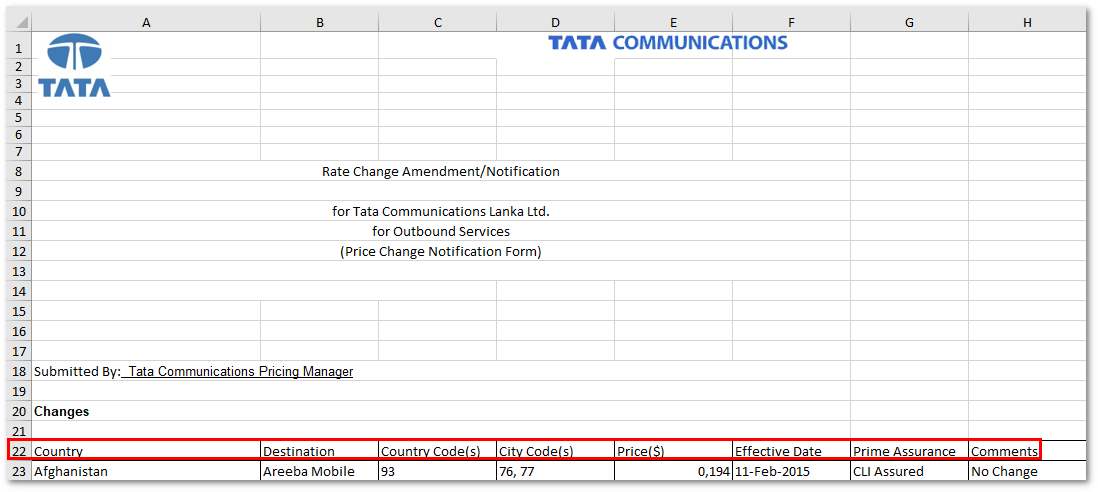
- This means there are 22 rows to skip/ignore for the Header Rows setting.
- Accordingly, Template’s Header Rows value must be set to 22.

Prefix/Code
- Prefix/Code requires to be set to match the Tariff/Rating Plan Prefix column.
- On some occasions, there may be two columns (like Country Code, City Code) which the System is also able to handle if Template settings are correct.
- Sometimes provided multiple Prefixes are displayed in singular cell format like “71-76”, “55,551,552,55257” or “370, 371, 372-376, 3772”, such formats are parsed automatically and do not require additional configuration.
- Example 1:
- Provided Tariff/Rating Plan below has only one Prefix column which is B.
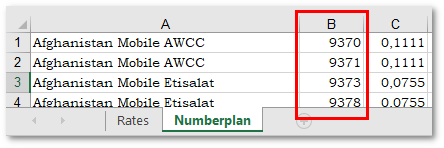
- Accordingly, Template’s Prefix/Code value must be set to B.

- Example 2:
- Provided Tariff/Rating Plan below has two Prefix columns which are C and D.

- Accordingly, Template’s Prefix/Code values must be set to C and D in exact order.

Destination/Zone
- The Zone drop-down list box identifies the Column in the Excel sheet that contains the Zone name.
- If there is only one Column containing this information then only one of the dropdown boxes needs to be completed. However, if the Zone is in two Columns then both of the drop-down boxes can be completed to identify this. In this scenario, the blank fields on either side of the second box can be used to format the Zone name.
- Example: A Rate Plan includes the following information:

- The Zone import is configured with Columns A and B and the separator fields with space “Column B”, as shown:

- This means that the Zone name will be displayed as Brazil Mobile
- Example 1:
- Provided Tariff/Rating Plan below has only one Destination/Zone column which is A.
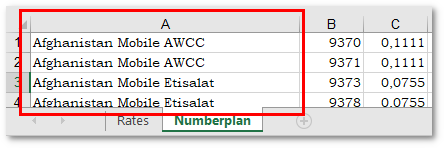
- Accordingly, Template’s Destination/Zone value must be set to A.

- Example 2:
- Provided Tariff/Rating Plan below has two Destination/Zone columns which are A and B.

- Accordingly, Template’s Destination/Zone values must be set to A and B in exact order.

Connection Fee
- While uncommon in wholesale, some Rating Plans being imported may still include a fixed Connection Charge - a one-off charge applied when the call is connected.
- If required, the Connection Charge drop-down list box can be used to identify the Column containing such a charge in the Rate Plan being imported.
Effective Date
- The Effective Date options determine in which Column(s) the Date and Time information for the imported rates can be found.
- Multiple options are provided to support different Spreadsheet formats.
- Some Tariff/Rating Plan Providers split Effective Date data between two Worksheets, whereas in the first Worksheet there are Destinations with the Effective Date, and in the second Worksheet - Destination, Prefix, and Rate data. Configuration of such cases is provided in Example 3.
- Example 1:
- Provided Tariff/Rating Plan below has an Effective Date column which is F.

- Accordingly, Template’s Effective Date value can be set to F.

- Example 2:
- Provided Tariff/Rating Plan below has an Effective Date column which is F and Effective Time which is G.

- Accordingly, Template’s Effective Date values can be set to F and G.

- Example 3:
- Provided Tariff/Rating Plan below in the first Worksheet shows the Destination (Column A) and Effective Date (Column D).
- In the second Worksheet, there is Destination (Column A), Prefix (Column B), and Rate/Price (Column C).

- The first dropdown configures from which Worksheet takes Effective Date data (which in this example’s case is Worksheet 1 (Rates)).
- The second dropdown configures the Effective Date column from the secondary Worksheet.
- The third dropdown configures by which the secondary Worksheet column does the mapping with the primary Worksheet (which in this example’s case is Destination from Worksheet 1 (Rates) Column A).
- The fourth dropdown configures by which the primary Worksheet column does the mapping with the secondary Worksheet (which in this example’s case is Destination from Worksheet 2 (Numberplan) Column A).
- Accordingly, Template’s Effective Date values can be set to 1, D, A = A.

Effective Date Format
- After selecting the Column, the Format field is used to specify the format of the information held in the Rate Plan.
- Some suggested formats already exist in the dropdown, which can be selected or used as an example to create a custom one if it is not present in the dropdown.
- Example:
- Provided Tariff/Rating Plan below has an Effective Date column which is F.

- Accordingly, Template’s Effective Date Format value can be selected from the dropdown with suggested formats.

Rate
- Rate requires to be set to match the Tariff/Rating Plan Rate/Price column.
- Example:
- Provided Tariff/Rating Plan below has a Price column which is E.

- Accordingly, Template’s Rate value must be set to E.

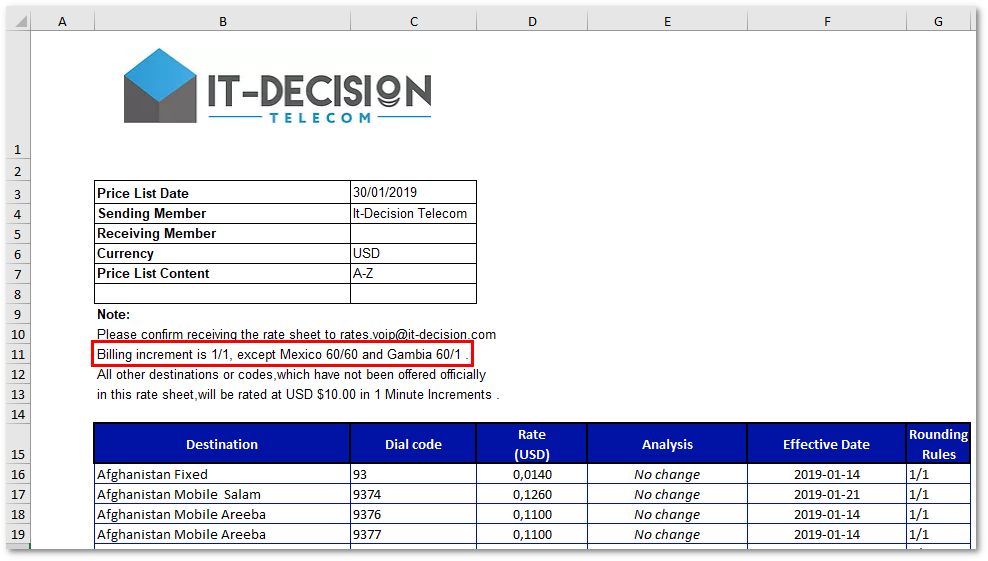
Minimal Time
- Minimal Time can be set to match the Tariff/Rating Plan Minimal Time column.
- Example 1:
- Provided Tariff/Rating Plan below has a Minimal Time column which is E.

- Accordingly, Template’s Minimal Time value can be set to E.

- Example 2:
- Provided Tariff/Rating Plan below has a Minimal Time column which is D and in the first place of the “x/y/z/” fields.
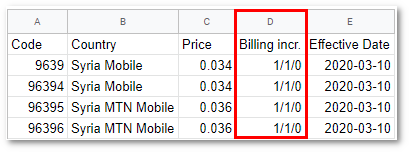
- Accordingly, Template’s Minimal Time value can be set to D and field 1.

Increment
- Increment can be set to match the Tariff/Rating Plan Increment column.
- Example 1:
- Provided Tariff/Rating Plan below has an Increment column which is F.

- Accordingly, Template’s Increment value can be set to F.

- Example 2:
- Provided Tariff/Rating Plan below has an Increment column which is D and in the second place of the “x/y/z/” fields.

- Accordingly, Template’s Increment value can be set to D and field 2.

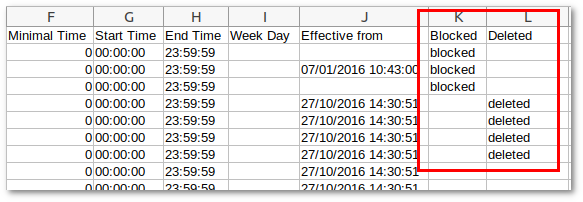
Deleted and Blocked rates.
If Providers send a Rates Sheet with the price "-1", which means, that this Destination is blocked, the system will block a route to particular Destinations.
Exceptions
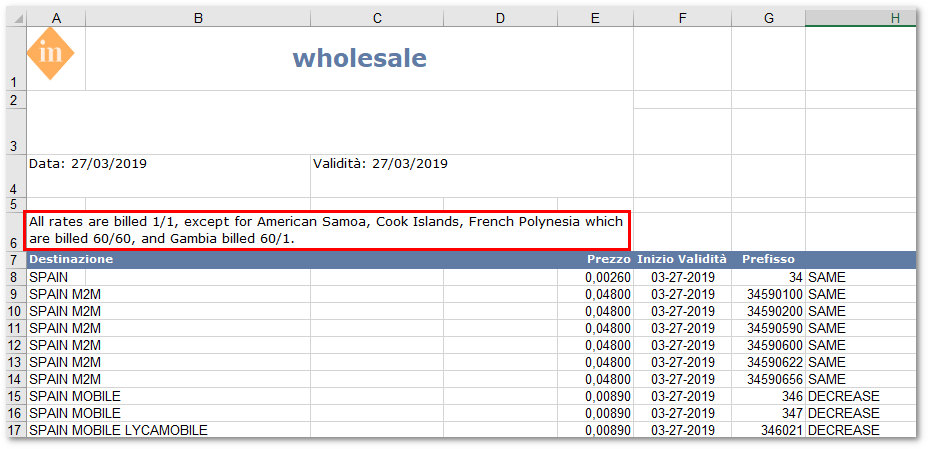
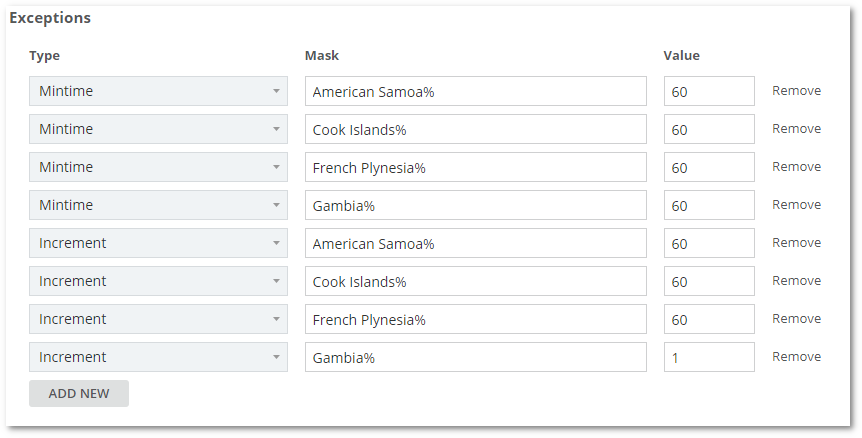
- Exceptions allow additional data manipulation when specific rules are defined separately in the provided Tariff/Rating Plan. Exceptions are set in Templates (BILLING > Tariff Import > Import Rules > Templates > EDIT). The Mask field allows defining which Destinations/Zones should have exceptional values set. % can be used as a wild card to match part of a text in Destination/Zone. Mask looks for Destination/Zone values as they are within the tariff sheet file. See examples below:
Exceptions fields are case-INsensitive. This means that, if the file contains MEXICO, you can create a template as meXIco, and the system will still find and replace it.
Do not put % in front of the text, it already acts like there would be a wild card by default.
Creating and Configuring Rate Import Rules
Rate Import Rules are relevant to the importing of Provider Rates and specify actions to be taken if the rule is broken.
The actions available are:
- None (ignore this rule)
- Alert (notify the Administrator)
- Reject Rate (automatically reject the rate which breaches this rule)
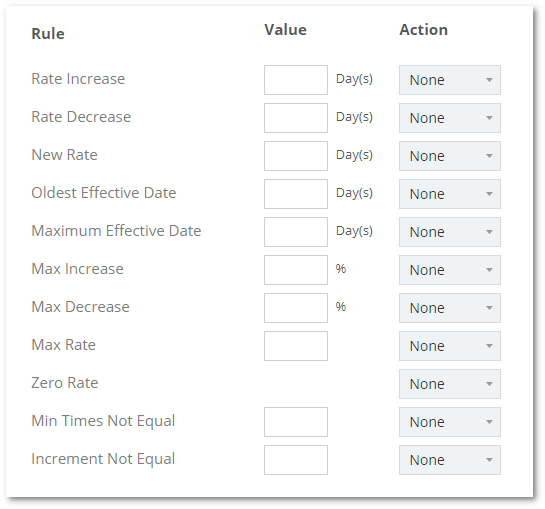
Example: The first Rate Import Rule is the rate increase rule. The variable for this rule is the number of days, 7 days by default. What this means is that when a Provider Tariff/Rating Plan is uploaded and a rate increase is detected with an Effective Date less than 7 days into the future the action that has been configured will be triggered. The rate could be automatically rejected, or an alert about this rating entry was raised.
Available Rate Import Rules with an explanation of each one of them:
Rate Increase
- If updating existing Rate, whose Rate (Price) increases and takes into effect earlier (by days compared to importing effective from) than set in Rule, then set action will be taken.
- Value can be set to any integer between 0 and 30 which represents the day(s).
Rate Decrease
- If updating existing Rate, whose Rate (Price) decreased and takes into effect earlier (by days compared to importing effective from) than set in Rule, then set will be taken.
- Value can be set to any integer between 0 and 30 which represents the day(s).
New Rate
- If creating a new non-existing Rate, which takes into effect earlier (by days compared to importing effective from) than set in Rule, then set action will be taken.
- Value can be set to any integer between 0 and 30 which represents the day(s).
Oldest Effective Date
- If updating existing or creating a new Rate, whose new Effective Date is earlier (by days) than set in Rule, then set action will be taken.
- Value can be set to any integer between 0 and 365 which represents the day(s).
Maximum Effective Date
- If updating existing or creating a new Rate, whose new Effective Date is later (by days) than set in Rule, then set action will be taken.
- Value can be set to any integer between 0 and 365 which represents the day(s).
Max Increase
- If updating the existing Rate, whose Rate (Price) increased more by percentages than set in Rule, then set action will be taken.
- Value can be set to any decimal between 0 and 500 which represents Rate’s (Price’s) percentages.
Max Decrease
- If updating the existing Rate, whose Rate (Price) decreased more by percentages than set in Rule, then set action will be taken.
- Value can be set to any decimal between 0 and 100 which represents Rate’s (Price’s) percentages.
Max Rate
- If updating existing or creating a new Rate, whose Rate (Price) is higher than set in Rule, then set action will be taken.
- Value can be set to any decimal between 0 and 100 which represents Rate’s (Price’s) value.
Zero Rate
- If updating the existing or creating a new Rate, whose Rate (Price) is zero, then a set action will be taken.
Min Times Not Equal
- If updating existing or creating a new Rate, whose new Min Time value does not match any from the set Rule, then set action will be taken.
- Acceptable value format is: “x,y,z,w”
- Where x, y, z, and w must be integer values between 0 and 7200.
- Must be separated by a comma (,).
- Must not have any spaces.
- Must not have leading zeros, unless it is only a zero.
- Limited to max 10 values.
- Examples:
- 0,100,60,7200
- 0,1,60
- 1,60
- 1
Increment Not Equal
- If updating existing or creating a new Rate, whose new Increment value does not match any from the set Rule, then set action will be taken.
- If updating existing or creating a new Rate, whose new Min Time value does not match any from the set Rule, then set action will be taken.
- Acceptable value format is: “x,y,z,w”
- Where x, y, z, and w must be integer values between 0 and 7200.
- Must be separated by a comma (,).
- Must not have any spaces.
- Must not have leading zeros, unless it is only a zero.
- Limited to max 10 values.
- Examples:
- 0,100,60,7200
- 0,1,60
- 1,60
- 1
Tariff Import Rules
The main Tariff Import Rules page shows all the Tariff Import-specific rules in the system. Here you can add new rules by clicking the button at the upper-right corner. Also, you can Edit/Delete selected Rules with the relevant buttons. The first column ACTIVE? allows you to activate or deactivate a specific Rule by clicking the YES/NO buttons. If you would like to change the order of the Rules, Drag&Drop functionality is available.
Follow the steps below to create Tariff Import Rules:
By clicking the 'ADD NEW TARIFF IMPORT RULES button, you are presented with the following settings:
- Name - Name of the Rules
- Rate Import Rules - Select the Rate Import Rules you would like to use
- Target Tariff - The Tariff for which the changes will be applied. The target tariff in M4 can be Buy or Sell tariff. The target tariff in M4 can be any Wholesale tariff (Provider and Users).
- Import Type - you can choose between 2 options: Add/Update and Replace All Rates
- Add/Update - new rates will be added from the file and existing ones will be updated
- Replace All Rates - existing rates will be deleted and new ones imported from the file
- Delete rates if not present - delete Rates for Prefixes that are not present in the imported file (available only with Import Type: Add/Update)
- Import Template - Template to be used
- Effective Date - Effective Date value to be used with Rates
- Template - Inline - Use Effective Date from File set by Template setting (see: Template)
- Subject - Use Effective Date from Email's Subject
- Email Body - Use Effective Date from Email's Body (Example)
- File Name - Use Effective Date from File (Attachment) Name
- Prefix - the text after which the Effective Date is specified.
- Date Format - date format in which Effective Date is specified. See available formats here.
- Time Zone - used to convert Effective Date file timezone to system timezone.
- Manual Review - Import automatically or wait for manual confirmation
- Reject Import if errors found - Tariff Import will be rejected if at least one error will be found * after analyzing
- Stop processing more Rules - Matching with Email Details and Active Tariff Import Rules will be in a specific order (from Tariff Import Rules List, from top to bottom). Email assigning will be stopped on this Rule if this option is enabled
- Default Effective From - Effective From value in Rates, when invalid value supplied from file
- Default Connection Fee - Set Connection Fee for Rates if it is not present or invalid in Import File
- Default Increment - Set Increment for Rates if it is not present or invalid in Import File
- Default Minimal Time - Set Minimal Time for Rates if it is not present or invalid in Import File
To edit the above parameters on Import Rules, which were previously used, you have to delete Processes related to those rules.
Email/Attachment Validation
Email/Attachment Validation section is used for specifying which emails where will be used by Tariff Import Rules. There are five fields. The first four are for email and the fifth is for the attachment.
- Mail From - Email Address(es). Multiple emails can be separated by ;.
- Sender Name - Senders name.
- Mail subject - Emails subject.
- Mail text - Emails text.
- File Name - Attachments file name.
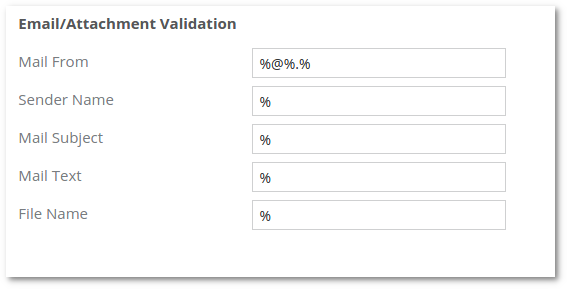
Wildcard % is allowed, which substitutes any character with any length. An example is shown in the image below
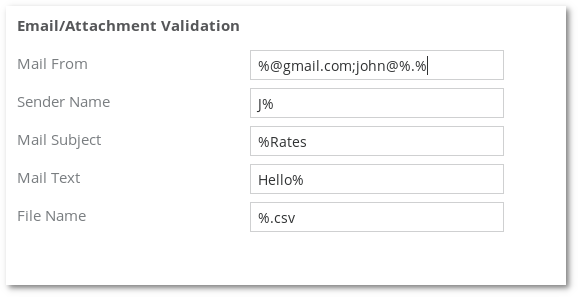
- Mail From has two values %@gmail.com and john@%.%.
- %@gmail.com specifies it is any Gmail email address.
- john@%.% specifies it is john from any email client.
- Sender Name J% any value That starts with uppercase J
- Mail Subject %Rates Subject ends with word Rates
- Mail Text Hello Mail Text Starts with the word Hello
- File Name %.csv filename ends with .csv
Notifications
Email Notifications are used to generate email notifications to an internal or external list of recipients.
Follow the steps below to create and configure a notification Template.
- Create an Email Template. Manual on how to create Email Templates can be found here: M4 Emails. Additional Email variables: tariff_job_id, tariff_job_analysis_url, tariff_job_tariff_id, tariff_job_tariff_name.
- Select created Email Template from the Email Template dropdown. The subject field will fill in automatically.

- Enter Email Address(es) in the Recipients field. Multiple Email Addresses must be separated by ;.
- Repeat the same process for desired Import Triggers.

Date Format
Data Format should be written in symbolic form, constructed from various elements. Could look like this %d-%m-%Y and this covers such date as 01-02-2021 (day-month-year). There are several ways how to describe it:
YEAR
- %Y - year (2021)
- %y - last two digits of the year (00..99)
MONTH
- %m - month (01..12)
- %b - locale's abbreviated month name (e.g., Jan)
- %B - locale's full month name (e.g., January)
DAY
- %d - day of the month (e.g., 01)
Tariff Link Attachment Rules
Sometimes providers send emails with the URL to download the rates list instead of the rates file.
Tariff Link Attachment Rules are for attachment extraction from the link only.
Here you can list, edit, or create new rules.
To change rules priority just drag the rule up or down.
Rule structure:
- Name - Rules name.
- String Start - String Start defines where to start to search for attachment links in email text or a web page.
Value: search word or phrase. Leave empty to start a search from the beginning. Example (String Start - can be downloaded):
Hello,
Attachments can be downloaded from here: http://www.example.com
Thank you for using our services
- String End - String End defines where to stop to search for attachment links in email text or a web page.
Value: search word or phrase. Leave it empty to search till the end. Example (String End - Thank you):
Hello,
Attachments can be downloaded from here: http://www.example.com
Thank you for using our services
- Link Pattern - Link pattern is used to search for particular links.
Value: link or its fragment. Examples:
https://www.example.com
https://www.example.com/example
example.com/example
Inbox
The Inbox is a type of email inbox available within the System that allows the Rating. Administrator to view and manage Provider Tariffs/Rate Notifications that have been sent to the System's Email Address.
Caution: The Inbox functions in a similar way to the email inbox of your desktop or web-based email client, with emails sent to the platform’s email address being displayed and stored in the inbox. The Inbox also includes additional functionality to support Provider's Rate Import procedures and processes. However, it is important to understand that the Rate Inbox is designed to manage received emails and not to be a “full email client”. This means that it is not possible to Reply To or Forward emails that are received into the Rate Inbox.
Inbox Interface:
The Inbox consists of 3 views: Inbox, Completed, and Junk.
Inbox - is the primary working inbox. It is this view that will show emails that have been received that have an associated task that requires carrying out. That task might be to review and commit an update, assign Tariff Import settings, or a number of other actions. Emails will remain visible in the Action Required view until the associated rate update is committed, or they are manually completed or deleted.
Completed - Fully processed emails are shown in the completed tab. Fully processed means that all of the email attachments had been assigned to at least one of the Tariff Import Rules and Tariff Job which is completed.
Junk - Emails that are deleted from Junk will be removed permanently, not displayed in the deleted view.
Tariff Inbox basics
- Email column - Sender name, email address, and subject
- Email details button - toggles email details
- Attachments list
- Attachments file type list
- Import jobs associated with attachments
- Import jobs button - toggles import jobs(if there are more than one tariff import job)
- Attachment mapping status
- Processing note
- Inbox view tab
- Completed view tab
- Junk view tab
- Select all emails checkbox
- Select a single email checkbox
- Delete Selected emails
- Refine Results - shows fields to filter emails
Email Details
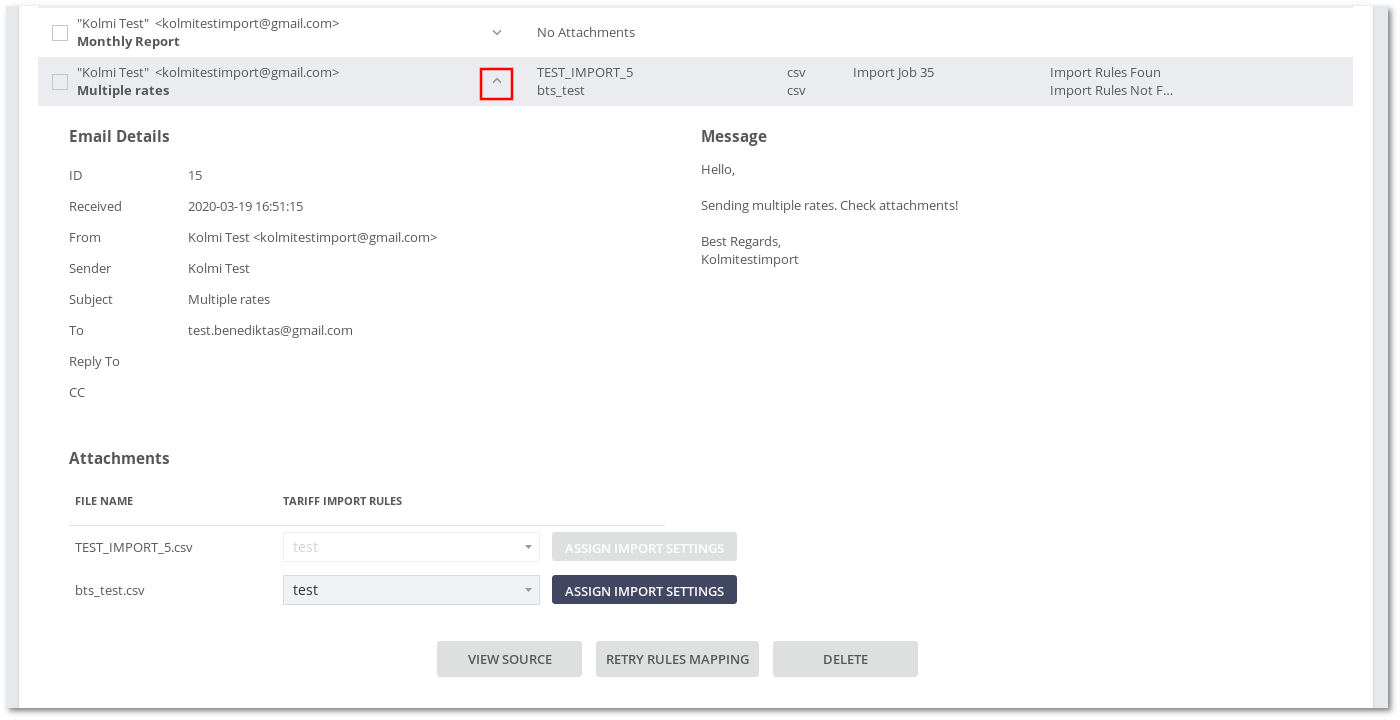
Email details are toggled by pressing the arrow button in the Email column. There are four sections: Email Details, Message, Attachments, and function buttons.
- Email Details section shows detailed email information such as ID, Received, From, Sender, Subject, To, Reply to, and CC.
- Message section contains emails message.
- Attachments section shows attachments associated with email.
- The Last Section represents three function buttons.
Filter Emails
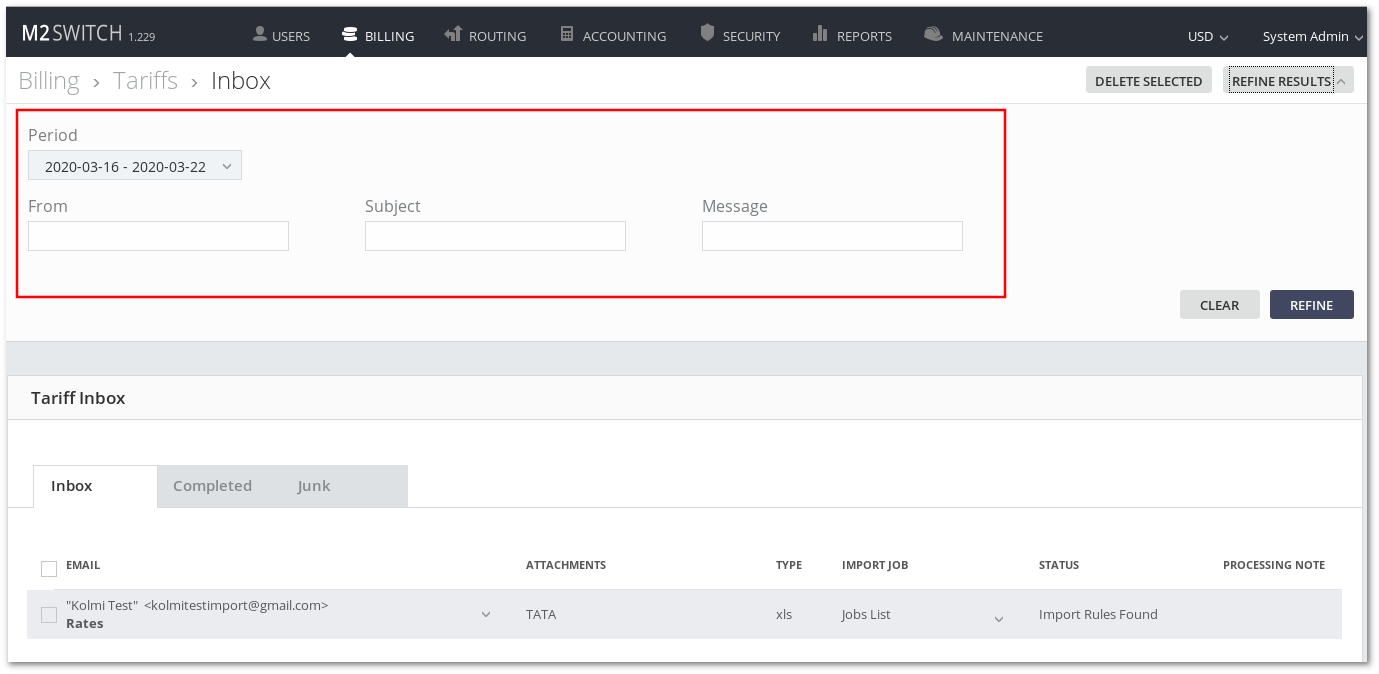
Email filtering is done by pressing the Refine Results button in the top right corner of the Tariff Inbox.
There are four fields:
- Period - the period between emails were received.
- From - email or sender name.
- Subject - email subject.
- Message - email message.
Press Refine button to see the results.
Press clear to clear fields.
Delete Emails
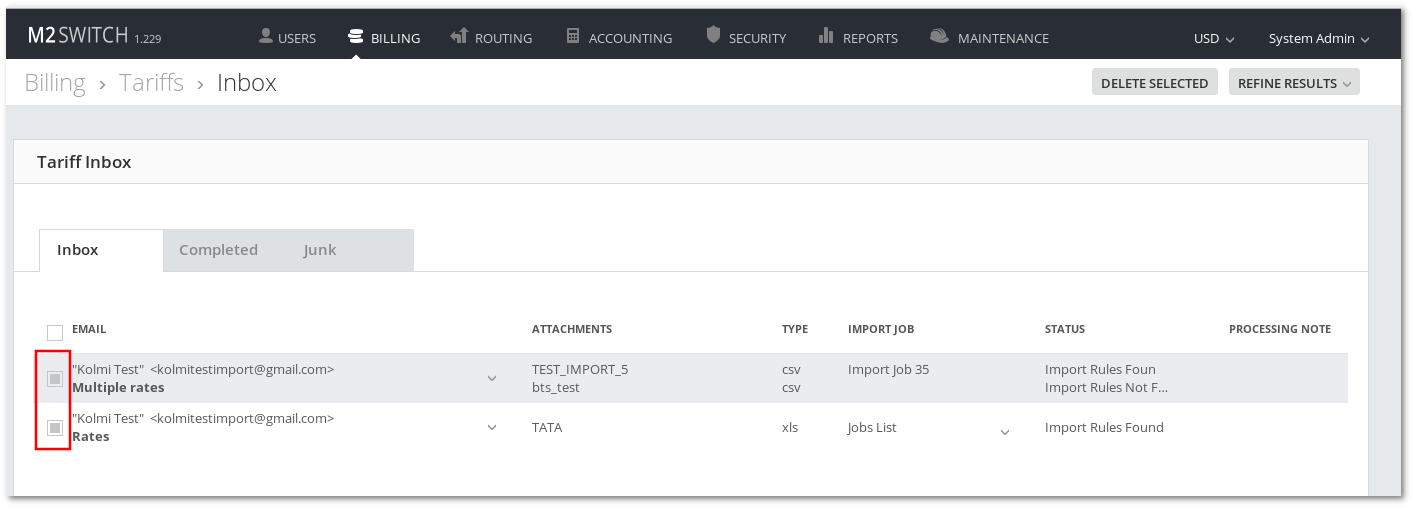
To delete emails, select emails by clicking their checkboxes.
Then press Delete Selected button on the top right side of the Tariff Inbox
After that, selected emails will be in a Junk view. To delete permanently, repeat the process in Junk view.
To select all emails, click on the top checkbox near the Email column heading.
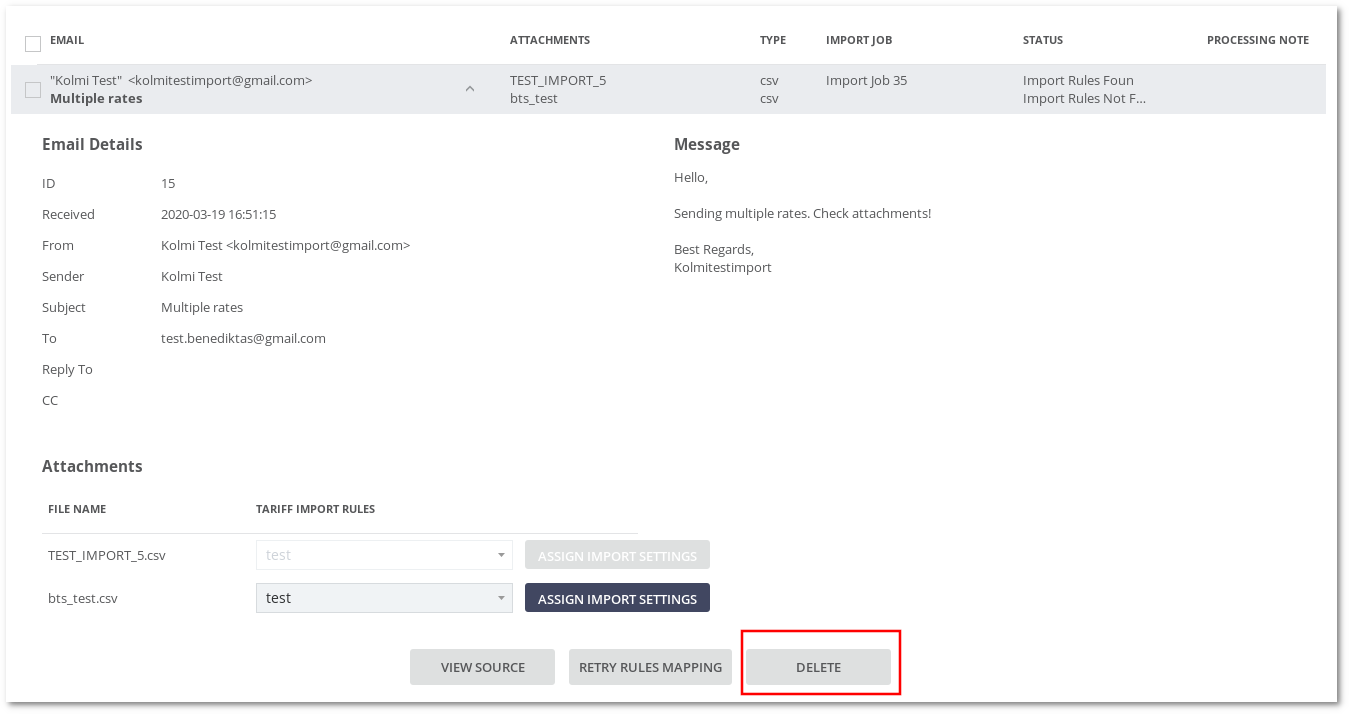
Also, email can be deleted by toggling Email Details and pressing the Delete button
Manually assign Tariff Import Settings
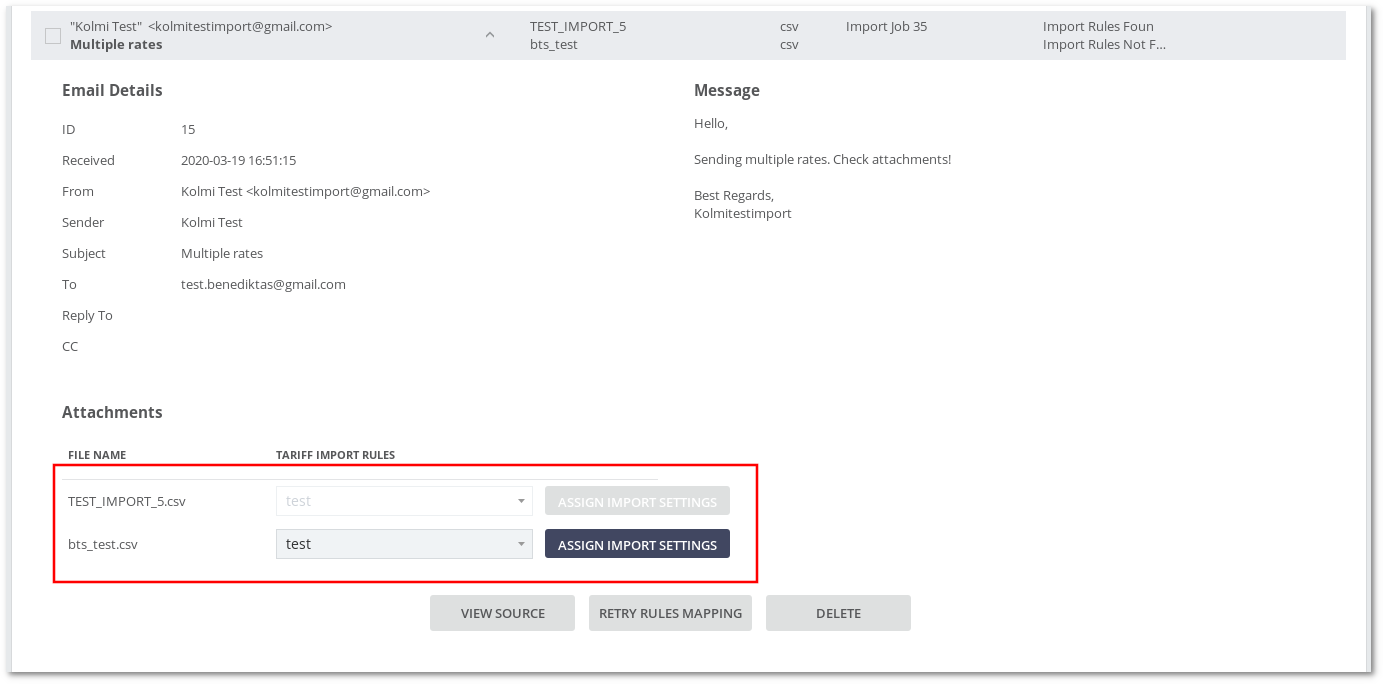
It is possible to manually Assign Tariff Import Settings.
- Toggle Email Details
- Select Tariff Import Rules for specific attachment
- Press Assign Import settings
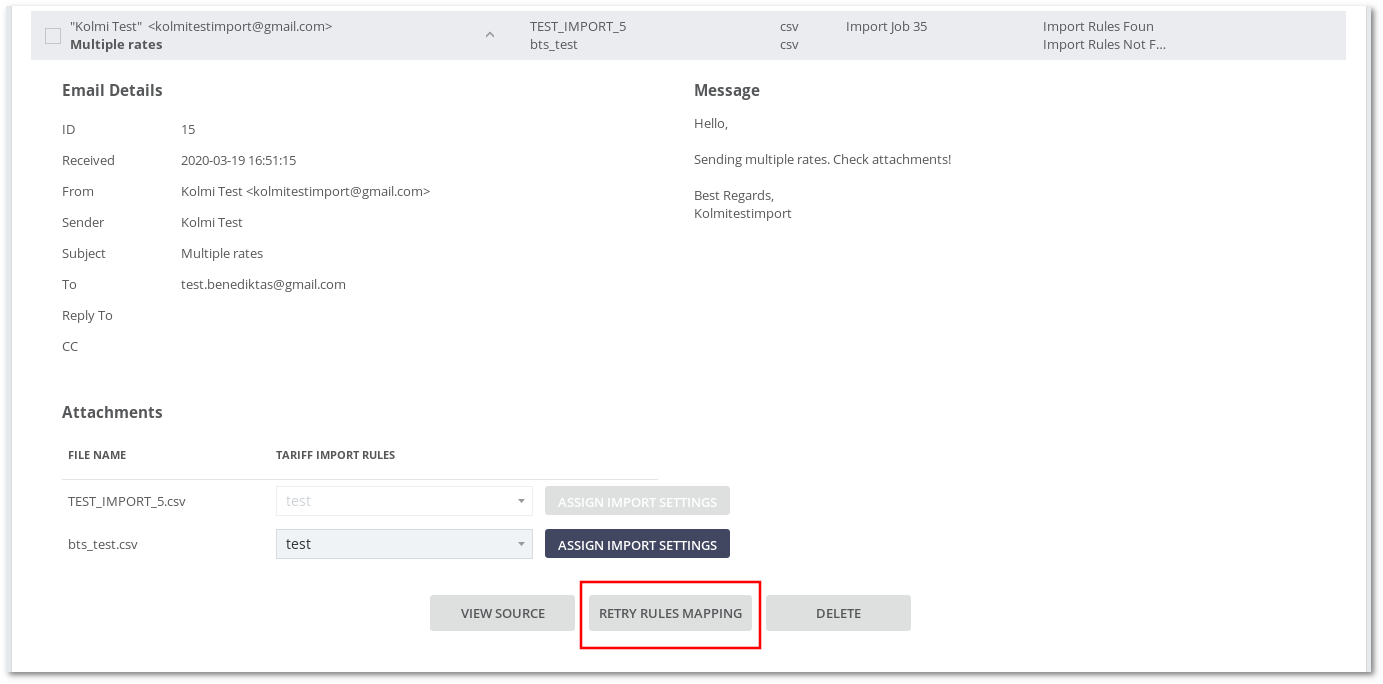
Retry Rules mapping
If an email with multiple attachments has attachments with no import rules it is possible to retry rules mapping. It's simple, press Retry Rules mapping.
Note: It’s not possible to Retry Rules mapping if all email attachments will have at least one import rule assigned to them.
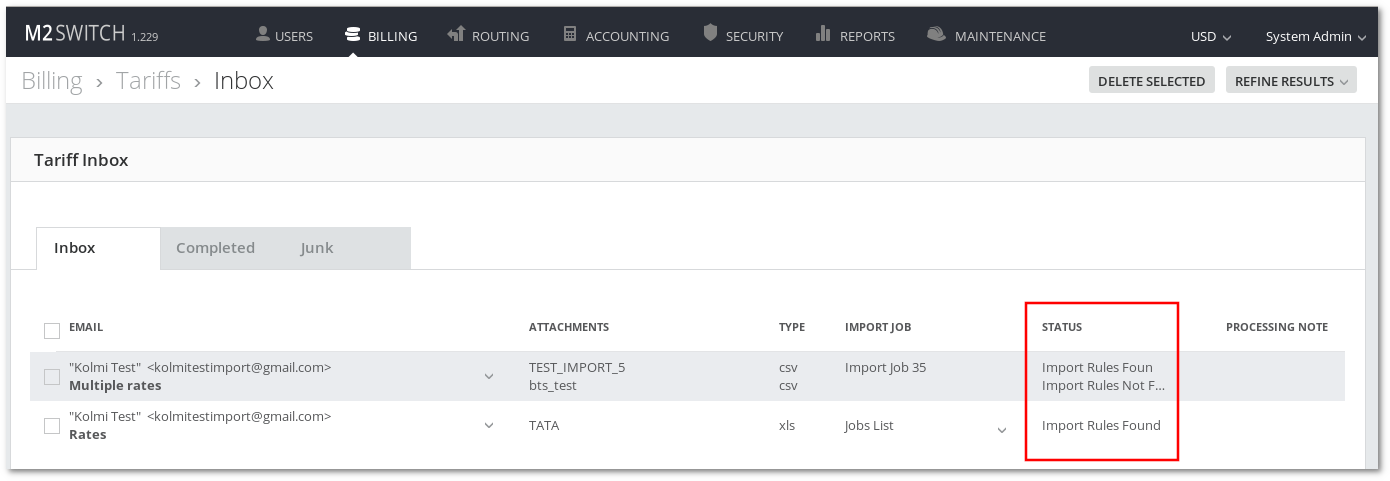
Attachment mapping status
Attachment mapping status(Status column in Emails list) indicates if Tariff Import Rules mapping was successful or not.
- Import Rules Found - attachment was mapped successfully with at least one of the Tariff Import Rules.
- Import Rules Not Found - attachment was not mapped to any of the Tariff Import Rules or there were no Tariff Import Rules to map.
- Invalid Effective Date/Format for Tariff Import Rules - Invalid attachment date or its format compared to Tariff Import Rules settings. Numbers after the status text represent Tariff Import Rules IDs.
Email Example
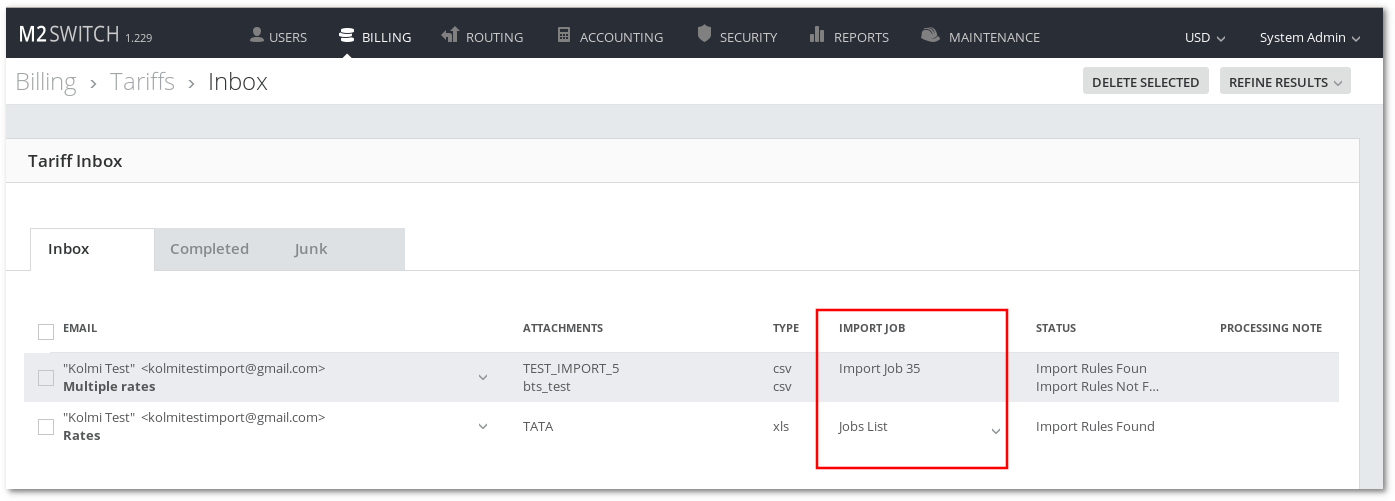
Email can have one or multiple attachments. Every attachment will be processed individually. Attachment can have one or multiple Import Jobs which are dependent on the number of mapped Tariff Import Rules.
If there are multiple Tariff Jobs they will be shown as a toggle list. To toggle the list, simply press the arrow button next to the Jobs list caption.
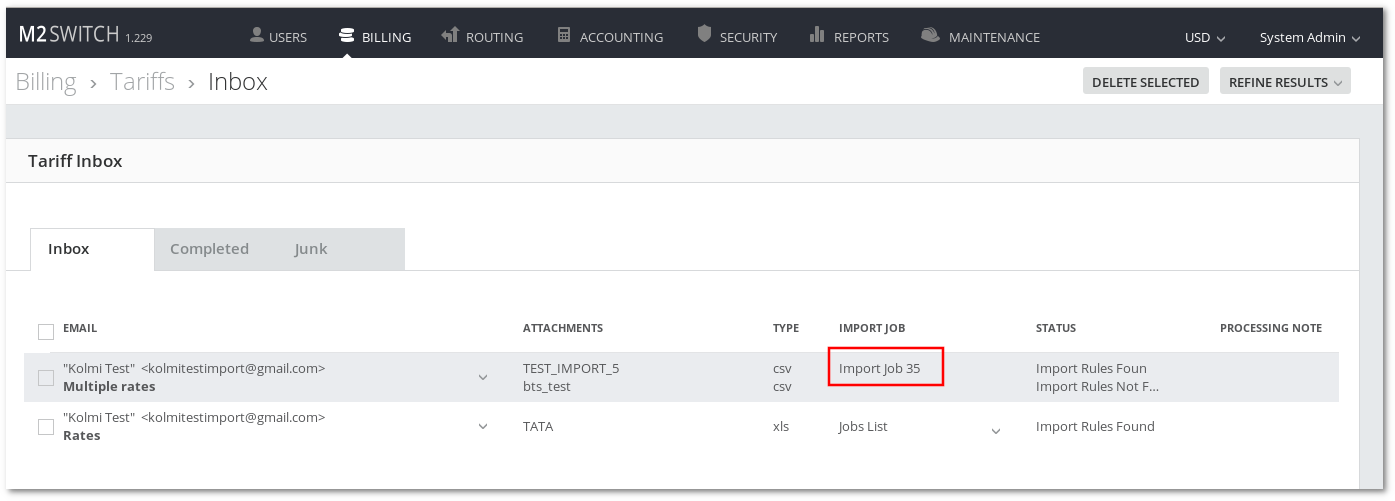
To see Job details click on any Import Job. The page will be redirected to the Tariff Jobs list.
Detailed Import Examples
Template Examples
