Difference between revisions of "DID Import from CSV"
| (4 intermediate revisions by 2 users not shown) | |||
| Line 1: | Line 1: | ||
=Description= | =Description= | ||
''DID Import from CSV'' functionality allows creating '''DIDs''' and '''DID Rates''' by uploading a valid CSV file with necessary information. | ''DID Import from CSV'' functionality allows creating '''DIDs''' and '''DID Rates''' by uploading a valid CSV file with necessary information. | ||
If Device ID is specified during the import, '''DIDs''' get assigned to Devices. | |||
The procedure is completed within the six following steps: | The procedure is completed within the six following steps: | ||
# File upload; | # File upload; | ||
| Line 48: | Line 51: | ||
"540554742477";"1";"en";"No comments";"0,6192";"0,4914";"0,472" | "540554742477";"1";"en";"No comments";"0,6192";"0,4914";"0,472" | ||
"775527580616";"1";"vw";"";"0,8793";"0,4397";"0,3471" | "775527580616";"1";"vw";"";"0,8793";"0,4397";"0,3471" | ||
DID;DeviceID | |||
577471314079;29 | |||
633465851462;29 | |||
743666501101;32 | |||
540554742478;32 | |||
775527580617;54 | |||
=Separator selection (Step 1)= | =Separator selection (Step 1)= | ||
| Line 71: | Line 81: | ||
The ''Column confirmation'' step is dedicated to review the [[DID_Import_from_CSV#Column_assignment_28Step_2.29|''Column assignment'']] results. Assignment mistakes might be corrected by using the '''Back''' button. When satisfied with the result, '''Confirm columns''' button should be pressed in order to go to the next step.<br> | The ''Column confirmation'' step is dedicated to review the [[DID_Import_from_CSV#Column_assignment_28Step_2.29|''Column assignment'']] results. Assignment mistakes might be corrected by using the '''Back''' button. When satisfied with the result, '''Confirm columns''' button should be pressed in order to go to the next step.<br> | ||
'''Notes:''' | '''Notes:''' | ||
* Only those columns that can be imported by current User are displayed in this step (eg. Simple Resellers | * Only those columns that can be imported by current User are displayed in this step (eg. Simple Resellers cannot view columns such as Provider ID, Grace Time, etc.); | ||
* When manual value is selected for a column this value is shown in this step as well; | * When manual value is selected for a column this value is shown in this step as well; | ||
* When neither column, nor manual value is selected the column is left empty (default will be assigned). | * When neither column, nor manual value is selected the column is left empty (default will be assigned). | ||
Latest revision as of 11:52, 27 January 2021
Description
DID Import from CSV functionality allows creating DIDs and DID Rates by uploading a valid CSV file with necessary information.
If Device ID is specified during the import, DIDs get assigned to Devices.
The procedure is completed within the six following steps:
- File upload;
- Separator selection (skipped when separators determined automatically match the system configuration);
- Column assignment;
- Column confirmation;
- Analysis;
- Import.
Note: each step is covered in more detail below.
Availability
- DID Import from CSV is available from MOR X10.
- The functionality can be used by the System Admin, Resellers (if allowed to create dids) and Accountants with a Manage DIDs permission.
File upload (Step 0)
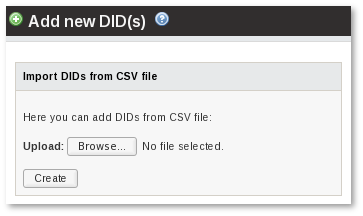
DID Import from CSV procedure starts in the DIDs list by clicking on the Add new DID(s) link. At the bottom of the DID creation form lies a CSV upload form. Here by selecting a valid CSV file and pressing the Create button the import operation is initialized.
File format
A valid file used in a DID import must be in a CSV format (Comma Separated Values).
A CSV Column Separator and a Decimal Separator must be set correctly in SETTINGS > Setup > Settings > Functionality:
- CSV Column Separator,
- CSV Decimal Separator.
CSV Columns could and sometimes should be enclosed within quotation marks ("). Possible closure cases:
- CSV column values include a CSV Column Separator.
Note: quotation marks within closures must be escpaed correctly in order for columns to be read as expected (eg. "test value\"escaped\"").
Required columns in a CSV file:
- DID (DID Number);
- Provider ID (not required when importing as a Simple Reseller).
Note: first line can be a header (might be useful when assigning columns).
Valid DID CSV file examples
576142556831,1,lt,Test comment,76,8,92,3706,se,4,2,0.9533,0.7166,0.94
475163135446,1,lt,35/50,75,86,61,3706,za,2,2,0.677,0.6074,0.0091
042133101573,1,lt,Special DID,83,2,15,370,mx,2,2,0.3266,0.1375,0.503
345177485331,1,it,DID for Reseller,123,65,92,,ml,4,2,0.1266,0.9194,0.0383
"DID";"Provider ID";"Language";"Comment";"Provider Rate";"Incoming Rate";"Owner Rate"
"577471314078";"1";"mc";"Test comment";"0,1925";"0,086";"0,1874"
"633465851461";"1";"li";"Some \"escaped\" text";"0,0876";"0,0413";"0,3369"
"743666501100";"1";"bh";"Test Comment #2";"0,3488";"0,714";"0,7528"
"540554742477";"1";"en";"No comments";"0,6192";"0,4914";"0,472"
"775527580616";"1";"vw";"";"0,8793";"0,4397";"0,3471"
DID;DeviceID
577471314079;29
633465851462;29
743666501101;32
540554742478;32
775527580617;54
Separator selection (Step 1)
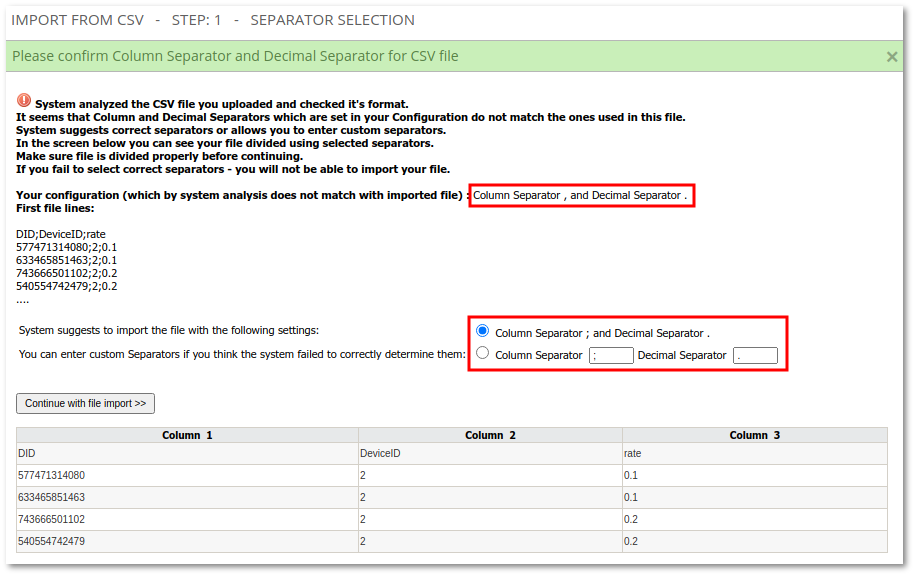
When separators predicted by the system do not match the configuration, the Separator selection step is necessary.
Column assignment (Step 2)
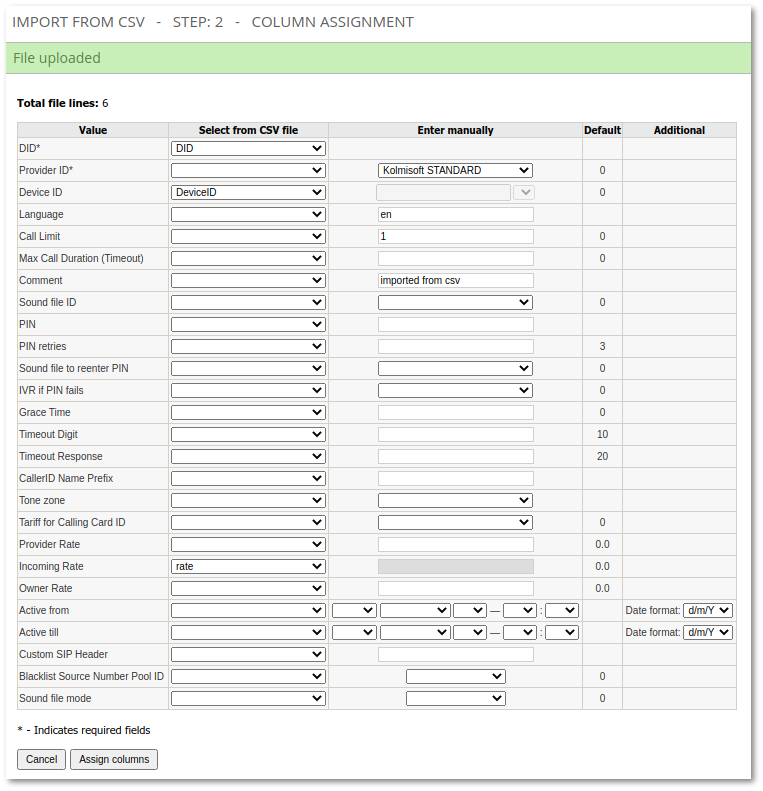
After determining the Separators, CSV file columns must be assigned to DID attributes.
- In the assignment table it is necessary to map DID attirubtes in a Value column to CSV columns in a Select from CSV file column;
- If a column is missing in the CSV file it is possible to manually enter some value in the Enter manually column. This value will be applied to all DIDs that are being imported;
- The Default column indicates default attribute values in the Database.
The page in this step also shows the first five lines of a CSV file in order to help with column assignment.
Notes:
- An asterisk (*) indicates the mandatory fields (Provider is not selected when Resellers cannot manage Providers);
- It is often practical to dedicate the first CSV file line to be a header and name the columns according to the Value column values. In this case columns will be assigned automatically (case is not relevant, spaces can be replaced with underscores (_));
- The order of priority when assigning values to DIDs is the following: CSV column > Manual value > Default value.
Column confirmation (Step 3)
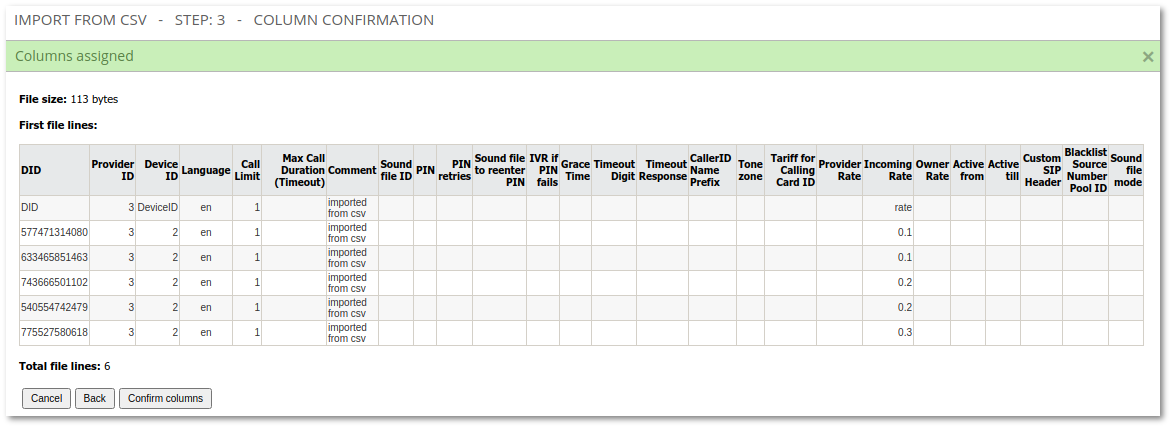
The Column confirmation step is dedicated to review the Column assignment results. Assignment mistakes might be corrected by using the Back button. When satisfied with the result, Confirm columns button should be pressed in order to go to the next step.
Notes:
- Only those columns that can be imported by current User are displayed in this step (eg. Simple Resellers cannot view columns such as Provider ID, Grace Time, etc.);
- When manual value is selected for a column this value is shown in this step as well;
- When neither column, nor manual value is selected the column is left empty (default will be assigned).
Analysis (Step 4)
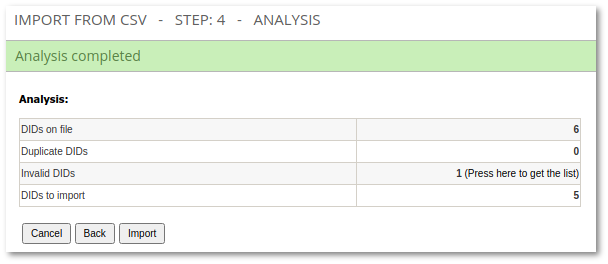
The Analysis step checks if the DIDs provided in a CSV file are valid:
- Marks duplicates;
- Checks if financial information is numeric;
- Checks if relations such as Provider ID, IVR Sound files, Users etc. exist in the system;
- Checks other numeric attributes (Timeout Digit, Grace Time etc.);
- Checks if manual values are valid. When invalid a warning is shown. If no action is taken to correct the errors default values are used.
The example analysis summary is provided in a screenshot below. By clicking on (Press here to get the list) link it is possible to view invalid DID information.
Import (Step 5)
After pressing the Import button in the Analysis step the system creates DIDs with DID Rates (when imported) and assigns them to the User performing the DID import (in case of Accountants the DIDs are assigned to the System Admin).
