Backup system
Description
The backup system backs up the MOR database and allows it to be restored at any time. This functionality is available just for System Admin.
Backup includes all database with all CDR, Invoices, Users, Providers. etc.
Configuration
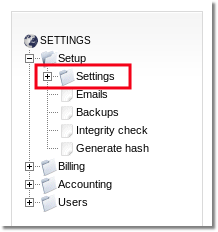
Go to SETTINGS –> Setup –> Settings

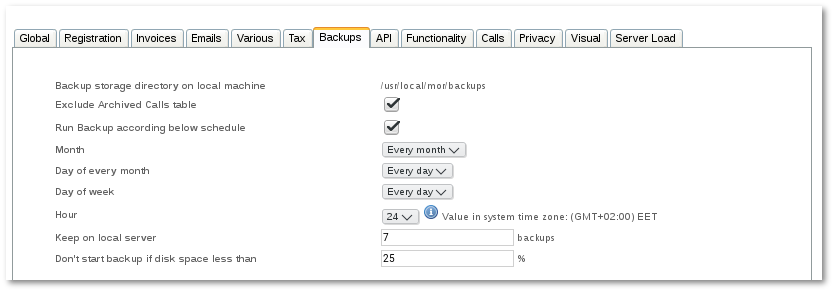
Click on Backups tab and here you can configure settings of Backups.

If Run Backup according below schedule is checked, the following settings become active:
- Month – in which month backup should be made.
- Day of every month – which day of every month backup should be made.
- Day of week – which day of the week backup should be made.
- Hour – which hour backup should be made.
- Keep on local server – how many backups to keep on the server. The system deletes the oldest one if the limit is reached.
- Don't start backup if disk space less than – checks disk space before making an auto backup.
You can find Backups folder on server by path: /usr/local/mor/backups. Archived DB Backups are named as db_dump_DateTime.sql.tar.gz. You can also find another configuration/Asterisk/GUI/etc files backup folders as well.
Manual Database Backup
1. Connect via ssh to your server.
2. Make database backup:
mysqldump mor >/path/to/file/db_backup.sql
Or with Username and Password if needed:
mysqldump mor -u DATABASEUSER -pDATABASEPASSWORD >/path/to/file/db_backup.sql
Note:
Database User: root
Database Password: kolmisoft
If you use MNP addon, don't forget to make MNP backup:
mysqldump mor_mnp >/path/to/file/mor_mnp_backup.sql
Or with Username and Password if needed:
mysqldump mor_mnp -u DATABASEUSER -pDATABASEPASSWORD >/path/to/file/mor_mnp_backup.sql
Usage
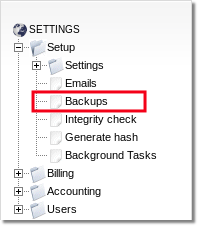
Go to Settings –> Backups

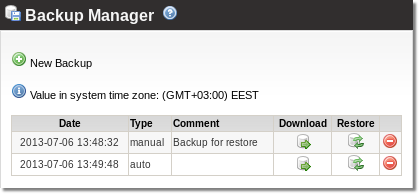
Here you can see list of all Backups:

You can download the backup by clicking the Download icon or restore the backup by clicking the Restore icon. When Scheduler (which runs every hour) makes an auto backup, it is seen as type = auto in the backups list. Click ![]() New Backup to create a new Manual Backup. Enter any comment and click on Create
New Backup to create a new Manual Backup. Enter any comment and click on Create
Restore Backup from other server
1. Connect via ssh to your server.
2. Import database Backup:
mysql mor </path/to/file/db.sql
Or with Username and Password if needed:
mysql -u DATABASEUSER -pDATABASEPASSWORD mor </path/to/file/db.sql
Note:
Database User: root
Database Password: kolmisoft
3. Update scripts:
rm -fr /usr/src/mor
svn co http://svn.kolmisoft.com/mor/install_script/trunk/ /usr/src/mor
4. Update database.
Your DB version must be the same as GUI.
To check GUI version type this command:
svn info /home/mor | grep URL | awk -F"/" '{print $NF}'
Database update must be done gradually, updating each version separately, from Backup version, till the version you need.
Available MOR versions: MOR 8, MOR 9, MOR 10, MOR 11, MOR 12, MOR X3, MOR X4, MOR X5, MOR X6, MOR X7.
Update database using script:
/usr/src/mor/db/MOR_Version/import_changes.sh
Note:
Use /usr/src/mor/db/12.126/import_changes.sh to update database for MOR 12.
Use /usr/src/mor/db/12/import_changes.sh to update database for MOR X3.
Use /usr/src/mor/db/x4/import_changes.sh to update database for MOR X4.
Use /usr/src/mor/x5/db/db_update.sh LATEST to update database for MOR X5
Use /usr/src/mor/x6/update.sh to update database for MOR X6.
Use /usr/src/mor/x7/update.sh to update database for MOR X7.
Use /usr/src/mor/x8/update.sh to update database for MOR X8.
For example, you have MOR X7 but you decided to restore backup from MOR X4. You have to run these scripts:
/usr/src/mor/x5/db/db_update.sh
/usr/src/mor/x6/update.sh
/usr/src/mor/x7/update.sh
5. Import Asterisk changes to database using this script:
/usr/src/mor/sh_scripts/asterisk/db/import_changes.sh
If the server completely dies will the restore be enough to return everything as it was, or are there some other files we should be backing up?
The Backup file contains only Database archived dump. Separate configuration/Asterisk/GUI/audio files/etc are not included in this Backup file. You should take care of them separately.
