Difference between revisions of "Fax2Email"
| Line 1: | Line 1: | ||
= Definition = | = Definition = | ||
This feature | This feature allows the user to receive a normal fax and get it to email in PDF format. The following image shows the common implementation of the Fax2Email functionality: | ||
[[Image:fax2mail_schema.png]] | [[Image:fax2mail_schema.png]] | ||
<big>'''NOTE: [[Fax over VoIP]] does not work reliably and should only be used for testing purposes | <big>'''NOTE: [[Fax over VoIP]] does not work reliably and should only be used for testing purposes.'''</big> | ||
= Setup = | = Setup = | ||
In order to start using this feature it should be enabled in Settings – Various – Fax2Email enabled. | In order to start using this feature, it should be enabled in Settings – Various – Fax2Email enabled. | ||
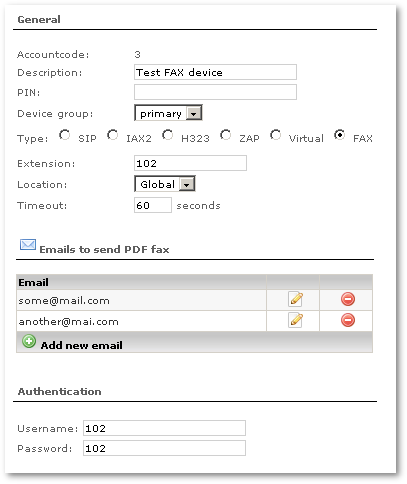
When it's enabled you need to create | When it's enabled, you need to create a device and make it FAX type. This can be done in device settings: | ||
[[Image:fax2email1.png]] | [[Image:fax2email1.png]] | ||
When device's type is FAX it is marked as FAX device everywhere with icon [[Image:icon_fax.png]] | When a device's type is FAX, it is marked as a FAX device everywhere with the icon [[Image:icon_fax.png]] | ||
Then you need to add | Then you need to add the email address or addresses to which the received fax should be sent. You can enter unlimited addresses. | ||
When fax device | When the fax device has been created, you have two possibilities for using it: | ||
# It is possible to route call directly to fax device | # It is possible to route a call directly to the fax device. | ||
# You can use fax-detection, so when fax is detected | # You can use fax-detection, so that when a fax is detected, it will be routed to the fax device. If it is not detected, it is routed to a normal device. | ||
The second choice lets you save one DID by receiving calls and faxes on the same number. | |||
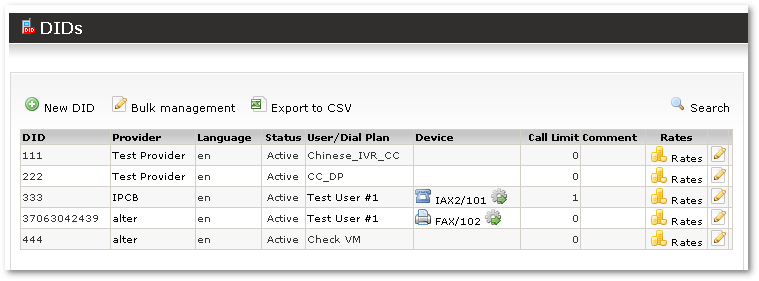
The first method is very easy to implement – you just need to assign the FAX device to a DID: | |||
[[Image:fax2email2.png]] | [[Image:fax2email2.png]] | ||
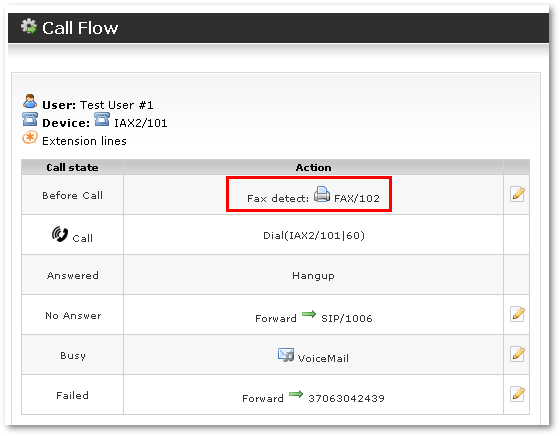
When you want to do fax-detection you need to set this in | When you want to do fax-detection, you need to set this in a device's [[Call Flow]]. In the Before Call state: | ||
[[Image:fax2email3.png]] | [[Image:fax2email3.png]] | ||
Here when call comes system will try to decide is it | Here, when a call comes, the system will try to decide whether it is a fax. If it decides that it is, the call is routed to the FAX device and sent to the appropriate email addresses. If the call is a simple call, it is sent to an IAX2/101 device. | ||
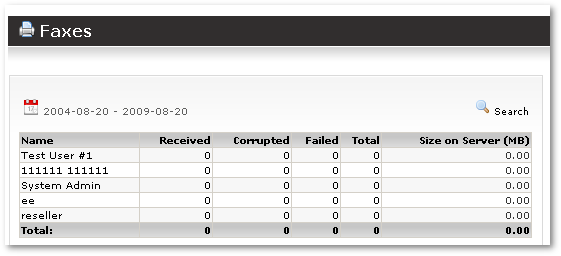
For received faxes and various | For received faxes and various statistics, check Fax statistics in the '''STATISTICS - Various - Faxes''' section: | ||
[[Image:fax2email4.png]] | [[Image:fax2email4.png]] | ||
| Line 49: | Line 49: | ||
= Stats = | = Stats = | ||
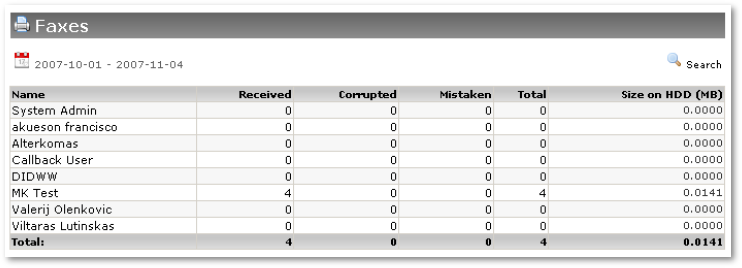
This report show all | This report show all information about faxes received (or not received). It can be found in '''STATISTICS – Various – Faxes''': | ||
[[Image:faxes_stats1.png]] | [[Image:faxes_stats1.png]] | ||
All users are visible here. | All users are visible here. A fax can have three states: | ||
* '''Received''' – everything | * '''Received''' – everything okay with this fax. It's been received and sent to the appropriate email addresses. | ||
* '''Corrupted''' – fax | * '''Corrupted''' – the fax has been received but is corrupted. It cannot be to sent to an email address. | ||
* '''Mistaken''' – | * '''Mistaken''' – this was simple call to a fax number, not a fax. | ||
You can | You can click on a number for each state to get a list of these faxes: | ||
[[Image:faxes_stats2.png]] | [[Image:faxes_stats2.png]] | ||
Clicking on [[Image:icon_pdf.png]], you can get this fax in PDF format. | |||
Revision as of 23:01, 16 May 2010
Definition
This feature allows the user to receive a normal fax and get it to email in PDF format. The following image shows the common implementation of the Fax2Email functionality:
NOTE: Fax over VoIP does not work reliably and should only be used for testing purposes.
Setup
In order to start using this feature, it should be enabled in Settings – Various – Fax2Email enabled.
When it's enabled, you need to create a device and make it FAX type. This can be done in device settings:
When a device's type is FAX, it is marked as a FAX device everywhere with the icon ![]()
Then you need to add the email address or addresses to which the received fax should be sent. You can enter unlimited addresses.
When the fax device has been created, you have two possibilities for using it:
- It is possible to route a call directly to the fax device.
- You can use fax-detection, so that when a fax is detected, it will be routed to the fax device. If it is not detected, it is routed to a normal device.
The second choice lets you save one DID by receiving calls and faxes on the same number.
The first method is very easy to implement – you just need to assign the FAX device to a DID:
When you want to do fax-detection, you need to set this in a device's Call Flow. In the Before Call state:
Here, when a call comes, the system will try to decide whether it is a fax. If it decides that it is, the call is routed to the FAX device and sent to the appropriate email addresses. If the call is a simple call, it is sent to an IAX2/101 device.
For received faxes and various statistics, check Fax statistics in the STATISTICS - Various - Faxes section:
Stats
This report show all information about faxes received (or not received). It can be found in STATISTICS – Various – Faxes:
All users are visible here. A fax can have three states:
- Received – everything okay with this fax. It's been received and sent to the appropriate email addresses.
- Corrupted – the fax has been received but is corrupted. It cannot be to sent to an email address.
- Mistaken – this was simple call to a fax number, not a fax.
You can click on a number for each state to get a list of these faxes:
Clicking on ![]() , you can get this fax in PDF format.
, you can get this fax in PDF format.
See also:

