Difference between revisions of "MOR BLF"
| Line 20: | Line 20: | ||
Here you will be able to give a name to your BLF Group and set a comment.<br> | Here you will be able to give a name to your BLF Group and set a comment.<br> | ||
When BLF Group is created, you will see '''Subscribed Devices''' and '''Assigned Devices''' columns. | When BLF Group is created, you will see '''Subscribed Devices''' and '''Assigned Devices''' columns. These columns will show many Devices are subscribed and assigned to BLF Group.<br><br> | ||
'''By assigning Device to a BLF group, you allow Device state to be monitored (idle/busy). By subscribing Device to a BLF group, you allow that Device to "watch" states of assiged Devices.'''<br><br> | |||
Click phone icon under '''Assigned Devices''' and Assigned Device list will be displayed.<br> | Click phone icon under '''Assigned Devices''' and Assigned Device list will be displayed.<br> | ||
Latest revision as of 14:41, 27 February 2018
BLF (Busy Lamp Field) feature allows to monitor the state of another phone/user extension. Usually this is indicated by the LEDs on a phone.
This has to be configured manually from the phone (if phone supports BLF) and also in MOR GUI.
Configuration in MOR
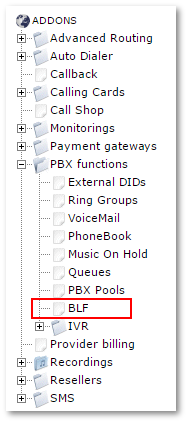
Go to PBX Functions -> BLF:
Here you will see a list of BLF groups. Admin will see only groups that were created by himself. This applies to Resellers and Users. Only owners will see their groups in BLF list.
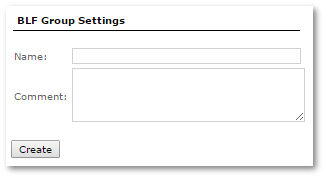
To create new BLF group press Add new BLF Group:
Here you will be able to give a name to your BLF Group and set a comment.
When BLF Group is created, you will see Subscribed Devices and Assigned Devices columns. These columns will show many Devices are subscribed and assigned to BLF Group.
By assigning Device to a BLF group, you allow Device state to be monitored (idle/busy). By subscribing Device to a BLF group, you allow that Device to "watch" states of assiged Devices.
Click phone icon under Assigned Devices and Assigned Device list will be displayed.
Click Assign Device and assign Devices that you want to monitor.
When assigning Device, you need to specify BLF extension. This extension will be used in your phone settings. BLF extension can be the same as Device extension or any other alphanumeric extension.
Next step is to subscribe Devices that will "watch" these assigned Devices.
In BLF Group list click phone icon under Subscribed Devices and Subscribed Device list will be displayed
Subscribed Device will be able to monitor Devices that are assigned to this group. More than one Device can be subscribed to BLF Group. Click Subscribe Device to subscribe new Device to this Group.
Select User and Device.
Now BLF Group has subscribed and assigned Devices and is fully functional.
BLF groups increase security by isolating Devices in a specific group so that only Devices that are subscribed to this group can see status of assigned Devices.
Last step is to configure BLF on phone.
Configuration on phone
Different phones have different BLF configuration settings. Follow your phone’s manual instructions how to configure BLF. Below is configuration example for Linksys SPA942 phone.
Linksys SPA942 configuration example
Linksys SPA942 phone supports up to 4 extensions. To enable BLF functionality on Linksys SPA942 phone, you need to update phone’s firmware version to 6.1.5a. If current phone's firmware version is lower than 5.2.5, then download and install 5.2.5 update before 6.1.5a.
Firmware update can be downloaded from CISCO website:
https://software.cisco.com/download/release.html?mdfid=282414124&softwareid=282463651&release=6.1.5a
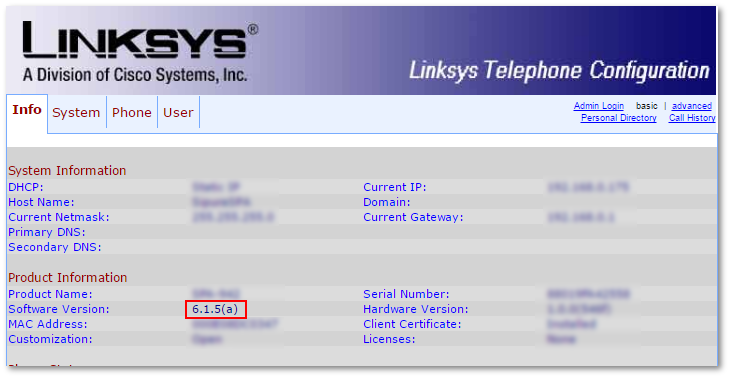
To check current Linksys SPA942 firmware version, go to phone’s configuration panel and under Info tab you can see firmware version:
Once Linksys SPA942 firmware is updated to 6.1.5a version, you can configure BLF in MOR. To do so, follow example in Configuration in MOR.
Next step is to configure BLF on Linksys SPA942. Go to phone’s configuration panel, click Admin Login and then switch to advanced settings:
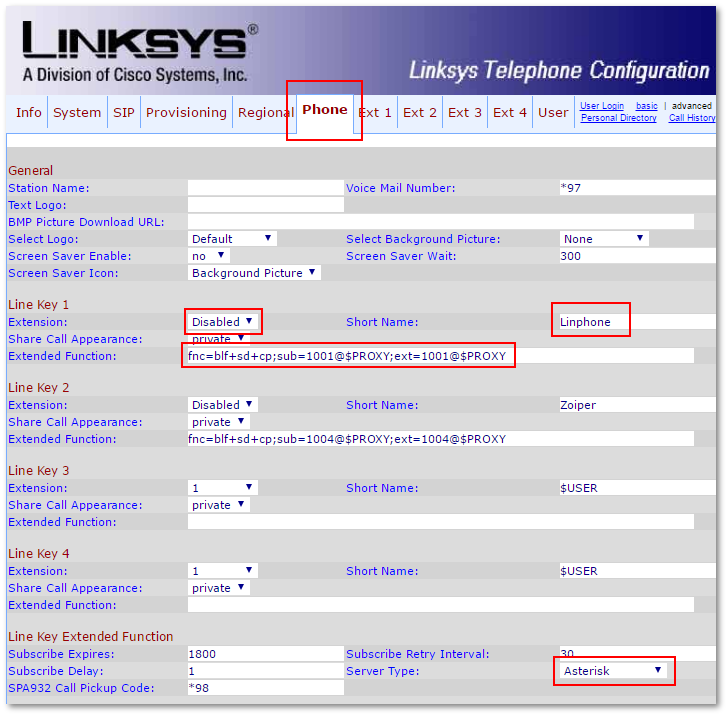
After switching to advanced settings, go to Phone tab. You should see 4 extensions (Line Key 1-4). These represents keys on your phone.
To enable BLF, set Extension to Disabled, enter Short Name that will be displayed near buttons on the screen and enter the following line in Extended Function input:
fnc=blf+sd+cp;sub=1001@$PROXY;ext=1001@$PROXY
Change extension 1001 to BLF Extension configured in MOR GUI.
Last step is to set Server Type to Asterisk.
Press Submit All Changes and phone will be set up for BLF. Now you should see blinking button on configured extensions.
Checking BLF in Asterisk
To check if BLF groups are configured correctly in Asterisk, execute the following command:
asterisk -rx "core show hints"
you should see something like:
    -= Registered Asterisk Dial Plan Hints =-

                     1001@mor_blf_group_1     : SIP/1001              State:Idle            Watchers  1

                     1002@mor_blf_group_1     : SIP/1002              State:Idle            Watchers  1

                     1003@mor_blf_group_1     : SIP/1003              State:Idle            Watchers  1

                     1004@mor_blf_group_1     : SIP/1004              State:Idle            Watchers  1
Here each line will represent Device that is being monitored. State shows Device state (idle/busy). Watchers shows how many phones are subscribed to this Device.
Try to make a call from one of the monitored Devices (in this example those are 1001, 1002, 1003 and 1004) and check if State is changing from Idle to Busy.
Make sure that there are subscribed phones to those Devices (Watchers should be greater than 0). If you see Watchers 0 it means that your phone did not subscribe correctly. In this case check phone configuration or try to restart your phone.
Permissions
BLF groups can be configured by Admin, Resellers, Accountants and Users. Resellers, Accountants and Users require BLF permission to do so.
User BLF permissions can be found in SETTINGS -> Users -> User Permissions (BLF permission)
Reseller BLF permissions can be found in ADDONS -> Resellers -> Reseller permissions (PBX functions permission)
Accountant BLF permissions can be found in SETTINGS -> Setup -> Accountant permissions (PBX functions permission)


