Difference between revisions of "Idefisk configuration"
| (One intermediate revision by one other user not shown) | |||
| Line 1: | Line 1: | ||
In this guide we will configure Idefisk 1.37 IAX2 softphone with server IP 192.168.0.110 username 101, password 101. | In this guide, we will configure Idefisk 1.37 IAX2 softphone with server IP 192.168.0.110 username 101, password 101. | ||
'''For your installation, use correct server IP, username and password.''' | '''For your installation, use the correct server IP, username and password.''' | ||
'''The ones in this example are only for DEMO!''' | '''The ones in this example are only for the DEMO!''' | ||
---- | ---- | ||
After downloading | After downloading Idefisk, install and start it. | ||
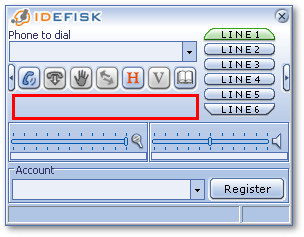
Click the RIGHT mouse button on the marked area: | |||
[[Image:idefisk_conf1.png]] | [[Image:idefisk_conf1.png]] | ||
| Line 16: | Line 16: | ||
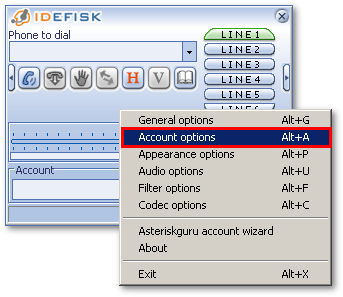
From menu select '''Account options''': | From the menu, select '''Account options''': | ||
[[Image:idefisk_conf2.png]] | [[Image:idefisk_conf2.png]] | ||
| Line 22: | Line 22: | ||
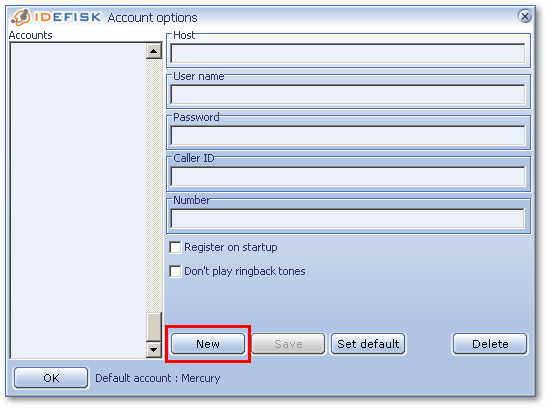
Press '''New''' to create new connection: | Press '''New''' to create a new connection: | ||
[[Image:idefisk_conf3.png]] | [[Image:idefisk_conf3.png]] | ||
| Line 28: | Line 28: | ||
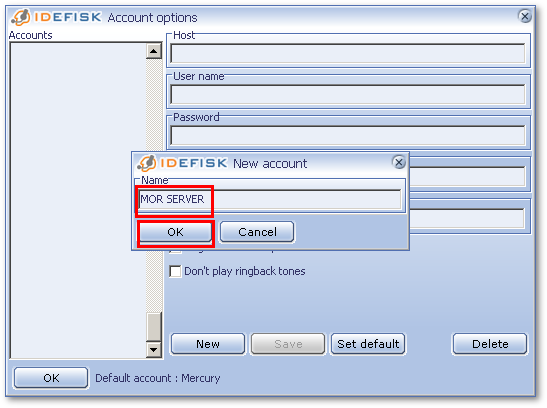
Enter | Enter a name for the connection and click '''OK''': | ||
[[Image:idefisk_conf4.png]] | [[Image:idefisk_conf4.png]] | ||
| Line 34: | Line 34: | ||
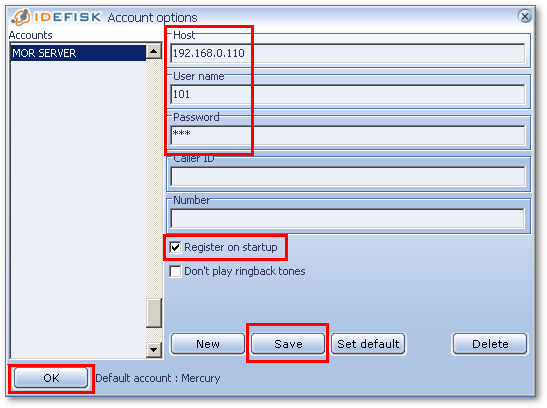
Enter '''Server IP''', '''username''' | Enter '''Server IP''', '''username''' and '''password''', check '''Register on startup''', and click '''Save''' and then '''OK''': | ||
[[Image:idefisk_conf5.png]] | [[Image:idefisk_conf5.png]] | ||
| Line 40: | Line 40: | ||
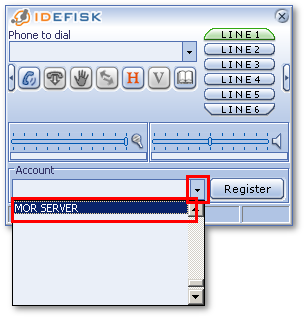
In main window | In the main window, click the arrow icon to open a list of available connections. Select the one you just created: | ||
[[Image:idefisk_conf6.png]] | [[Image:idefisk_conf6.png]] | ||
| Line 46: | Line 46: | ||
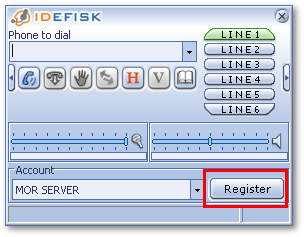
Click '''Register''' to register with the server: | |||
[[Image:idefisk_conf7.png]] | [[Image:idefisk_conf7.png]] | ||
| Line 52: | Line 52: | ||
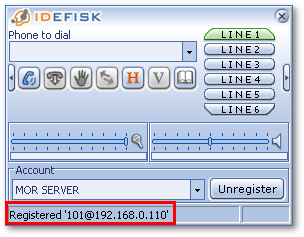
You should see confirmation that registration went | You should see confirmation that registration went okay: | ||
[[Image:idefisk_conf8.png]] | [[Image:idefisk_conf8.png]] | ||
| Line 58: | Line 58: | ||
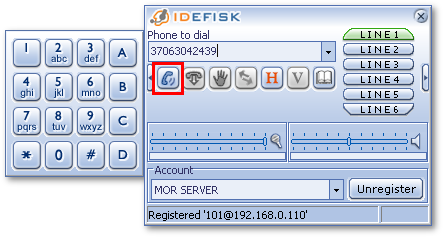
Enter number and | Enter the number and click the Dial icon to dial: | ||
[[Image:idefisk_conf9.png]] | [[Image:idefisk_conf9.png]] | ||
Latest revision as of 15:19, 9 March 2015
In this guide, we will configure Idefisk 1.37 IAX2 softphone with server IP 192.168.0.110 username 101, password 101.
For your installation, use the correct server IP, username and password.
The ones in this example are only for the DEMO!
After downloading Idefisk, install and start it.
Click the RIGHT mouse button on the marked area:
From the menu, select Account options:
Press New to create a new connection:
Enter a name for the connection and click OK:
Enter Server IP, username and password, check Register on startup, and click Save and then OK:
In the main window, click the arrow icon to open a list of available connections. Select the one you just created:
Click Register to register with the server:
You should see confirmation that registration went okay:
Enter the number and click the Dial icon to dial:
