Difference between revisions of "Linksys SPA942 Configuration"
| (One intermediate revision by one other user not shown) | |||
| Line 1: | Line 1: | ||
[[Image:spa942.jpg|right]] | [[Image:spa942.jpg|right]] | ||
First we need to know | First we need to know the IP address of the phone. | ||
On phone press '''Menu''' button: | On the phone, press the '''Menu''' button: | ||
[[Image:spa942_menu.jpg]] | [[Image:spa942_menu.jpg]] | ||
| Line 12: | Line 12: | ||
23.45.67.89 | 23.45.67.89 | ||
This is just example IP address! Yours will be different! Remember it or write it down. | This is just an example IP address! Yours will be different! Remember it or write it down. | ||
<br> | <br> | ||
| Line 18: | Line 18: | ||
<br> | <br> | ||
Then open your internet browser on computer which is connected | Then open your internet browser on the computer which is connected to the same network as your SPA942 and in the address line, type: | ||
http://23.45.67.89 | http://23.45.67.89 | ||
ATTENTION! Change 23.45.67.89 to your IP address you | ATTENTION! Change 23.45.67.89 to your IP address that you found earlier! | ||
SPA942 Configuration should open. | SPA942 Configuration should open. | ||
| Line 30: | Line 30: | ||
<br> | <br> | ||
Click on '''Admin Login''' and then on '''Advanced''': | |||
| Line 39: | Line 39: | ||
<br> | <br> | ||
Click on '''SIP''' and find the '''RTP Parameters''' section. Change the '''RTP Packet Size''' value to '''0.020''': | |||
| Line 48: | Line 48: | ||
<br> | <br> | ||
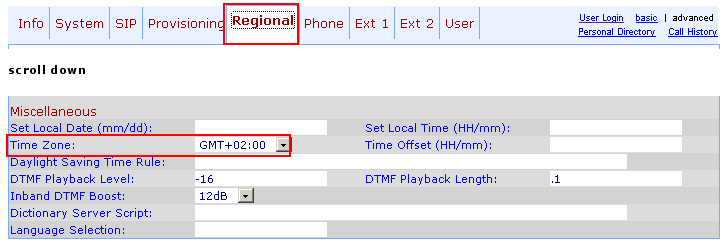
Click on '''Regional''', find the '''Miscellaneous''' section and change '''Time Zone''' to the appropriate one: | |||
| Line 57: | Line 57: | ||
<br> | <br> | ||
'''OPTIONAL''': If you experience low audio or your callee can't hear you | '''OPTIONAL''': If you experience low audio or your callee can't hear you properly, click on '''Phone''' and in the '''Audio Input Gain(dB)''' section, change fields values to '''6''': | ||
| Line 66: | Line 66: | ||
<br> | <br> | ||
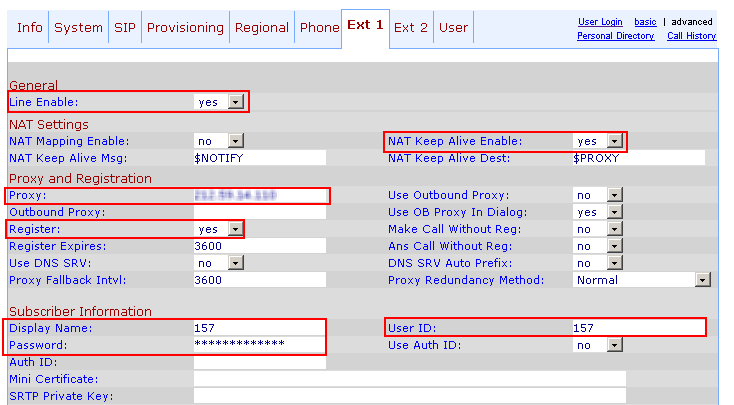
Click on '''Ext 1''' and do the following: | |||
* In the '''General''' section, make sure the '''Line Enable''' field is '''Yes'''. | |||
* Under '''NAT Settings''', the '''NAT Keep Alive Enable''' field should be '''Yes'''. | |||
* '''Proxy and Registration''' | * '''Proxy and Registration''' | ||
** '''Proxy''' - value which | ** '''Proxy''' - the value which provider gave you (an IP). | ||
** '''Register''' - '''Yes''' | ** '''Register''' - '''Yes'''. | ||
* '''Subscriber Information''' | * '''Subscriber Information''' | ||
** '''Display Name''' - value | ** '''Display Name''' - value you got from your provider (username or login). | ||
** '''User ID''' - value | ** '''User ID''' - value you got from your provider (username or login) - same as '''Display Name'''. | ||
** '''Password''' - value | ** '''Password''' - value you got from your provider (password or secret). | ||
| Line 85: | Line 87: | ||
<br> | <br> | ||
Finally, click on '''Submit All Changes''': | |||
| Line 92: | Line 94: | ||
<br> | <br> | ||
---- | ---- | ||
<br> | <br> | ||
<br> | |||
= Forward on second line = | |||
Call forward on second line is not working. Only 1st line: http://forums.whirlpool.net.au/forum-replies-archive.cfm/756453.html | |||
Latest revision as of 09:42, 13 July 2010
First we need to know the IP address of the phone.
On the phone, press the Menu button:
Then press 9 and you should see:
2 Current IP
23.45.67.89
This is just an example IP address! Yours will be different! Remember it or write it down.
Then open your internet browser on the computer which is connected to the same network as your SPA942 and in the address line, type:
http://23.45.67.89
ATTENTION! Change 23.45.67.89 to your IP address that you found earlier!
SPA942 Configuration should open.
Click on Admin Login and then on Advanced:
Click on SIP and find the RTP Parameters section. Change the RTP Packet Size value to 0.020:
Click on Regional, find the Miscellaneous section and change Time Zone to the appropriate one:
OPTIONAL: If you experience low audio or your callee can't hear you properly, click on Phone and in the Audio Input Gain(dB) section, change fields values to 6:
Click on Ext 1 and do the following:
- In the General section, make sure the Line Enable field is Yes.
- Under NAT Settings, the NAT Keep Alive Enable field should be Yes.
- Proxy and Registration
- Proxy - the value which provider gave you (an IP).
- Register - Yes.
- Subscriber Information
- Display Name - value you got from your provider (username or login).
- User ID - value you got from your provider (username or login) - same as Display Name.
- Password - value you got from your provider (password or secret).
Finally, click on Submit All Changes:
Forward on second line
Call forward on second line is not working. Only 1st line: http://forums.whirlpool.net.au/forum-replies-archive.cfm/756453.html


