Difference between revisions of "Recordings Addon"
(→Usage) |
|||
| (64 intermediate revisions by 16 users not shown) | |||
| Line 14: | Line 14: | ||
* Convert recordings from WAV to MP3 format and store them on an external server, to ease the load on the main server. | * Convert recordings from WAV to MP3 format and store them on an external server, to ease the load on the main server. | ||
NOTE: | NOTE: Reseller is able to have the same functions as an administrator if '''Allow to use recording functionality''' option is checked by Admin in resellers settings. In order for the calls to be recorded for resellers users the "Record calls for this Device:" option (located in the device edit window, "Recordings" block) has to be enabled by the reseller for the devices for which the calls should be recorded. | ||
<br><br> | <br><br> | ||
=== Limitations === | === Limitations === | ||
* | * Recordings will not be saved on the server if there will be left less then 10% of free space. Such recordings will be sent directly to the Email (if email is specified in GUI Interface) and will be completely removed from the server. | ||
* | *Calling Cards calls cannot be recorded. | ||
<br><br> | <br><br> | ||
=== Sound file format === | === Sound file format === | ||
Recordings are saved into mp3 format. | Recordings are saved into mp3 format. 1MB can save around 4min of recordings. | ||
<br><br> | <br><br> | ||
=Configuration= | =Configuration= | ||
Adjust needed settings in '''ADDONS –> Recordings –> Settings''' | |||
<br><br> | |||
[[File:recordings_addon_settings.png]] | |||
<br><br> | |||
* '''Show in the File Name:''' select format for recording filename. This applies to filename when you download recording(s) over GUI interface. Recordings filename in the server will always be stored in internal Asterisk format uniqueid.mp3, where uniqued is in format unixtimestamp.xxxxx. Format rules also do not apply to recording files sent over email. Internal recording filename will be used for attachment. | |||
* '''Show Recordings with zero billsec:''' Display recordings which have zero billsec. | |||
* '''Start Recordings On Answer:''' by default, the recording starts before the call is answered. However, you have the option to start recording when the call is answered. This feature helps to minimize system resource usage. | |||
* '''Delete Recordings older than:''' delete recordings older than x amount of days. 0 (default) means to no delete any recordings. | |||
* '''Delete Recordings on the Backup Server''' - With this option enabled, MOR will explicitly delete recordings (both manually selected and automatically selected based on recordings age) on the Backup server. Use this option only if there are two GUI servers (Main and Backup) and there is a cron that syncs recordings between these servers. SSH connection using keys [[Configure SSH connection between servers |must be configured]] between the Main and Backup servers. | |||
** '''IP:''' - IP of the backup server. | |||
** '''Port:''' - SSH Port of the backup server. | |||
** '''Login:''' - SSH username of the backup server. | |||
** '''Path:''' - Recordings path on the backup server. Default /home/mor/public/recordings | |||
* '''Use external Server:''' enable this option if you want to use [[External Recordings Server]]. | |||
* '''Recordings Server:''' valid only if '''Use external Server:''' is enabled. More information available in [[External Recordings Server]] page. | |||
In order to use Recording, you have to set up which Users' Calls you want to record. | In order to use Recording, you have to set up which Users' Calls you want to record. | ||
| Line 36: | Line 52: | ||
<br><br> | <br><br> | ||
Here you can check the '''Forced record calls for this User''' field for the Users you want to record. By checking '''Allow to use recording functionality''' option you can authorize the User to use the Recordings Addon functionality.Click '''Update''' at the bottom for the changes to take effect. | Here you can check the '''Forced record calls for this User''' field for the Users you want to record. By checking '''Allow to use recording functionality''' option you can authorize the User to use the Recordings Addon functionality. Click '''Update''' at the bottom for the changes to take effect. | ||
To allow particular Reseller to use Recordings functionality, "Allow to use recording functionality" option must be checked in his details. | |||
If you leave '''Server space (MB)''' 0 - there will be no limitations in data usage (HDD will fill up after some time). | |||
'''NOTE''' Recordings are NOT available in Calls between 2 SIP Devices in MOR. | |||
<br><br> | |||
'''SETTINGS –> Users –> Edit (on selected user)''' | |||
The Recordings section has the following options: | |||
* Allow to use recording functionality - can this user use the Recording addon functionality? | |||
* Forced record calls for this User - record calls for this user (all devices) without user knowledge. This option has the highest priority. | |||
when enabled - records for all User devices will be recorded regardless of other options (value in Device settings: Record calls for this Device: - will be ignored, Server space - dedicated for User will be ignored ant etc ) | |||
* Server space - how much HDD space to reserve for recordings of this user. Takes effect only if Admin has not enabled recordings for User himself. Such options should be set on appropriate User/Device by Admin in order to enable this function for User: | |||
User settings | |||
Forced record calls for this User: NO | |||
Device settings: | |||
Record calls for this Device : NO | |||
Keep Recordings on Server after sent to Email: NO | |||
* Send deleted recordings to this email. If HDD space is exceeded, the new recordings will not be saved and will be sent to this email instead. If this email is empty, the recording will be sent to the default user email. Recordings will be kept in server if email sending fails. | |||
<br><br> | |||
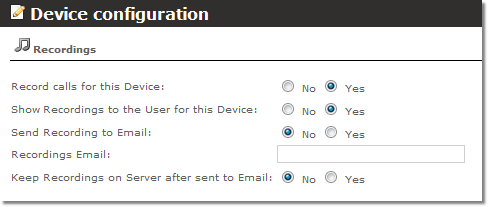
'''Device –> Edit window''' | |||
The following options are available for Device: | |||
* '''Record calls for this Device''' - record calls for this Device (without user knowledge). If this option is enabled, recordings must be deleted manually. If this option is set to YES, then server space - dedicated for User will be ignored and records will be placed on server regardless of this value | |||
* '''Show Recordings to the User for this Device''' - allows User to see his recordings. Shows new recordings from time then this option enabled. | |||
* '''Send Recording to Email''' - when recording is completed, send to it email. Recordings will be kept in server if email sending fails. Admin must enable "Allow to use recording functionality" for this User; and User, on his/her account must set "Record calls for this Device:" to "Yes" in the Device settings, otherwise, mail will not be sent. | |||
* '''Recordings Email''' - send to this email address. | |||
* '''Keep Recordings on Server after sent to Email''' - should the recording be left on the server after being sent to email? If this option is set to YES, then server space - dedicated for User will be ignored and records will be placed on server regardless of this value | |||
<br><br> | |||
[[File:device_recordings_settings.png]] | |||
<br><br> | |||
== Setup User so he could see his recorded Calls == | |||
1. As admin, go to '''User Edit''' settings [[Image:icon_edit.png]] and check '''Allow to use recording functionality'''. User will be able to use Recording addon functionality. | |||
2. Log in as this User and in '''PERSONAL MENU –> Details –> Devices''', click [[Image:icon_edit.png]] for Device and in the Recordings section check '''Record calls for this Device: YES.''' | |||
3. Now the user will be able to see his calls in '''PERSONAL MENU –> Call –> Recordings'''. | |||
<br><br> | |||
=== User settings === | |||
The Administrator must authorize the User to use the Recording Addon functionality before User can use its functions. This can be done by checking '''Allow to use recording functionality''' in the User Edit window. | |||
* Delete Recordings older than - any integer value higher than 0 enables functionality only for this User (ignoring Global Recordings Setting). Value 0 - disables deleting Recordings older than by days functionality, only for this User (ignoring Global Recordings Setting). Empty input box (no value at all) uses Global Recordings Setting. | |||
<br><br> | |||
'''PERSONAL MENU –> Details''' | |||
If | * Server space - shows used/reserved HDD space for recordings. If limit reached , recordings will not be showed for user. | ||
* Email for deleted Recordings - to which email recordings should be sent if there is not enough space for them. | |||
<br><br> | |||
'''PERSONAL MENU –> Details –> Devices –> Edit''' | |||
* Record calls for this Device - user can set to record calls for this device or not. | |||
* Send Recording to Email - should recording be sent to email? Recordings will be kept in server if email sending fails. | |||
* Recordings Email - the email address email to which recordings should be sent. | |||
* Keep Recordings on Server after sent to Email - should recordings be left on the server after being sent to email? | |||
<br><br> | <br><br> | ||
'''PERSONAL MENU –> Calls –> Recordings''' | |||
On this page, the User can manage his recordings. | |||
<br><br> | <br><br> | ||
User Owner can decide: | |||
* Whether or not the user can use Recording Addon functionality (set to record calls, send recordings to email, etc). | |||
* Which user calls should always be recorded (without User knowledge). | |||
<br><br> | <br><br> | ||
== Record not answered calls == | == Record not answered calls == | ||
| Line 61: | Line 140: | ||
2) Option Show Recordings with zero billsec should be enabled in GUI. <br> | 2) Option Show Recordings with zero billsec should be enabled in GUI. <br> | ||
To enable it go to ''' | To enable it go to '''Addons –> Recordings –> Settings''' and check option '''Show recordings with zero billsec'''. <br> | ||
Now system records not answered calls for all users which are using recording functionality. <br> | Now system records not answered calls for all users which are using recording functionality. <br> | ||
| Line 75: | Line 152: | ||
[[Image:recordingams2.png]] | [[Image:recordingams2.png]] | ||
<br><br> | <br><br> | ||
== | |||
== Delete recordings after sending it via e-mail == | |||
1. As admin, go to '''User Edit''' settings [[Image:icon_edit.png]] and check '''Allow to use recording functionality'''. User will be able to use Recording addon functionality. Do not check '''Forced record calls for this User''' because it this way recordings will '''NOT''' be deleted. | |||
2. Log in as this User and in '''PERSONAL MENU –> Personal Details –> Devices''', click [[Image:icon_edit.png]] for Device and in the Recordings section check '''Keep Recordings on Server after sent to Email: NO.''' | |||
3. Now recordings will be deleted immediately after they will be sent via e-mail. | |||
<br><br> | |||
== Recordings on external server == | |||
Manage settings for recordings upload to external server go to '''ADDONS –> Recordings –> Settings''' | Manage settings for recordings upload to external server go to '''ADDONS –> Recordings –> Settings''' | ||
| Line 85: | Line 171: | ||
[[File:recordings_addon_settings.png]] | [[File:recordings_addon_settings.png]] | ||
<br><br> | <br><br> | ||
* Use external Server - should system send recordings to | * '''Use external Server''' - should system send recordings to [[External Recordings Server]]? Please check instructions how to setup [[External Recordings Server]]. | ||
* Recordings server - details such as IP/Port/Login where port is SSH default port 22 and Login is default root. | * '''Recordings server''' - details such as IP/Port/Login where port is SSH default port 22 and Login is default root. | ||
* By default recording files in remote server will be placed at /tmp directory | |||
'''P.S. SSH keys must be configured without password in order scp command could transfer the recordings to other server. | '''P.S. SSH keys must be configured without password in order scp command could transfer the recordings to other server. If this functionality is not enabled - the recordings are stored in local server''' | ||
<br><br> | <br><br> | ||
==Recordings on additional HDD== | |||
If you want to save recordings on an additional HDD, [[Recordings on additional HDD|please follow this instruction]]. | |||
<br><br> | <br><br> | ||
[[ | |||
==Recordings HDD usage== | |||
By default, recordings will not be stored on HDD if free space drops below 10%. If the limit is reached, recordings will be sent to email. | |||
It is possible to set a specific free space limit (in gigabytes) to control when recordings should be sent to email and deleted from the HDD. To set this limit, edit '''/etc/mor/system.conf''' file in each Asterisk server and add the following line: | |||
recordings_hdd_free_space_limit_gb = X | |||
Here X is the limit in gigabytes. For example '''recordings_hdd_free_space_limit_gb = 5''' will force recordings to be sent via email (instead of storing them on HDD) when free space left on the recordings partition is 5GB or less. | |||
==Do not send Recordings to Email on free space limit== | |||
By default, Recordings are sent to the User via Email when the free space limit is reached (either global HDD space limit or personal User Server Space limit). To disable these emails, add the following option to '''/etc/mor/system.conf''': | |||
recordings_no_email_on_free_space_limit = 1 | |||
Note that in this case Recordings will be lost (deleted from the server and not sent to the User). | |||
=Usage= | |||
To view/listen/download/delete recorded Calls go to '''ADDONS –> Recordings'''. You will see something like this: | |||
<br><br> | |||
[[Image:recordings2.png]] | |||
<br><br> | <br><br> | ||
Here | Here Admin/Reseller can see all recordings, search Recordings by: | ||
* Period. | * Period. | ||
| Line 103: | Line 214: | ||
* User. | * User. | ||
* Device. | * Device. | ||
* Provider. | |||
With each recording, it is possible to: | With each recording, it is possible to: | ||
* Check its details. | * Check its details. | ||
* Check Call details. | * Check Call details. | ||
* Add comment to it | * Add comment to it (note that User and Admin have different comment fields) | ||
* Listen to it. | * Listen to it. | ||
* Download it. | * Download it. | ||
* Delete it. | * Delete it. | ||
<br> | |||
'''NOTE:''' It is available to use recordings 15 minutes after call was made. Till then you may see the message '''Recording was not found locally'''. When listening to a recording its row will turn green as an indicator that the recording was listened. | |||
<br><br> | |||
[[Image:Recordig_listened_indicator.png]] | |||
<br><br> | |||
= Recordings bulk management = | |||
This feature allows an administrator to quickly delete Recordings for selected period or selected Device | |||
<br><br> | <br><br> | ||
=== Who can use this functionality? === | |||
* This feature is available for MOR administrator and Users. | |||
By default, simple Users can listen and download selected recordings. Please note that Users need to have enabled Recording functionality. | |||
If you want to let simple users to delete Recordings. Special permission must be enabled at Users->[[User_Permissions]]->Recordings delete. | |||
<br><br> | <br><br> | ||
=== How to use this functionality === | |||
To delete by device:<br> | |||
Go to '''ADDONS –> Recordings''' | |||
<br><br> | |||
[[File:Recordings_menu_path.png]] | |||
<br><br> | |||
Click on [[image:icon_edit.png]] '''Bulk management''' link. | |||
<br><br> | <br><br> | ||
[[File: | [[File:Recordings_bulk_management.png]] | ||
<br><br> | <br><br> | ||
Here you can check an option to delete by device, select device and click '''Delete'''. | |||
To delete all recordings from all devices at once, select '''All'''. | |||
<br><br> | |||
[[File:Recordings_bulk_management_delete_all.png]] | |||
<br><br> | |||
[[File:Recordings_bulk_management_confirm.png]] | |||
<br><br> | <br><br> | ||
Confirm that you really want to delete recordings of selected device. | |||
<br><br> | <br><br> | ||
To delete by date:<br> | |||
Go to '''ADDONS –> Recordings''' | Go to '''ADDONS –> Recordings''' | ||
<br><br> | <br><br> | ||
| Line 154: | Line 270: | ||
Click on [[image:icon_edit.png]] '''Bulk management''' link. | Click on [[image:icon_edit.png]] '''Bulk management''' link. | ||
<br><br> | <br><br> | ||
[[File: | [[File:Date bulkmanagement.png]] | ||
<br><br> | |||
Here you can check an option to delete by date, select date and click '''Delete'''. | |||
<br><br> | |||
[[File:Date recorddelete.png]] | |||
<br><br> | <br><br> | ||
Confirm that you really want to delete recordings of selected period. | |||
<br><br> | <br><br> | ||
To delete recordings for specific user and for specific date, please select user, date and click '''Delete'''. | |||
<br><br> | <br><br> | ||
[[File:Recorduserdate.png]] | |||
<br><br> | <br><br> | ||
= | = Recordings Quality Test = | ||
This feature allows to record Calls for specified Destination Group with desired quantity and send Recordings' links via e-mail. | |||
<br><br> | <br><br> | ||
=== Who can use this functionality? === | |||
* This feature is only available for MOR administrator and accountant (Manage Recordings Permission) | |||
<br> | |||
=== How to use this functionality === | |||
To setup new Quality Test:<br> | |||
Go to '''ADDONS –> Recordings –> Quality Test''' | |||
<br><br> | |||
[[File:Recordings_quality_test_menu_path.png]] | |||
<br><br> | |||
[[File:Recordings_quality_test_list.png]] | |||
<br><br> | |||
Set desired E-mail address, Destination Group, Calls Quantity and click on [[image:icon_add.png]] icon. | |||
<br><br> | |||
[[File:Recordings_quality_test_list_input.png]] | |||
<br><br> | |||
After Quality Test is created, MOR will collect Recordings with required Destination Group. | |||
Once Recordings quantity is met, shortly after links with Recordings will be sent to Email. | |||
<br><br> | <br><br> | ||
[[File:Recordings_quality_test_list_input_success.png]] | |||
<br><br> | <br><br> | ||
Once email is sent, corresponding Quality Test row will not be shown in list. | |||
<br><br> | <br><br> | ||
=See also= | =See also= | ||
* [[MOR Addons]] | * [[MOR Addons]] | ||
Latest revision as of 11:06, 21 June 2024
Description
Recordings functionality can be used to record selected users' calls for Monitoring purpose.
Functionality
Recording Addon provides this functionality:
- Record User Calls.
- Send a Recording to email.
- Limit space Users' space for Recordings.
- Record Calls without User knowledge.
- Let Users manage their Recordings (send to email/listen/download/delete).
- Convert recordings from WAV to MP3 format and store them on an external server, to ease the load on the main server.
NOTE: Reseller is able to have the same functions as an administrator if Allow to use recording functionality option is checked by Admin in resellers settings. In order for the calls to be recorded for resellers users the "Record calls for this Device:" option (located in the device edit window, "Recordings" block) has to be enabled by the reseller for the devices for which the calls should be recorded.
Limitations
- Recordings will not be saved on the server if there will be left less then 10% of free space. Such recordings will be sent directly to the Email (if email is specified in GUI Interface) and will be completely removed from the server.
- Calling Cards calls cannot be recorded.
Sound file format
Recordings are saved into mp3 format. 1MB can save around 4min of recordings.
Configuration
Adjust needed settings in ADDONS –> Recordings –> Settings
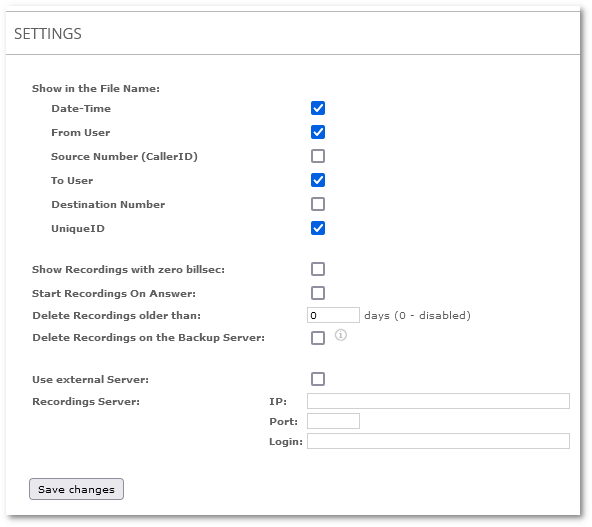
- Show in the File Name: select format for recording filename. This applies to filename when you download recording(s) over GUI interface. Recordings filename in the server will always be stored in internal Asterisk format uniqueid.mp3, where uniqued is in format unixtimestamp.xxxxx. Format rules also do not apply to recording files sent over email. Internal recording filename will be used for attachment.
- Show Recordings with zero billsec: Display recordings which have zero billsec.
- Start Recordings On Answer: by default, the recording starts before the call is answered. However, you have the option to start recording when the call is answered. This feature helps to minimize system resource usage.
- Delete Recordings older than: delete recordings older than x amount of days. 0 (default) means to no delete any recordings.
- Delete Recordings on the Backup Server - With this option enabled, MOR will explicitly delete recordings (both manually selected and automatically selected based on recordings age) on the Backup server. Use this option only if there are two GUI servers (Main and Backup) and there is a cron that syncs recordings between these servers. SSH connection using keys must be configured between the Main and Backup servers.
- IP: - IP of the backup server.
- Port: - SSH Port of the backup server.
- Login: - SSH username of the backup server.
- Path: - Recordings path on the backup server. Default /home/mor/public/recordings
- Use external Server: enable this option if you want to use External Recordings Server.
- Recordings Server: valid only if Use external Server: is enabled. More information available in External Recordings Server page.
In order to use Recording, you have to set up which Users' Calls you want to record.
Go to ADDONS –> Recordings –> Users and you will see this window:
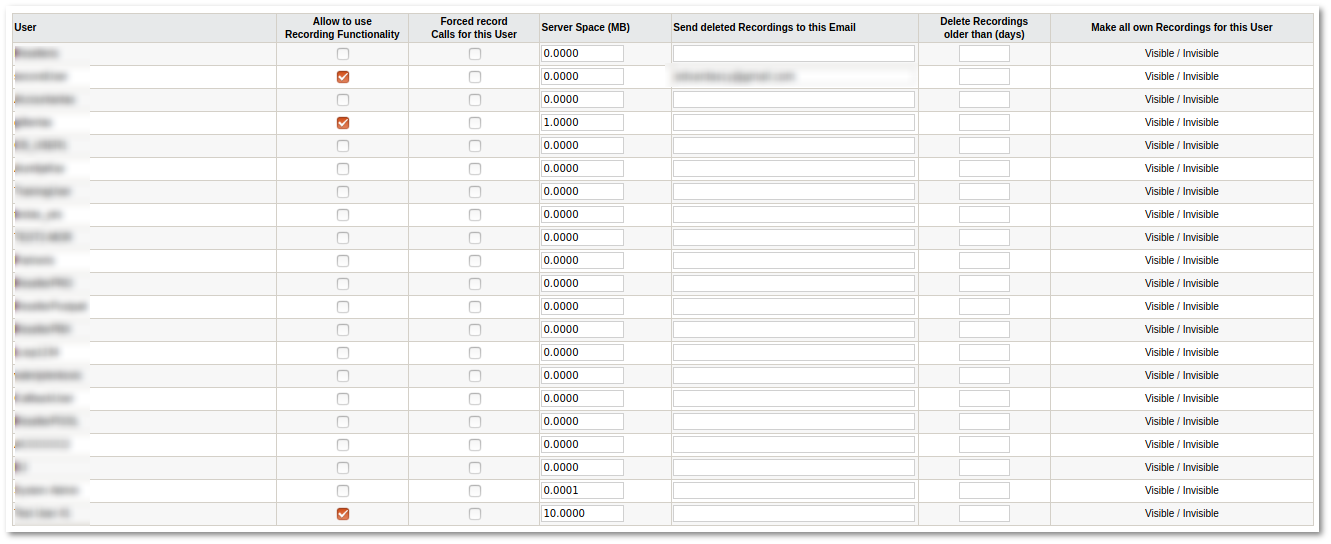
Here you can check the Forced record calls for this User field for the Users you want to record. By checking Allow to use recording functionality option you can authorize the User to use the Recordings Addon functionality. Click Update at the bottom for the changes to take effect. To allow particular Reseller to use Recordings functionality, "Allow to use recording functionality" option must be checked in his details.
If you leave Server space (MB) 0 - there will be no limitations in data usage (HDD will fill up after some time).
NOTE Recordings are NOT available in Calls between 2 SIP Devices in MOR.
SETTINGS –> Users –> Edit (on selected user)
The Recordings section has the following options:
- Allow to use recording functionality - can this user use the Recording addon functionality?
- Forced record calls for this User - record calls for this user (all devices) without user knowledge. This option has the highest priority.
when enabled - records for all User devices will be recorded regardless of other options (value in Device settings: Record calls for this Device: - will be ignored, Server space - dedicated for User will be ignored ant etc )
- Server space - how much HDD space to reserve for recordings of this user. Takes effect only if Admin has not enabled recordings for User himself. Such options should be set on appropriate User/Device by Admin in order to enable this function for User:
User settings
Forced record calls for this User: NO
Device settings:
   Record calls for this Device : NO
   Keep Recordings on Server after sent to Email: NO
- Send deleted recordings to this email. If HDD space is exceeded, the new recordings will not be saved and will be sent to this email instead. If this email is empty, the recording will be sent to the default user email. Recordings will be kept in server if email sending fails.
Device –> Edit window
The following options are available for Device:
- Record calls for this Device - record calls for this Device (without user knowledge). If this option is enabled, recordings must be deleted manually. If this option is set to YES, then server space - dedicated for User will be ignored and records will be placed on server regardless of this value
- Show Recordings to the User for this Device - allows User to see his recordings. Shows new recordings from time then this option enabled.
- Send Recording to Email - when recording is completed, send to it email. Recordings will be kept in server if email sending fails. Admin must enable "Allow to use recording functionality" for this User; and User, on his/her account must set "Record calls for this Device:" to "Yes" in the Device settings, otherwise, mail will not be sent.
- Recordings Email - send to this email address.
- Keep Recordings on Server after sent to Email - should the recording be left on the server after being sent to email? If this option is set to YES, then server space - dedicated for User will be ignored and records will be placed on server regardless of this value
Setup User so he could see his recorded Calls
1. As admin, go to User Edit settings ![]() and check Allow to use recording functionality. User will be able to use Recording addon functionality.
and check Allow to use recording functionality. User will be able to use Recording addon functionality.
2. Log in as this User and in PERSONAL MENU –> Details –> Devices, click ![]() for Device and in the Recordings section check Record calls for this Device: YES.
for Device and in the Recordings section check Record calls for this Device: YES.
3. Now the user will be able to see his calls in PERSONAL MENU –> Call –> Recordings.
User settings
The Administrator must authorize the User to use the Recording Addon functionality before User can use its functions. This can be done by checking Allow to use recording functionality in the User Edit window.
- Delete Recordings older than - any integer value higher than 0 enables functionality only for this User (ignoring Global Recordings Setting). Value 0 - disables deleting Recordings older than by days functionality, only for this User (ignoring Global Recordings Setting). Empty input box (no value at all) uses Global Recordings Setting.
PERSONAL MENU –> Details
- Server space - shows used/reserved HDD space for recordings. If limit reached , recordings will not be showed for user.
- Email for deleted Recordings - to which email recordings should be sent if there is not enough space for them.
PERSONAL MENU –> Details –> Devices –> Edit
- Record calls for this Device - user can set to record calls for this device or not.
- Send Recording to Email - should recording be sent to email? Recordings will be kept in server if email sending fails.
- Recordings Email - the email address email to which recordings should be sent.
- Keep Recordings on Server after sent to Email - should recordings be left on the server after being sent to email?
PERSONAL MENU –> Calls –> Recordings
On this page, the User can manage his recordings.
User Owner can decide:
- Whether or not the user can use Recording Addon functionality (set to record calls, send recordings to email, etc).
- Which user calls should always be recorded (without User knowledge).
Record not answered calls
In order to enable this functionality few changes a needed:
1) Edit /etc/asterisk/mor.conf
vi /etc/asterisk/mor.conf
and set record_not_answered_calls = 1
This option record_not_answered_calls - save audio to the file while the channel is not answered (not bridged), default 0 (by default records only answered calls).
2) Option Show Recordings with zero billsec should be enabled in GUI.
To enable it go to Addons –> Recordings –> Settings and check option Show recordings with zero billsec.
Now system records not answered calls for all users which are using recording functionality.
Recordings are located in ADDONS –> Recordings.
In recording list you will be able to see recordings without duration.
Such calls were not answered but recorded.

Delete recordings after sending it via e-mail
1. As admin, go to User Edit settings ![]() and check Allow to use recording functionality. User will be able to use Recording addon functionality. Do not check Forced record calls for this User because it this way recordings will NOT be deleted.
and check Allow to use recording functionality. User will be able to use Recording addon functionality. Do not check Forced record calls for this User because it this way recordings will NOT be deleted.
2. Log in as this User and in PERSONAL MENU –> Personal Details –> Devices, click ![]() for Device and in the Recordings section check Keep Recordings on Server after sent to Email: NO.
for Device and in the Recordings section check Keep Recordings on Server after sent to Email: NO.
3. Now recordings will be deleted immediately after they will be sent via e-mail.
Recordings on external server
Manage settings for recordings upload to external server go to ADDONS –> Recordings –> Settings
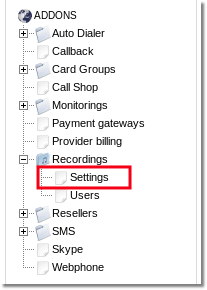
you will reach settings page

- Use external Server - should system send recordings to External Recordings Server? Please check instructions how to setup External Recordings Server.
- Recordings server - details such as IP/Port/Login where port is SSH default port 22 and Login is default root.
- By default recording files in remote server will be placed at /tmp directory
P.S. SSH keys must be configured without password in order scp command could transfer the recordings to other server. If this functionality is not enabled - the recordings are stored in local server
Recordings on additional HDD
If you want to save recordings on an additional HDD, please follow this instruction.
Recordings HDD usage
By default, recordings will not be stored on HDD if free space drops below 10%. If the limit is reached, recordings will be sent to email.
It is possible to set a specific free space limit (in gigabytes) to control when recordings should be sent to email and deleted from the HDD. To set this limit, edit /etc/mor/system.conf file in each Asterisk server and add the following line:
recordings_hdd_free_space_limit_gb = X
Here X is the limit in gigabytes. For example recordings_hdd_free_space_limit_gb = 5 will force recordings to be sent via email (instead of storing them on HDD) when free space left on the recordings partition is 5GB or less.
Do not send Recordings to Email on free space limit
By default, Recordings are sent to the User via Email when the free space limit is reached (either global HDD space limit or personal User Server Space limit). To disable these emails, add the following option to /etc/mor/system.conf:
recordings_no_email_on_free_space_limit = 1
Note that in this case Recordings will be lost (deleted from the server and not sent to the User).
Usage
To view/listen/download/delete recorded Calls go to ADDONS –> Recordings. You will see something like this:

Here Admin/Reseller can see all recordings, search Recordings by:
- Period.
- Source (CallerID).
- Destination (Dialed number).
- User.
- Device.
- Provider.
With each recording, it is possible to:
- Check its details.
- Check Call details.
- Add comment to it (note that User and Admin have different comment fields)
- Listen to it.
- Download it.
- Delete it.
NOTE: It is available to use recordings 15 minutes after call was made. Till then you may see the message Recording was not found locally. When listening to a recording its row will turn green as an indicator that the recording was listened.

Recordings bulk management
This feature allows an administrator to quickly delete Recordings for selected period or selected Device
Who can use this functionality?
- This feature is available for MOR administrator and Users.
By default, simple Users can listen and download selected recordings. Please note that Users need to have enabled Recording functionality.
If you want to let simple users to delete Recordings. Special permission must be enabled at Users->User_Permissions->Recordings delete.
How to use this functionality
To delete by device:
Go to ADDONS –> Recordings
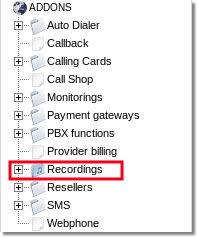
Click on ![]() Bulk management link.
Bulk management link.

Here you can check an option to delete by device, select device and click Delete.
To delete all recordings from all devices at once, select All.

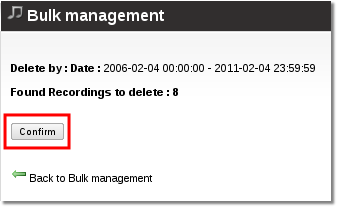
Confirm that you really want to delete recordings of selected device.
To delete by date:
Go to ADDONS –> Recordings

Click on ![]() Bulk management link.
Bulk management link.
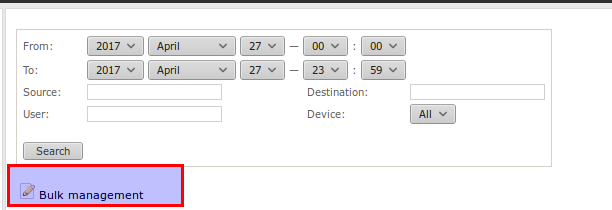
Here you can check an option to delete by date, select date and click Delete.

Confirm that you really want to delete recordings of selected period.
To delete recordings for specific user and for specific date, please select user, date and click Delete.

Recordings Quality Test
This feature allows to record Calls for specified Destination Group with desired quantity and send Recordings' links via e-mail.
Who can use this functionality?
- This feature is only available for MOR administrator and accountant (Manage Recordings Permission)
How to use this functionality
To setup new Quality Test:
Go to ADDONS –> Recordings –> Quality Test
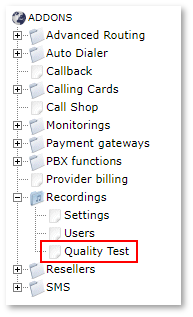

Set desired E-mail address, Destination Group, Calls Quantity and click on ![]() icon.
icon.

After Quality Test is created, MOR will collect Recordings with required Destination Group.
Once Recordings quantity is met, shortly after links with Recordings will be sent to Email.

Once email is sent, corresponding Quality Test row will not be shown in list.
