Difference between revisions of "CDR Import"
(→Step 4) |
|||
| (54 intermediate revisions by 10 users not shown) | |||
| Line 1: | Line 1: | ||
= Description = | |||
Sometimes MOR can be used as separate billing software (that is, other than for real-time billing). In case if MOR is used as separate billing software, CDRs Import is most important functionality, because it allows to import CDRs from other switches (they need not be Asterisk) and bill these CDRs. | |||
<br><br> | |||
= Configuration = | = Configuration = | ||
In [[Configuration_from_GUI#Various | Configuration]], make sure you select the correct options for these values: | |||
* '''CSV Column Separator''' | * '''CSV Column Separator'''. | ||
* '''CSV Decimal Separator''' | * '''CSV Decimal Separator'''. | ||
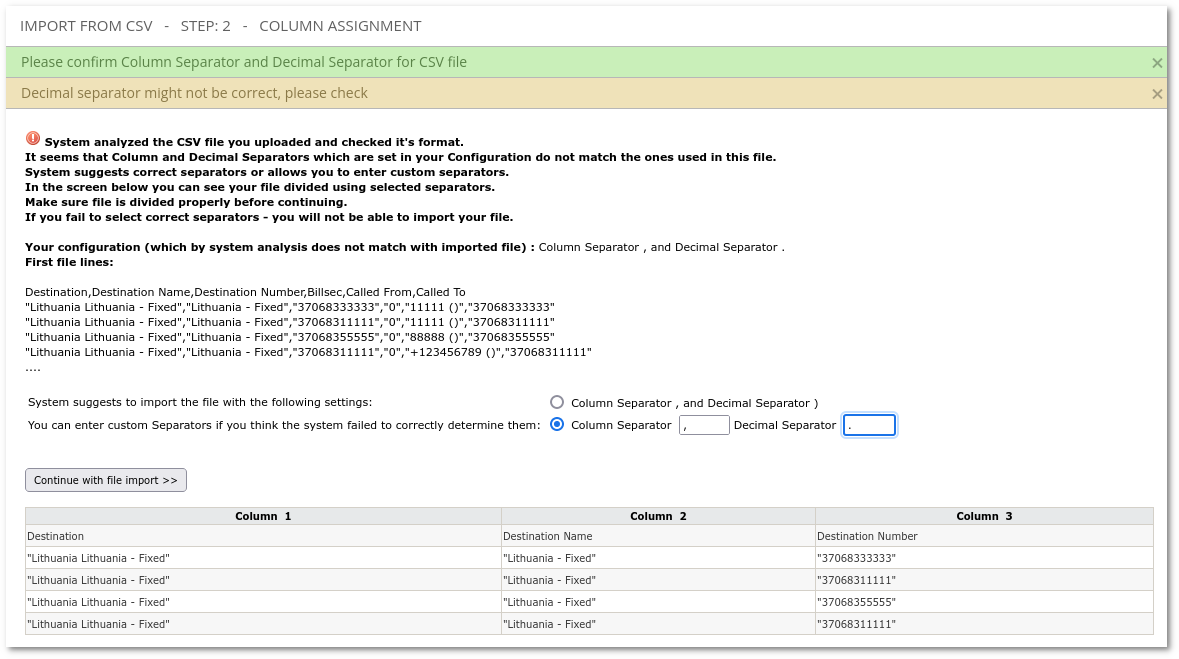
If the settings do not match your CSV file, you will not be able to import CDRs. | If the settings do not match your CSV file, you will not be able to import CDRs. | ||
<br><br> | <br><br> | ||
=Import= | |||
= | ==Step 1 == | ||
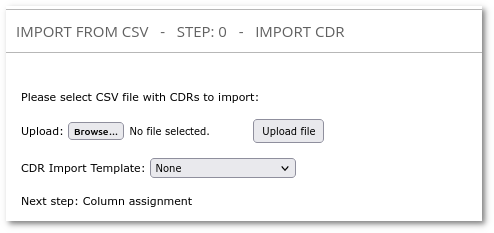
CDR Import can be found in '''SETTINGS –> Billing –> CDR –> Import'''. | |||
CDR Import can be found in '''SETTINGS – Billing – | |||
The first step is to select a CSV file to import: | |||
<br><br> | |||
[[Image:cdrimport1.png]] | [[Image:cdrimport1.png]] | ||
<br><br> | |||
Click on '''Upload file'''. | |||
We can also optionally select the already created [[CDR_Import_Templates | CDR Import template]]. | |||
If we choose Template, we will go directly to Step 3. | |||
== Step 2 (Optional)== | |||
Sometimes MOR system is able to detect wrong CSV separator settings. If CSV separator settings are wrong MOR will suggest you change them: | |||
<br><br> | |||
[[File:Cdr_import_wrong_separators.png]] | |||
<br><br> | |||
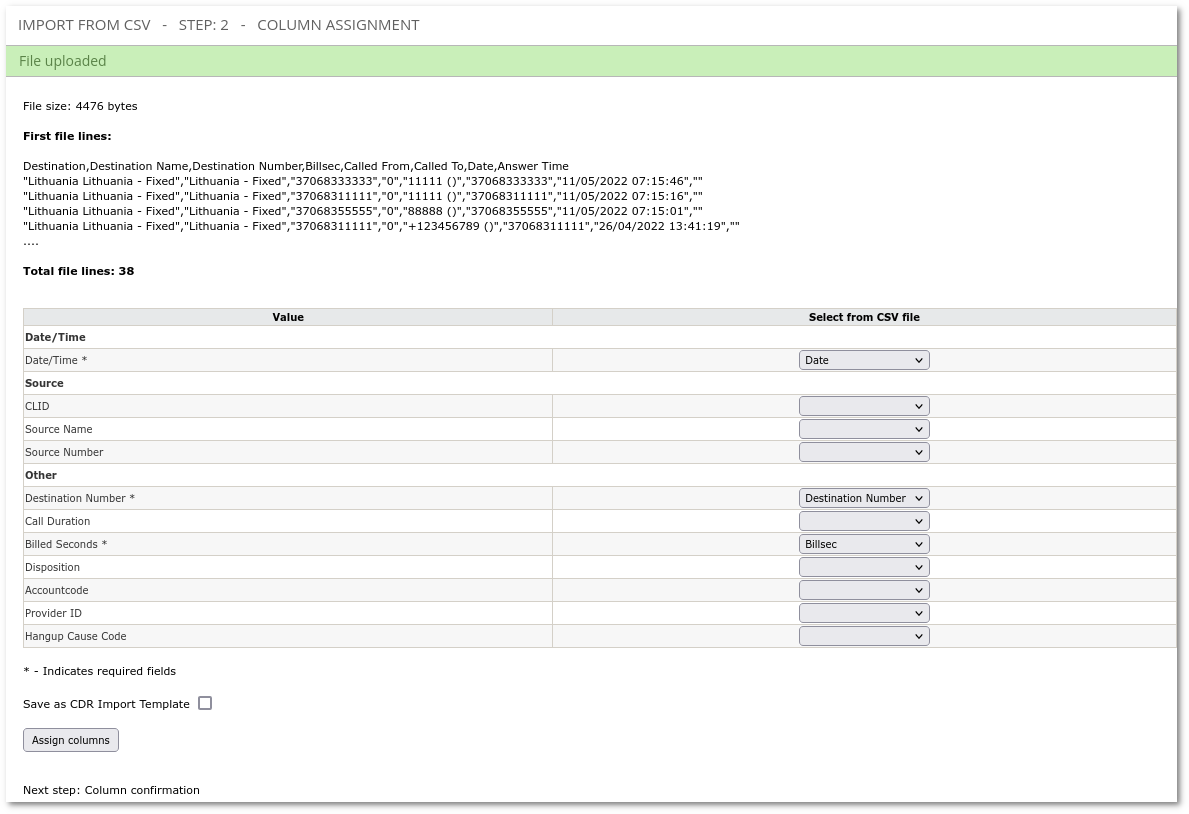
[[Image: | Next, you will have to assign columns to CDR values. This step is needed only if the template is not selected in Step 1. Required fields are marked by a star (*), all others are optional. Without selecting at least one field marked by *, you will not be able to continue the import process. Select the appropriate settings and click '''Assign Columns''': | ||
<br><br> | |||
[[Image:cdrimport2_2.png]] | |||
<br><br> | |||
Option '''Save as CDR Import Template''' allows you to automatically save assigned columns as a [[CDR_Import_Templates | CDR template]] so that you could use this template for future imports. | |||
==Step 3 == | |||
Here you will be presented with a parsed file. If something is not right, click the '''Back''' button. If it's okay, click '''Confirm columns''': | |||
<br><br> | |||
[[Image:cdrimport3.png]] | [[Image:cdrimport3.png]] | ||
<br><br> | |||
==Step 4 == | |||
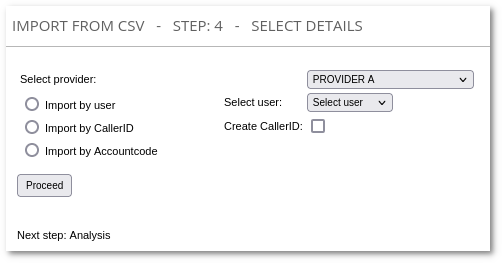
Here you can choose method which should be used to assign calls to device: | |||
<br><br> | |||
[[Image:cdrimport4_2.png]] | |||
<br><br> | |||
* '''Select provider''' - allows to assign calls to certain provider. You will not see this option if you selected provider ID in step 2. | |||
* '''Import by user''' - allows to assign calls to one user. | |||
* '''Select user''' - user and device should be chosen here, when '''Import by user''' is selected. | |||
* '''Import by CallerID''' - allows to automatically assign calls to users by CallerID. It checks [[CLIs_(Incoming_CallerIDs)|CLIs]] on Device settings. If CLI matches with CallerID call is assigned to this Device. | |||
* '''Import by Accountcode''' - allows to automatically assign calls to users by accountcode. | |||
Admin are able to assign Calls to CLI of Device which belongs to User of Simple Reseller. Admin cannot import calls for Reseller PRO Users, but Reseller PRO able to import such Calls by himself. | |||
* '''Create CallerID''' - creates list of all CallerIDs on CDR file and allows to assign CallerIDs to Devices. It creates new CLIs. | |||
<br> | |||
====Choosing provider ID during the import==== | |||
There is an option in step 2 where you can choose provider ID. System automatically selects tariff according to the ID from the file which is the same as Provider ID in MOR. | |||
If there is provider ID in a file that doesn't exist in a system, file is not imported and you are informed about bad CDRs in step 5. If you chose to leave Provider ID not selected in step 2, everything is fine and you won't see the line "Bad CDRs". | |||
<br><br> | |||
[[Image:cdrimport5_2.png]] | |||
<br><br> | |||
When you choose to import provider ID in step 2, you can select Provider in step 6, but this is optional. This column will not be visible if you are not importing provider's ID. | |||
<br><br> | |||
[[Image:cdrimport6_4.png]] | |||
<br><br> | |||
=Imported Calls Billing= | |||
Imported Calls are billed using [[CDR Rerating]] functionality logic. This means that imported Calls will be re-rated using Tariffs' Rates of MOR Resellers, Users and Providers who will be assigned for Calls during Calls Import. | |||
<br><br> | |||
=How to use file exported form [[Last Calls]]= | |||
You can export CDR in either the PDF or the CSV format. This can be done in the Call Stats page ('''STATISTICS –> Calls''') and other places where you see: | |||
* [[Image:pdf.png]] Export to PDF | |||
* [[Image:excel.png]] Export to CSV | |||
Just cick on one of these links and you will get CDR in the selected period. | |||
<br><br> | |||
Make sure that before exporting Last Calls, setting '''Show Full Source (CallerID Name and Number)''' in Settings Visual tab is '''unchecked''', otherwise CallerId will be exported not correctly and CDR import will be unsuccessful. | |||
<br> | |||
Check your localization rules before the import. Exported calls are localized calls (localization rules were applied to these calls). Localization rules are applied for the imported calls as well. This is how it is suppose to be, since: | |||
<br> | |||
1) If you import numbers which are not in E.164 format (not from MOR), localization rules will be applied and the calls will be billed correctly. | |||
<br> | |||
2) If you import numbers in E.164 format, they will not be changed, since there should be no localization rules for good numbers in E.164 format. | |||
<br> | |||
However, you can encounter a problem if you have incorrect Localization rules in a MOR systems. | |||
====Example of a wrong configuration==== | |||
[[ | *There is a Global rule for international calls: '''Cut''': 00, '''Add''': , '''Min''': 1, '''Max''': 100. | ||
*There is also a rule for Spain local calls: '''Cut''': 9, '''Add''': 349, '''Min''': 1, '''Max''': 100. | |||
If you had a call too destination: 00972xxxxxxxxx, it will be changed to 972xxxxxxxxx (Israel number). You export the CDR of this call and re-import it (or import it to another MOR system), then localization rules will be applied again and you will have destination number 34972xxxxxxxxx (Spain number). To avoid this, use correct [[Number_Manipulation_Examples#Example_4_-_Spain | localization rules]]. | |||
<br><br> | |||
= Other Notes= | |||
If CDR, where Billsec is more than 0, then: | |||
*When Disposition is not selected, it will be set to "ANSWERED". | |||
*When Hangup Cause Code is not selected, it will be set to "16". | |||
If CDR, where Billsec is equal to 0, then: | |||
*When Disposition is not selected, it will be set to "FAILED". | |||
*When Hangup Cause Code is not selected, it will be set to "0". | |||
== Calls to DIDs == | |||
Calls to DIDs are billed as for calls to normal numbers.<br> | |||
Calls to DIDs which belong to the caller are not billed at all (Price = 0). | |||
<br><br> | |||
== Import of duplicated CDRs == | |||
CDR Import will only detect CDRs as duplicates if date, source and destination number matches. To import duplicated CDRs modify one of those fields. | |||
<br><br> | |||
= See also = | |||
* [[How to create a csv file]] | |||
* [[CDR Rerating]] | |||
* [[Automatic CDR Export]] | |||
* [[CDR Import Templates]] | |||
Latest revision as of 13:59, 12 May 2023
Description
Sometimes MOR can be used as separate billing software (that is, other than for real-time billing). In case if MOR is used as separate billing software, CDRs Import is most important functionality, because it allows to import CDRs from other switches (they need not be Asterisk) and bill these CDRs.
Configuration
In Configuration, make sure you select the correct options for these values:
- CSV Column Separator.
- CSV Decimal Separator.
If the settings do not match your CSV file, you will not be able to import CDRs.
Import
Step 1
CDR Import can be found in SETTINGS –> Billing –> CDR –> Import.
The first step is to select a CSV file to import:
Click on Upload file.
We can also optionally select the already created CDR Import template. If we choose Template, we will go directly to Step 3.
Step 2 (Optional)
Sometimes MOR system is able to detect wrong CSV separator settings. If CSV separator settings are wrong MOR will suggest you change them:
Next, you will have to assign columns to CDR values. This step is needed only if the template is not selected in Step 1. Required fields are marked by a star (*), all others are optional. Without selecting at least one field marked by *, you will not be able to continue the import process. Select the appropriate settings and click Assign Columns:
Option Save as CDR Import Template allows you to automatically save assigned columns as a CDR template so that you could use this template for future imports.
Step 3
Here you will be presented with a parsed file. If something is not right, click the Back button. If it's okay, click Confirm columns:

Step 4
Here you can choose method which should be used to assign calls to device:
- Select provider - allows to assign calls to certain provider. You will not see this option if you selected provider ID in step 2.
- Import by user - allows to assign calls to one user.
- Select user - user and device should be chosen here, when Import by user is selected.
- Import by CallerID - allows to automatically assign calls to users by CallerID. It checks CLIs on Device settings. If CLI matches with CallerID call is assigned to this Device.
- Import by Accountcode - allows to automatically assign calls to users by accountcode.
Admin are able to assign Calls to CLI of Device which belongs to User of Simple Reseller. Admin cannot import calls for Reseller PRO Users, but Reseller PRO able to import such Calls by himself.
- Create CallerID - creates list of all CallerIDs on CDR file and allows to assign CallerIDs to Devices. It creates new CLIs.
Choosing provider ID during the import
There is an option in step 2 where you can choose provider ID. System automatically selects tariff according to the ID from the file which is the same as Provider ID in MOR.
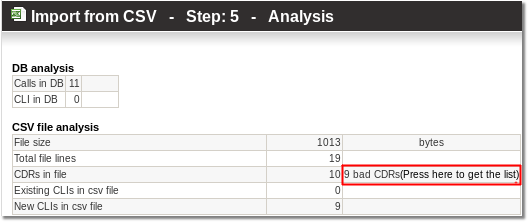
If there is provider ID in a file that doesn't exist in a system, file is not imported and you are informed about bad CDRs in step 5. If you chose to leave Provider ID not selected in step 2, everything is fine and you won't see the line "Bad CDRs".
When you choose to import provider ID in step 2, you can select Provider in step 6, but this is optional. This column will not be visible if you are not importing provider's ID.

Imported Calls Billing
Imported Calls are billed using CDR Rerating functionality logic. This means that imported Calls will be re-rated using Tariffs' Rates of MOR Resellers, Users and Providers who will be assigned for Calls during Calls Import.
How to use file exported form Last Calls
You can export CDR in either the PDF or the CSV format. This can be done in the Call Stats page (STATISTICS –> Calls) and other places where you see:
Just cick on one of these links and you will get CDR in the selected period.
Make sure that before exporting Last Calls, setting Show Full Source (CallerID Name and Number) in Settings Visual tab is unchecked, otherwise CallerId will be exported not correctly and CDR import will be unsuccessful.
Check your localization rules before the import. Exported calls are localized calls (localization rules were applied to these calls). Localization rules are applied for the imported calls as well. This is how it is suppose to be, since:
1) If you import numbers which are not in E.164 format (not from MOR), localization rules will be applied and the calls will be billed correctly.
2) If you import numbers in E.164 format, they will not be changed, since there should be no localization rules for good numbers in E.164 format.
However, you can encounter a problem if you have incorrect Localization rules in a MOR systems.
Example of a wrong configuration
- There is a Global rule for international calls: Cut: 00, Add: , Min: 1, Max: 100.
- There is also a rule for Spain local calls: Cut: 9, Add: 349, Min: 1, Max: 100.
If you had a call too destination: 00972xxxxxxxxx, it will be changed to 972xxxxxxxxx (Israel number). You export the CDR of this call and re-import it (or import it to another MOR system), then localization rules will be applied again and you will have destination number 34972xxxxxxxxx (Spain number). To avoid this, use correct localization rules.
Other Notes
If CDR, where Billsec is more than 0, then:
- When Disposition is not selected, it will be set to "ANSWERED".
- When Hangup Cause Code is not selected, it will be set to "16".
If CDR, where Billsec is equal to 0, then:
- When Disposition is not selected, it will be set to "FAILED".
- When Hangup Cause Code is not selected, it will be set to "0".
Calls to DIDs
Calls to DIDs are billed as for calls to normal numbers.
Calls to DIDs which belong to the caller are not billed at all (Price = 0).
Import of duplicated CDRs
CDR Import will only detect CDRs as duplicates if date, source and destination number matches. To import duplicated CDRs modify one of those fields.
