Difference between revisions of "How to set up Google App Passwords"
| (5 intermediate revisions by the same user not shown) | |||
| Line 3: | Line 3: | ||
= Google App Password configuration = | |||
<br> | <br> | ||
Google App Passwords generation is a two-part process. Firstly, we need to enable two-factor authentication. Once this is enabled we will be able to generate Google App Password for MOR/M4. | |||
<br><br> | <br><br> | ||
== Enabling 2-Step Verification == | |||
<br> | <br> | ||
Two-Step verification is documented by Google [https://support.google.com/accounts/answer/185839 on this page]. | Two-Step verification is documented by Google [https://support.google.com/accounts/answer/185839 on this page]. | ||
| Line 13: | Line 13: | ||
Here is a step-by-step example with screenshots for a 2-Step Verification with SMS: | Here is a step-by-step example with screenshots for a 2-Step Verification with SMS: | ||
<br><br> | <br><br> | ||
1. Go to your https://myaccount.google.com/ | 1. Go to your [https://myaccount.google.com/ Google Account]. This should be the account you will use for MOR/M4. If you currently using a different account, please log in to the correct one which is used in MOR/M4. | ||
2. Click on '''Security'''. | 2. Click on '''Security'''. | ||
| Line 44: | Line 44: | ||
<br><br> | <br><br> | ||
== Generating Google App Password == | |||
Google App Passwords is documented by Google [https://support.google.com/accounts/answer/185833 on this page]. | Google App Passwords is documented by Google [https://support.google.com/accounts/answer/185833 on this page]. | ||
| Line 66: | Line 66: | ||
<br>[[File:gmail9.png]]<br><br> | <br>[[File:gmail9.png]]<br><br> | ||
5. Google will ask to enter the device name. We suggest entering either MOR or M4 (depending on which switch | 5. Google will ask to enter the device name. We suggest entering either MOR or M4 (depending on which switch you use). Press '''Generate'''. | ||
<br>[[File:gmail10.png]]<br><br> | <br>[[File:gmail10.png]]<br><br> | ||
6. The app password (16-character code) will be displayed in Yellow bar. This is the code you will use in MOR/M4. Please note that code is displayed with space every 4 characters, but once you copy, it will be copied correctly as 16-character code without spaces. | 6. The app password (16-character code) will be displayed in the Yellow bar. This is the code you will use in MOR/M4. Please note that code is displayed with space every 4 characters, but once you copy, it will be copied correctly as 16-character code without spaces. After copying the password, click '''DONE'''. | ||
[[File:gmail11.png]]<br> | [[File:gmail11.png]]<br> | ||
<br><br> | <br><br> | ||
= Configuration in MOR/M4 = | |||
<br><br> | <br><br> | ||
== Configuration for Switch SMTP server== | |||
If you are using the Gmail SMTP server to send emails from your switch, enter generated App Password: | If you are using the Gmail SMTP server to send emails from your switch, enter generated App Password: | ||
* In MOR, go to [[ | * In MOR, go to [[Configuration_from_GUI#Emails | MOR Email Settings]] and put generated App Password in the '''Password''' field. | ||
* In M4, go to [[ | * In M4, go to [[M2-M4_Settings#Emails | M4 Email Settings]] and put generated App Password in the '''Password''' field. | ||
<br><br> | <br><br> | ||
== Configuration for POP server used in Automatic Tariff Import == | |||
This is relevant only if you are using [[Automatic Tariff Import]]. | This is relevant only if you are using [[Automatic Tariff Import]]. | ||
Latest revision as of 09:33, 11 May 2023
Description
Starting from May 30, 2022, Google no longer supports the Less secure app access option. This means that the only way to use Google email servers in MOR/M4 is by using Google App Passwords.
Google App Password configuration
Google App Passwords generation is a two-part process. Firstly, we need to enable two-factor authentication. Once this is enabled we will be able to generate Google App Password for MOR/M4.
Enabling 2-Step Verification
Two-Step verification is documented by Google on this page.
Here is a step-by-step example with screenshots for a 2-Step Verification with SMS:
1. Go to your Google Account. This should be the account you will use for MOR/M4. If you currently using a different account, please log in to the correct one which is used in MOR/M4.
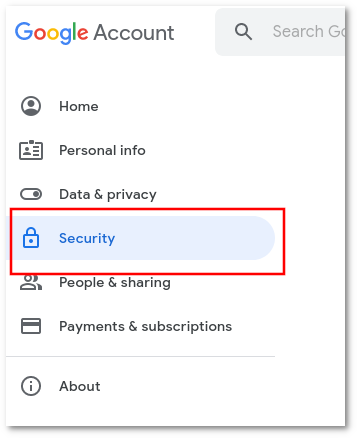
2. Click on Security.
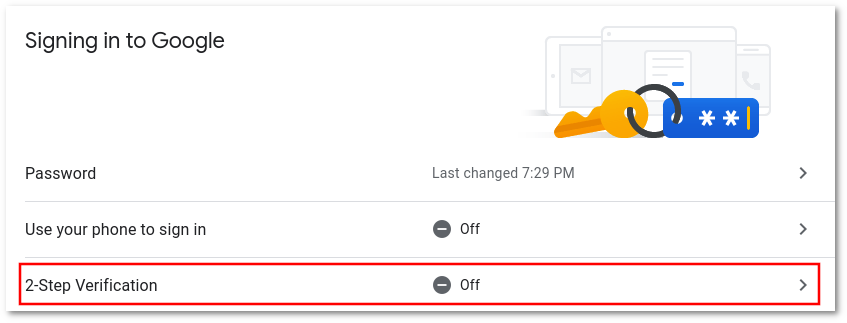
3. Click on 2-Step Verification.
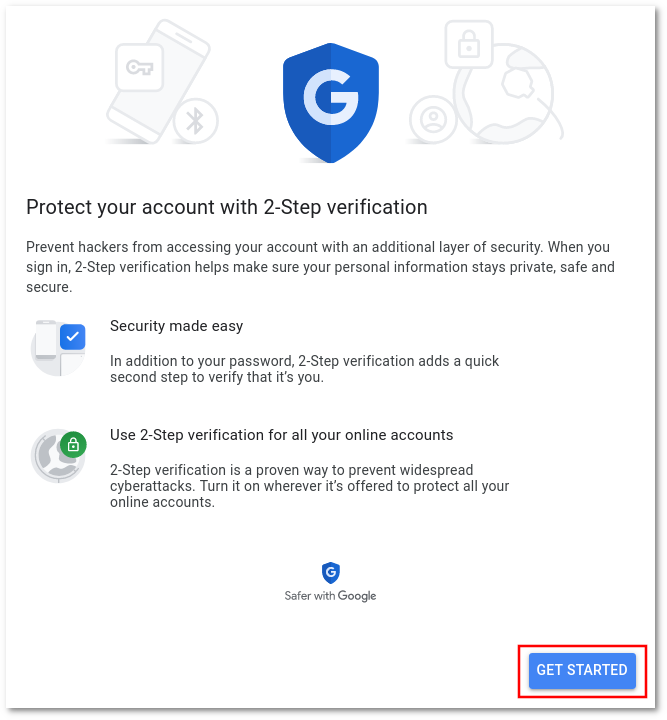
4. 2-Step Verification window will open. Click on GET STARTED.
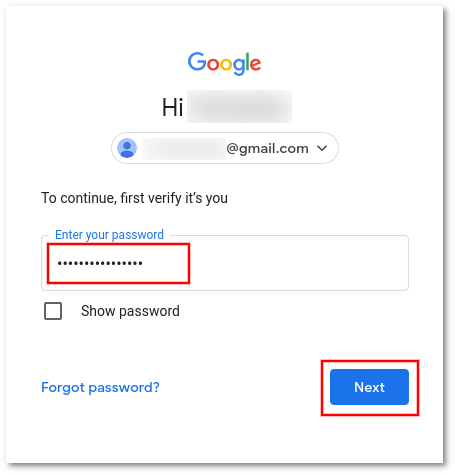
5. If Google will ask you to authenticate again, enter the correct password for your account.
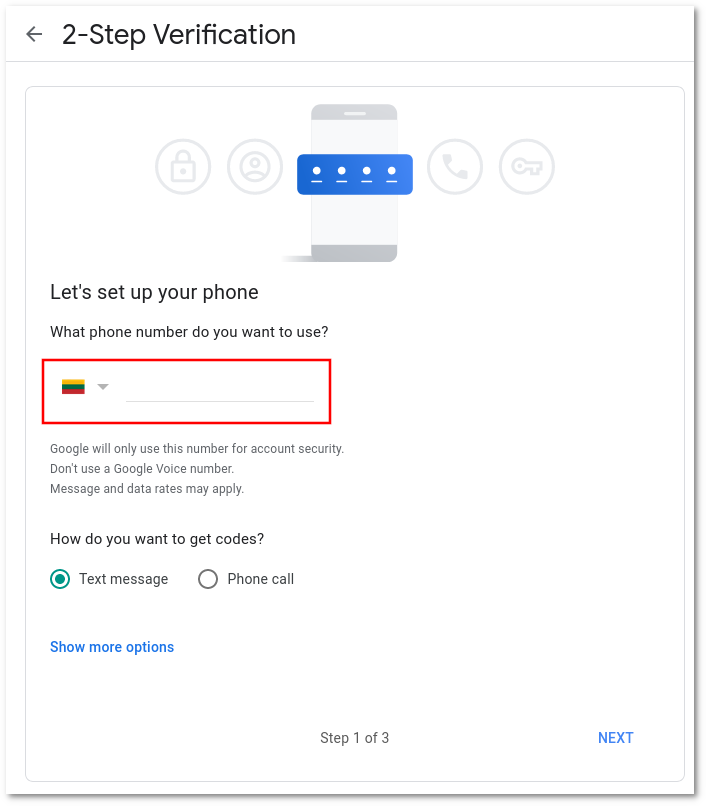
6. Enter your Phone which will receive SMS during a 2-Step Verification and click NEXT.
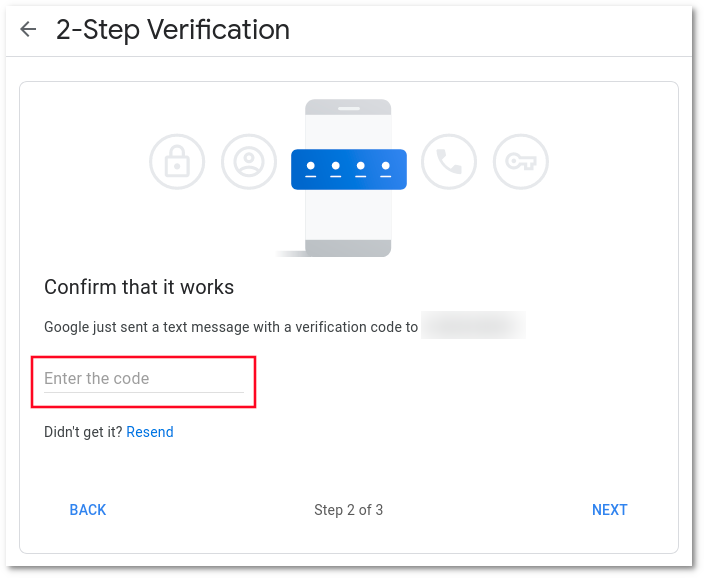
7. Enter the code that you received from Google and click NEXT.
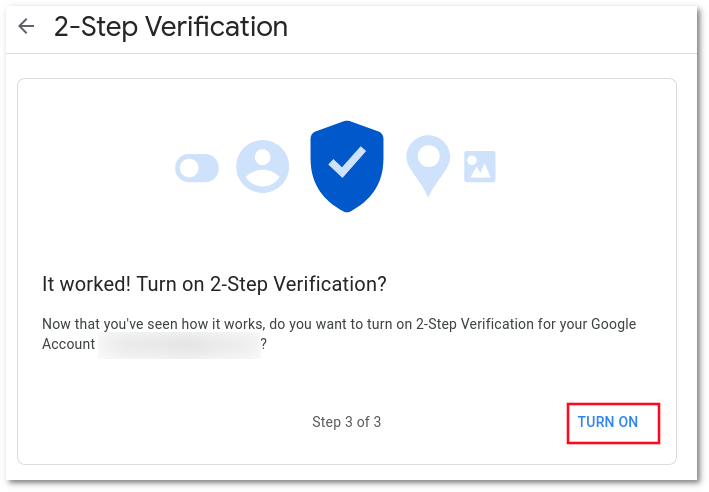
8. Turn on 2-Step Verification.
Generating Google App Password
Google App Passwords is documented by Google on this page.
Here is a step-by-step example with screenshots that demonstrates how to generate Google App Password for MOR/M4:
1. Go to your Google Account. This should be the account you will use for MOR/M4. If you currently using a different account, please log in to the correct one which is used in MOR/M4.
2. Click on Security.
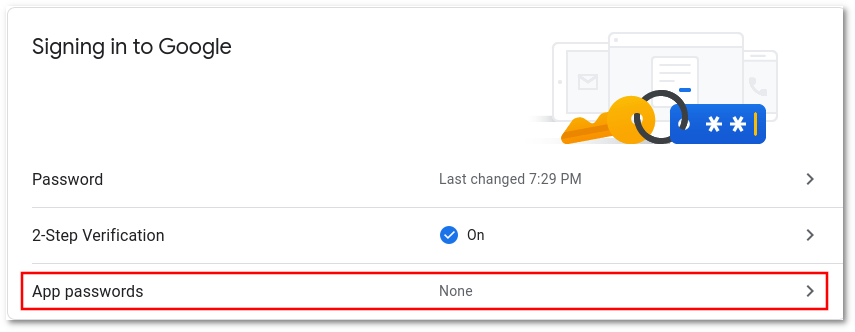
3. Select App passwords. If Google will ask you to authenticate again, enter the correct password for your account.
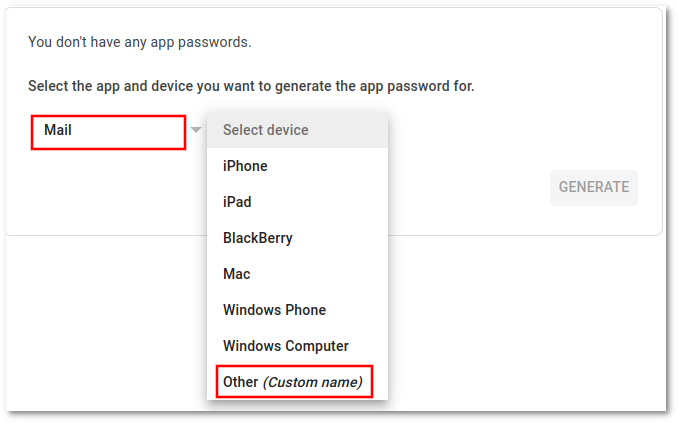
4. In App passwords window:
- In Select app choose Mail
- In Select device choose Other (Custom name)
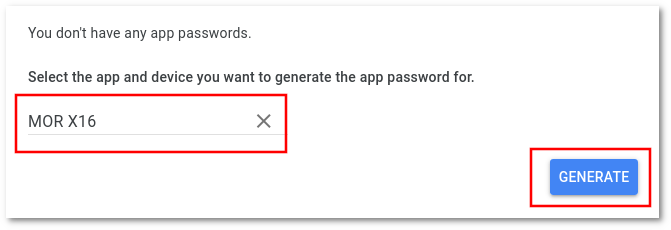
5. Google will ask to enter the device name. We suggest entering either MOR or M4 (depending on which switch you use). Press Generate.
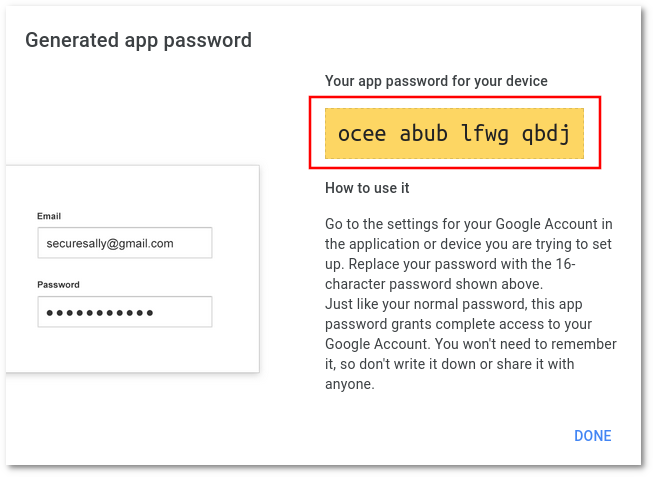
6. The app password (16-character code) will be displayed in the Yellow bar. This is the code you will use in MOR/M4. Please note that code is displayed with space every 4 characters, but once you copy, it will be copied correctly as 16-character code without spaces. After copying the password, click DONE.
Configuration in MOR/M4
Configuration for Switch SMTP server
If you are using the Gmail SMTP server to send emails from your switch, enter generated App Password:
- In MOR, go to MOR Email Settings and put generated App Password in the Password field.
- In M4, go to M4 Email Settings and put generated App Password in the Password field.
Configuration for POP server used in Automatic Tariff Import
This is relevant only if you are using Automatic Tariff Import.
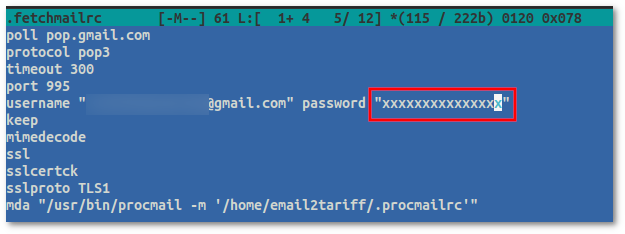
The same instructions apply both for MOR and M4. On your switch (use GUI server if the switch is a multiserver system), log in over SSH and:
- Open file /root/.fetchmailrc with text editor, for example mcedit
mcedit /root/.fetchmailrc
- Replace current password with generated App Password. If using mcedit, press F2 to save changes and F10 to exit the editor.
This is it, from now switch will use generated App Password to login to Gmail POP server and download email.
