Difference between revisions of "Heartbeat configuration"
| Line 177: | Line 177: | ||
Make this on both servers. | Make this on both servers. | ||
= system.conf = | |||
In file '''/etc/mor/system.conf''' add variable VIRTUAL_IP with correct virtual IP | |||
VIRTUAL_IP=xx.xx.xx.xx | |||
= mor.conf = | = mor.conf = | ||
Revision as of 14:32, 2 February 2021
What is High availability?
High availability is a system design protocol and associated implementation that ensures a certain absolute degree of operational continuity during a given measurement period.
Lets say you have two servers 'A' and 'B' with MOR installed, MySQL is running replication between them. By default all trafic comming to server 'A' is monitored by server 'B', so when server 'A' fails, server 'B' stands in its position by given time.
So allmost no data is lost, and your users will be happy with your services.
What is Heartbeat?
Heartbeat is software which implements these monitoring and availability features for your servers. It must be carrefully installed, configured and tested on both servers to ensure correct producing of services.
What do you need to know before starting
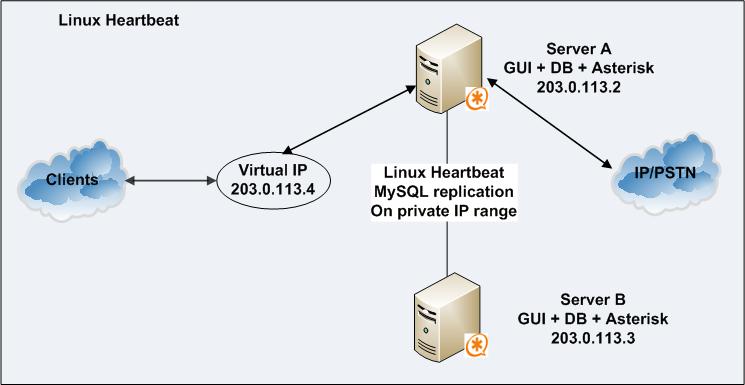
Please review once more the provided above scheme. It represents a typical Linux Heartbeat configuration. Before starting you have to be aware of 4 main points:
1. All public IP addresses have to be on same subnet.
2. Virtual IP has to be free (not assigned to any device on the network) and the last octet of the address (in this case .4 is the last octet) has to be the highest in the configuration. Server A and B have to be on "lower" IP, in this case .2 and .3 (the last octet).
3. Never use servers when they are off-line as it will ruin the MySQL replication.
4. After heartbeat configuration has been made, do not change the addressing scheme or the host-names of the servers.
Installation
Hearbeat 2.99 has been full tested on Centos 5.2 only, there is no guarantee that it will work on older versions or distros.
Download mor install scripts from svn. in both servers.
Run /usr/src/mor/sh_scripts/install_heartbeat.sh in both servers
Script will:
* download special file, then yum automaticaly install correct heartbeat files for your system.
* install pacemaker, its future only.
* configure /etc/ha.d/authkeys so you don't need to change anything here
* configure /etc/ha.d/ha.cf file, but you still need adjust it by hand (how? later on this page).
* configure /etc/ha.d/haresources file, but you still need to change few bits there, also, later on this page.
* add 3 lines to /etc/hosts, but just for testing purposes only, so you will have to change IPs here.
ATTENTION: if you installed Heartbeat manually, please make sure that you have same version of Heartbeat on both servers. You will probably need same Centos version on both servers to do that.
Configuration
Before going further, you need to setup hostname of both servers. Make sure master will have node01 and slave node02. (uname -n) must return correct words.
Make sure to remove all services which are related to Heartbeat from the runlevels:
chkconfig --list
If you want to turn off startup for service (for example asterisk):
chkconfig asterisk off
Edit /etc/sysconfig/network to change your hostname. Then reboot your machine.
First configure master (node01):
Open /etc/hosts and you will see something like this:
192.168.0.131 node01 #change to correct IP
192.168.0.132 node02 #change to correct IP here aswell
192.168.0.130 virtual_ip #change 192.168.0.130 to correct virtual IP here
Change IP of node01 to master machine, which "accept all incoming traffic by default".
Change IP of node02 to slave machine which "accept all data, if master will die".
Change IP of virtual_ip to virtual IP of the system (the same IP which we will use later in /etc/ha.d/haresources)
Note: node01 and node02 should be replaced with actual hostnames of master and slave server if they are not set to node01 and node02 respectively, while virtual_ip is static and you do need to change it, just change IP to actual system virtual IP.
Open /etc/ha.d/ha.cf and change:
Deadtime higher or lower setting. Deadtime means how many seconds have to pass before take over job from master.
Remember, this should be lower on on "lightly" loaded machines, and higher and "highly" loaded machines.
Deadtime 10 is more than enough. (Default is 5)
Make sure you add 2 network interfaces for heartbeat broadcasts.
The ucast directive configures Heartbeat to communicate over a UDP unicast communications link.
For example 'ucast eth0 10.10.10.133'.
This directive will cause us to send packets to 10.10.10.133 over interface eth0.
If you like to use more than one interface for communication between nodes, you can add multiple lines with ucast directive.
The udpport directive is used to configure which port is used for these unicast communications if the udpport directive is specified before the ucast directive, otherwise the default port will be used.
Now open /etc/ha.d/haresources (be sure to leave only the lines given below):
node01 203.0.113.4 asterisk # just for testing, remember this ip can't be used in your network!!!
Or
node01 IPaddr::192.168.0.142/24/eth0:0 httpd # just for testing, remember this ip can't be used in your network!!! # if eth0:0 does not appear
So, first of all:
Assuming node01 is master and node02 is slave, by default all traffic is going to node01.
You need to choose IP (for Virtual IP) from your network and never use it, otherwise this will lead to unexpected results.
node01 203.0.113.4 asterisk, "if master is dead, slave (node02) will restart asterisk and start to accept traffic comming from 203.0.113.4"
Now copy all configuration to slave (node02).
scp -r /etc/ha.d/ root@node02:/etc/
VERY IMPORTANT After copying configs to another node, open /etc/ha.d/ha.cf on both nodes and change IP in ucast directive.
node01 should have node02 IP there; node02 should have node01 IP there.
Start heartbeat on both servers by running /etc/init.d/heartbeat start. If everything will be ok, you will see something like this:
Starting High-Availability services:

2008/12/18_18:13:22 INFO:  Resource is stopped


                                                          [  OK  ]
Do not forget to remove Asterisk from system startup, because it needs to be started by Heartbeat:
chkconfig asterisk off
on both servers.
Testing
Now run iptraf on both machines, from another machine start pinging your binded IP address (in this example we speak about 203.0.113.4).
Check for masters iptraf window, you will see incoming ICMP data, slave have to be quiet.
Now kill master (for example: ifconfig eth0 down or issue a reboot), after short period of time (on this example 5 seconds) on slave you will see incoming ICMP packets.
To bring master to work again, first of all you have to configure network on master and start heartbeat. After 20~ seconds master have to start doing his job again.
Now go to GUI and change your default asterisk server IP (Settings -> Servers), change from 127.0.0.1 to virtual IP address. If your GUI is unable connect to them, make sure both asterisk servers allow connections from your GUI server. (file: /etc/asterisk/manager.conf)
sip.conf
In file /etc/asterisk/sip.conf enter correct IP for value bindaddr, correct IP = IP to which your devices are registering. E.g. Virtual IP.
Do same changes for bindaddr in iax.conf, h323.conf and manager.conf
Make this on both servers.
system.conf
In file /etc/mor/system.conf add variable VIRTUAL_IP with correct virtual IP VIRTUAL_IP=xx.xx.xx.xx
mor.conf
On slave server go to /etc/asterisk/mor.conf and set server_id = 2 (default is 1)
Possible problems
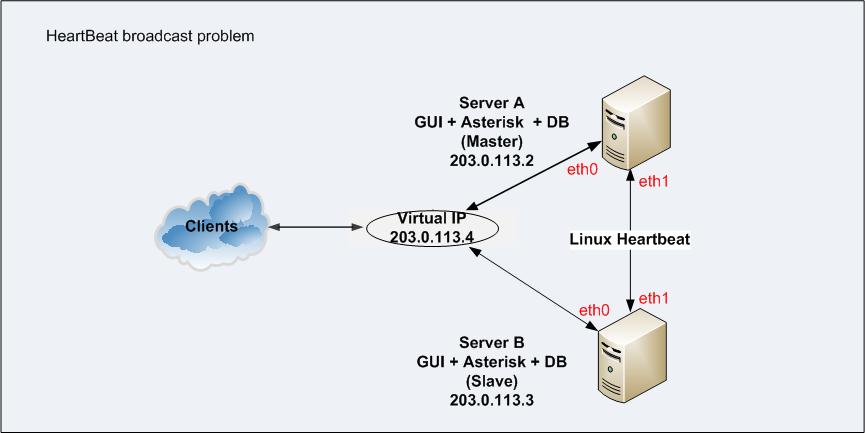
Look at the picture:

In this example HeartBeat in ucast directive has only one interface configured on both servers: eth1
This can lead to problems if the link eth1 <----> eth1 between the servers fails (broken cable, switch, NIC, etc)
It is recommended to specify at least 2 interfaces in ucast directive
The ucast directive is used to configure which interfaces Heartbeat sends UDP traffic on and to which IP.
An example of ucast directive:
ucast eth0 1.1.1.1
ucast eth1 1.1.1.1
Virtual interface does not appear
Check /var/log/heartbeat.log
If you can see something like:
...
ResourceManager(default)[6106]: 2012/12/07_11:33:51 info: Running /etc/ha.d/resource.d/IPaddr 123.123.123.123 start
IPaddr(IPaddr_123.123.123.123)[6197]: 2012/12/07_11:33:51 ERROR: /usr/lib64/heartbeat/findif failed [rc=1].
/usr/lib/ocf/resource.d//heartbeat/IPaddr(IPaddr_123.123.123.123)[6183]: 2012/12/07_11:33:51 ERROR:  Generic error
...
Please add subnet mask and interface to /etc/ha.d/haresources like this:
node01 123.123.123.123/27/em1 asterisk
Virtual interface appears on both nodes
Check if servers can send packets through port UDP 694 to each other (both directions). Firewalls may block that port.
Check if /etc/ha.d/haresources has properly defined "node01" (or relevant hostname) on both servers.
There is more than one HA cluster in the same subnet
We can suspect that there is another HA cluster runing if in /var/log/heartbeat.log we see such output:
Nov 06 13:25:28 node01 heartbeat: [9200]: WARN: Invalid authentication type [3] in message!
Nov 06 13:25:28 node01 heartbeat: [9200]: WARN: string2msg_ll: node [cpc2] failed authentication
So we need to change port in /etc/ha.d/ha.cf like this:
logfile /var/log/heartbeat.log
logfacility local0
keepalive 6
deadtime 20 # depends on load, so be careful!
initdead 60 # start time
udpport 496 # UDPPORT SHOULD COME IN FRONT OF UCAST LINE OTHERWISE PORT WON'T BE CHANGED
ucast  eth0 1.1.1.1
auto_failback on
node node01
node node02
Sometimes solution above does not help, so it is a good practice to generate new The authkeys files on both servers.
You may create an authkeys file using this command:
( echo -ne "auth 1\n1 sha1 "; \
  dd if=/dev/urandom bs=512 count=1 | openssl md5 ) \
  > /etc/ha.d/authkeys
chmod 0600 /etc/ha.d/authkeys
Heartbeat service does not start
There is was bug with resource-agents-3.9.2-21.el6_4.8.x86_64 package.
Make sure that packets "heartbeat" and "resource-agents" are up to date.
Command to update:
yum install heartbeat resource-agents
More details: http://bugs.centos.org/view.php?id=6727
Two Virtual IPs
Lets say, we have two network interfaces - eth0 and eth1.
We need two Virtual IPs for each interface.
For example:
192.168.0.179 for eth0 interface
192.168.0.180 for eth1 interface
Add second Virtuap IP to /etc/ha.d/haresources and specify network interface to which you want to assign Virtual IP:
node01 192.168.0.179 asterisk/24/eth0 # just for testing, remember this ip can't be used in your network!!!
node01 192.168.0.180 asterisk/24/eth1 # just for testing, remember this ip can't be used in your network!!!
Check on node2 server if Virtual IPs are assigned correctly. Type command:
ip a
You should get similar output:
[root@kolmisoft2 ~]# ip a
1: lo: <LOOPBACK,UP,LOWER_UP> mtu 65536 qdisc noqueue state UNKNOWN
   link/loopback 00:00:00:00:00:00 brd 00:00:00:00:00:00
   inet 127.0.0.1/8 scope host lo
   inet6 ::1/128 scope host
      valid_lft forever preferred_lft forever
2: eth0: <BROADCAST,MULTICAST,UP,LOWER_UP> mtu 1500 qdisc pfifo_fast state UP qlen 1000
   link/ether 08:00:27:3d:bc:8c brd ff:ff:ff:ff:ff:ff
   inet 192.168.0.139/24 brd 192.168.0.255 scope global eth0
   inet 192.168.0.179/24 brd 192.168.0.255 scope global eth0
   inet6 fe80::a00:27ff:fe3d:bc8c/64 scope link
      valid_lft forever preferred_lft forever
3: eth1: <BROADCAST,MULTICAST,UP,LOWER_UP> mtu 1500 qdisc pfifo_fast state UP qlen 1000
   link/ether 08:00:27:e6:09:23 brd ff:ff:ff:ff:ff:ff
   inet 192.168.0.140/24 brd 192.168.0.255 scope global eth1
   inet 192.168.0.180/24 brd 192.168.0.255 scope global eth1
   inet6 fe80::a00:27ff:fee6:923/64 scope link
      valid_lft forever preferred_lft forever
Switching resources manually
It is possible to switch resources manually by using scripts in /usr/share/heartbeat
hb_standby - releases resources on active server
hb_takeover - takes over resources on standby server
it should be enough to run one of it on one of servers.


