Difference between revisions of "MOR PRO v0.6 documentation"
| Line 175: | Line 175: | ||
=VoiceMail configuration= | =VoiceMail configuration= | ||
[[Voicemail]] | |||
Revision as of 19:29, 18 December 2008
This section describes features already implemented into version of MOR PRO v0.6.
Allow loss calls
Allow loss calls - this setting let's you decide - do you want to allow user to use some provider if provider's rate to some destination is lower then user's rate. Allowing such call you will pay more to provider then user pays you for such call - that means you will take loss on such call. If this setting is no (default) - cheaper providers will not be used in dialing.
CID control by DIDs
This setting let's you control what CID user can enter in his devices. These CID numbers should be from the set of device's DIDs. It is mainly used when user's PBX is connected over trunk and many DIDs are routed to this Trunk. Calls coming out from this PBX must have CallerID Number from the set of DIDs assigned to this Trunk (PBX). If CID from DIDs is checked - system checks if device's cid number is from dids assigned to this device. If no dids are assigned - this value is ignored. In order for this setting to be active - CID Name/Number fields must be empty to allow user enter any CID number he wants. If CID from DIDs is checked and user enters any CID (not from his DIDs) - system will change his CID by his first available DID (selected from database by lowest id).
Tariff analysis
Using this tool you can select the tariffs (wholesale) which you want to compare. Click on desired tariffs and select currency in which you want to compare tariffs. When you selected tariffs press on Generate CSV icon to get CSV file. In this file you can see all selected tariffs with their rates for ALL destinations. In 4 last columns you will find MIN and MAX rates for each destination with their providers. This let's you compare tariffs on the fly. The final section shows Total/Min/Max rates for each tariff. Using these values let's you see which tariff is the most expensive/cheap. NOTE: Min + Max can be not equal to Total because same provider can have MIN and MAX rates for some prefix if there're no more providers for this prefix (destination).
Destinations CSV
This link in Tariffs window gets you CSV file with all Destinations/Directions. It is suitable for rate entering and importing back to MOR.
API
API waits for HTML POST to get request data. Then it returns result in XML.
MOR API <- more details
Addons
New addons introduced in MOR PRO v0.6
MOR Addons <- more details
Invoice by CallerID
Hide users
As it is not allowed to delete users who have at least 1 call - after some time such 'non-active' users accumulate and we need to do something to them to have clear control panel.
For that reason we just Hide them. They remain active - nothing changes for them - except we do not see them in the GUI.
Later you can find them in SETTINGS - Users - Hidden. You can unhide them if you wish anytime.
To hide a user go to his details and select Hidden. To unhide - Not hidden.
Hangupcause codes
Active Calls
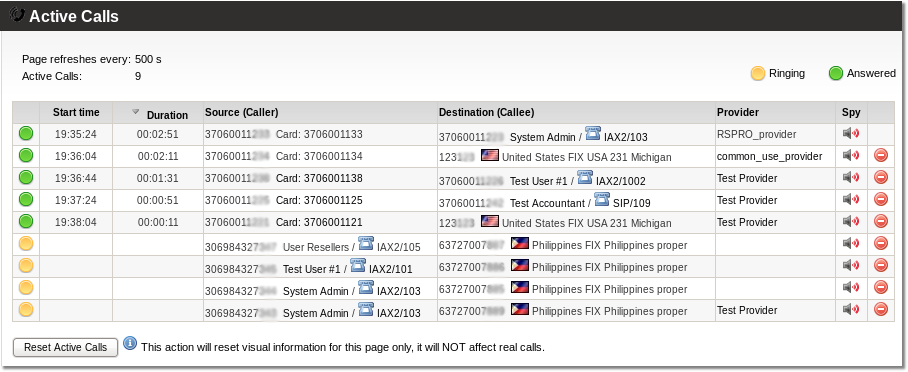
On main window in Quick Stats it is possible to see Active Calls - these are the calls, which are in the system at this moment.
It is possible to press on it and new window opens - with detailed Active Calls.
You can get to this window in STATISTICS - Various - Realtime - Active Calls.
In this window all active calls are presented with more details, such as: Start Date, Duration, Src, Dst.
In order to see correct duration on multi-server systems, all time on servers should be synchronized.
In order to see Active Calls in GUI, in file /etc/asterisk/mor.conf you should have:
active_calls=1
NOTE: local calls are not visible on MOR GUI, only calls to/from outside
Quick Forwards
Some DIDs can be assigned to Quick Forwards functionality. When it is done each user can enter different number to be forwarded when he calls some DID.
Main advantage of this function is to use limited number of DIDs to let different users to call these DIDs and be forwarded to different numbers (which are assigned by users).
Example
We have several DIDs assigned to Quick Forwards functionality:
- 1111111111
- 2222222222
Now we have 2 users with such CallerIDs:
- User A with CallerID 8888888888
- User B with CallerID 9999999999
User A set such forwards:
- From DID 1111111111 forward to 3333333333
- From DID 2222222222 forward to 4444444444
User B set such forwards:
- From DID 1111111111 forward to 5555555555
- From DID 2222222222 forward to 6666666666
- When User A dials DID 1111111111 his CallerID (8888888888) is checked, user is recognized and call is automatically forwarded to number 3333333333
- When User A dials DID 2222222222 his CallerID (8888888888) is checked, user is recognized and call is automatically forwarded to number 4444444444
- When User B dials DID 1111111111 his CallerID (9999999999) is checked, user is recognized and call is automatically forwarded to number 5555555555
- When User B dials DID 2222222222 his CallerID (9999999999) is checked, user is recognized and call is automatically forwarded to number 6666666666
IMPORTANT: Correct CallerIDs should be set for users in order to recognize them. Only system admin can do that.
- If system can't recognize the caller it asks to enter PIN number of the device.
- If user is dialing DID which has not assigned Forward Number, user is asked to enter such number.
User can manipulate his Quick Forwards in his menu. He needs to login to GUI to change numbers.
Destination to create from CSV
When importing rates from CSV file now you can check which Destinations will be created automatically.
You can view them in separate window when you press List in step 4 in field Destinations to create.
Such destinations do not exist in MOR database and MOR will create them when importing rate file.
IMPORTANT! DO NOT FORGET TO ADD THEM TO APPROPRIATE DESTINATION GROUP LATER!!!
Device details
This window shows all fields from database table devices to some particular device. It is only read-only.
It can help to troubleshoot login problems for device.
VoiceMail configuration
Provider with ANI
Automatic Number Identification for provider is used ONLY (at least we don't know any other situations) when provider gives you some access number after which (IMPORTANT!) after which dialer enters destination number WITHOUT PAUSES. E.g. WHOLE number is sent to provider instantly.
Explanation:
- Let's say provider gave you access number 1234
- When somebody wants to dial some destination, lets say: 22234567890, he enters on his phone: 123422234567890
- 22234567890 from provider comes to your MOR box
- Because Provider is with ANI, we are checking user's CLI
- If CLI is found - we know which user is dialing
- Before he dials out, we change CallerID of this call by CallerID found in our database - that's minor job, but it's part of algorithm
- After that call is sent to 22234567890
IMPORTANT!!! - Do not check ANI for Provider if this description does not match your working scenario!
Similar scenario which can't be used with ANI for Provider
If you have access number as DID, you can enter p(pause) after your DID calling to the provider and then enter destination. But that's totally different scenario. It should be configured with DID + Auth. by ANI DialPlan, because destination is send to MOR by DTMF, not by provider as in previous example.
Example:
- If your DID is: 234567890 and you want to dial dst: 987654321 in your mobile phone (example) you enter: 234567890p987654321
- That way call will reach MOR, when p (pause) is reached - MOR will play "please enter destination" and 987654321 will be sent by DTMF to MOR.
Provider timeout
This setting lets set how long this provider should be dialed before giving up. Default value is 60 seconds. Minimum value is 30 seconds.
It can be found in Provider Edit page.
Device timeout
This setting can be set under each device Edit window. It describes how long device should be trying to be reached before timeouting the call.
Default value is 60 seconds. Minimum value is 10 seconds.
WebMoney integration
This payment gateway is popular in Russia and neighboring countries. Now MOR users can use http://www.webmoney.ru/ to pay for services.
Settings are in SETTINGS - Setup - Payments - Webmoney:
- Enabled - enable or disable it (hides logo on front page)
- Purse - purse ID from WebMoney
- Currency - purse's currency
- Default Amount - which amount is default for user who wants to pay by WM (he can change this amount)
- Minimal Amount - minimal amount which user can pay over WM
- Test - should it be test or real payment
- Test mode - describes how many payments are successful in test
Process SIPCHANINFO
Logo upload
Now you can change logo very easily over GUI. Go to SETTINGS - Setup - Logo and browse for your new logo.
Relogin to see your new logo.


