Difference between revisions of "Didx.net"
m |
|||
| (8 intermediate revisions by 3 users not shown) | |||
| Line 1: | Line 1: | ||
=What is didx.net= | =What is didx.net= | ||
DIDX (DIDXchange) is where | DIDX (DIDXchange) is a place where VOIP companies buy and sell DID (Direct Inward Dialing) phone numbers. | ||
=How to configure a DID purchased from didx.net to work with MOR?= | =How to configure a DID purchased from didx.net to work with MOR?= | ||
1. Go to purchased DIDs: | 1. Go to purchased DIDs: | ||
| Line 36: | Line 37: | ||
[[File:Dids_new_did.png]] | [[File:Dids_new_did.png]] | ||
<br><br> | <br><br> | ||
6. Now go to '''SETTINGS - | 6. Now go back to DIDs list: '''SETTINGS - Billing -> DIDs''' | ||
<br><br> | <br><br> | ||
[[File: | [[File:Did_path.png]] | ||
<br><br> | <br><br> | ||
7. | 7. Edit the DID you created: | ||
<br><br> | <br><br> | ||
[[File: | [[File:Didx_edit_did.png]] | ||
<br><br> | <br><br> | ||
8. Select | 8. Select a user you want to reserve a DID for: | ||
<br><br> | <br><br> | ||
[[File: | [[File:Didx_edit_did_reserve_for_user.png]] | ||
<br><br> | <br><br> | ||
9. | 9. Reserve the DID for a user - press the marked button: | ||
<br><br> | <br><br> | ||
[[File: | [[File:Didx_edit_did_reserve_for_user_commit.png]] | ||
<br><br> | <br><br> | ||
10. | 10. Now you have to select the device you configured earlier with callflow, in this case it will be SIP/1001: | ||
<br><br> | <br><br> | ||
[[File: | [[File:Didx_edit_did_select_device.png]] | ||
<br><br> | <br><br> | ||
11. | 11. Save the changes by pressing the marked button: | ||
<br><br> | <br><br> | ||
[[File: | [[File:Didx edit did select device commit.png]] | ||
<br><br> | <br><br> | ||
= How to allow incoming connections from DIDx.net = | |||
== DIDx.net used IP's == | |||
DIDX may send you calls from any of the IP's below. | |||
You can find the most up-to-date at KB.DIDX list of IP addresses at http://kb.didx.net/tiki-index.php?page=IP%20Addresses | |||
Last update (2016 Jan 29): | |||
67.15.128.14 – sip1.didx.net | |||
67.15.128.18 – sip2.didx.net | |||
198.101.50.4 – sip4.didx.net | |||
198.101.50.2 – sip5.didx.net | |||
74.55.75.30 – sip6.didx.net | |||
67.228.182.162 – sip8.didx.net | |||
66.228.114.228 - sip10.didx.net | |||
88.208.247.34 – eu1.didx.org | |||
== Configuration on MOR == | |||
In order to receive incoming connections from DIDx you can ether create IP authenticated Providers for all IP's or you can do the following: | |||
It is possible to implement multiple DIDx IP addresses by making these changes: | |||
1. Create a provider in MOR, with a name didx:<br> | |||
[[File:provider_create_didx.png]] <br> | |||
2. Afterwards, enter any IP (or leave blank) in Provider Network settings, and write down Provider Device ID value, you | |||
will need it later.<br> | |||
[[File:provider_settings_didx.png]]<br> | |||
3. Now connect to your server over ssh and locate this file /etc/asterisk/extensions_mor_didx.conf and find these lines: | |||
[from-didx] | |||
exten => _X.,1,Set(CDR(ACCOUNTCODE)=0) | |||
exten => _X.,2,Goto(mor,${EXTEN},1) | |||
Now you need to change '''(ACCOUNTCODE)=0''' value (0) to Provider Device ID value as follows: | |||
exten => _X.,1,Set(CDR(ACCOUNTCODE)=221) | |||
exten => _X.,2,Goto(mor,${EXTEN},1) | |||
<br> | |||
4. Make sure, file /etc/asterisk/sip.conf has this line included: | |||
#include sip_didx.conf | |||
<br> | |||
NOTE: sip_didx.conf file contains list of DIDWW server IPs, so this file must be included if you are using DIDx DIDs. Without this list, all incoming calls from DIDx will not be allowed by MOR.<br> | |||
<br> | |||
5. [[How_to_restart_Asterisk_server | Restart Asterisk]] | |||
<br> | |||
Now your system is updated with all the DIDx IP addresses that are listed in their recommendations. | |||
<br><br> | <br><br> | ||
'''Now there is no need to create one Provider for each IP''' | |||
<br><br> | <br><br> | ||
'''That's all''' | |||
Latest revision as of 08:27, 29 January 2016
What is didx.net
DIDX (DIDXchange) is a place where VOIP companies buy and sell DID (Direct Inward Dialing) phone numbers.
How to configure a DID purchased from didx.net to work with MOR?
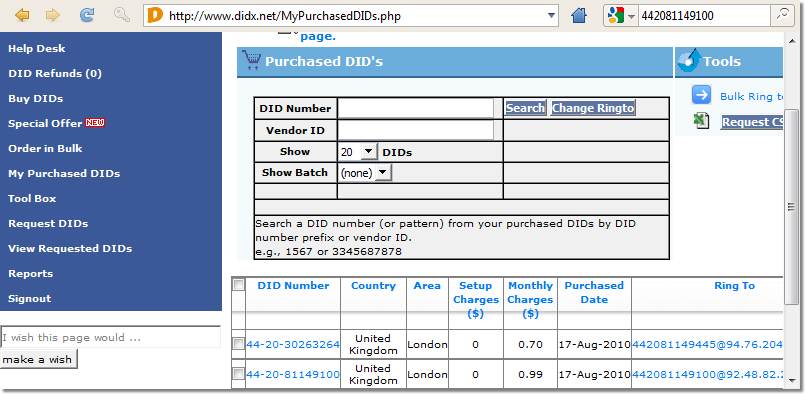
1. Go to purchased DIDs:
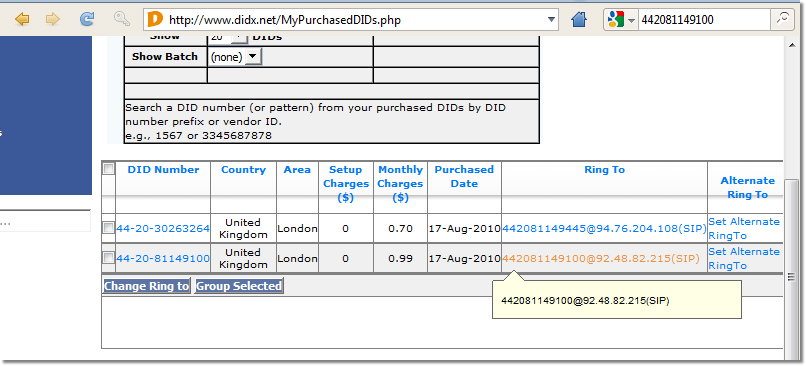
2. Then select a DID for edit:
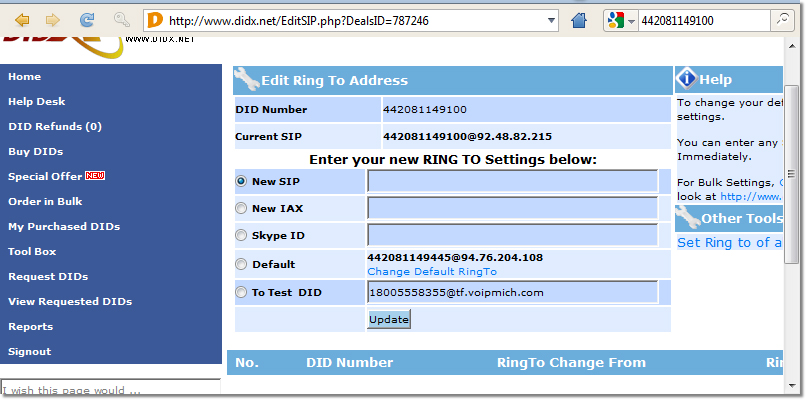
3. Select "New SIP"
In this field you have to enter your DID and server address with the following syntax: DID@example.com
For example:
You have purchased a DID: 37068111888 Your MOR server address is: 127.0.0.1
Then you have to put in this field:
37068111888@127.0.0.1
Don't forget to press the update button!
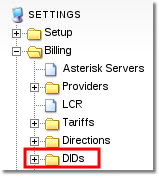
4. Now login to MOR GUI and go to SETTINGS - Billing -> DIDs
5. Now create a new DID and leave it free at the moment. To create a DID press the marked icon:
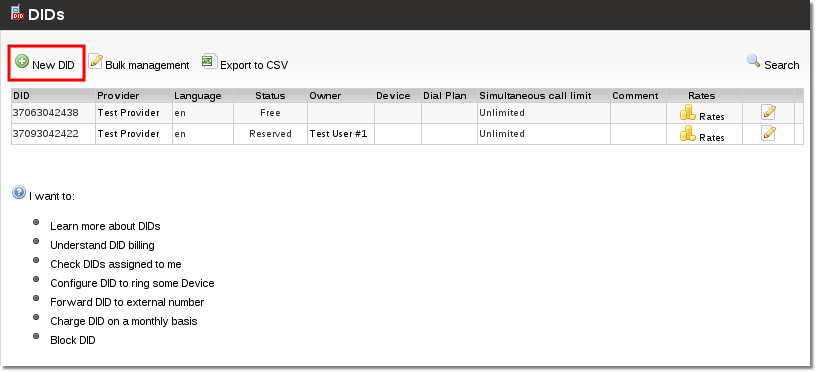
6. Now go back to DIDs list: SETTINGS - Billing -> DIDs

7. Edit the DID you created:
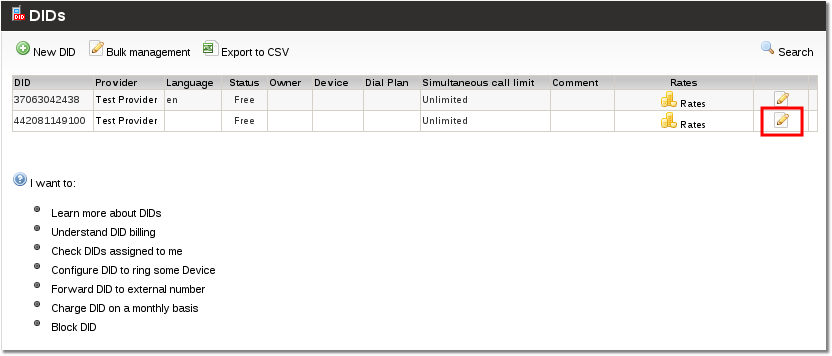
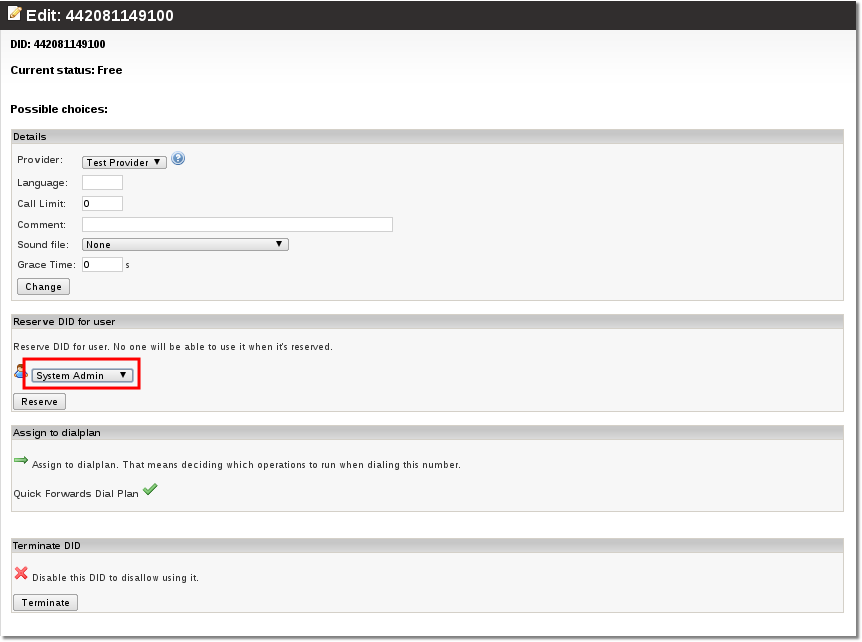
8. Select a user you want to reserve a DID for:
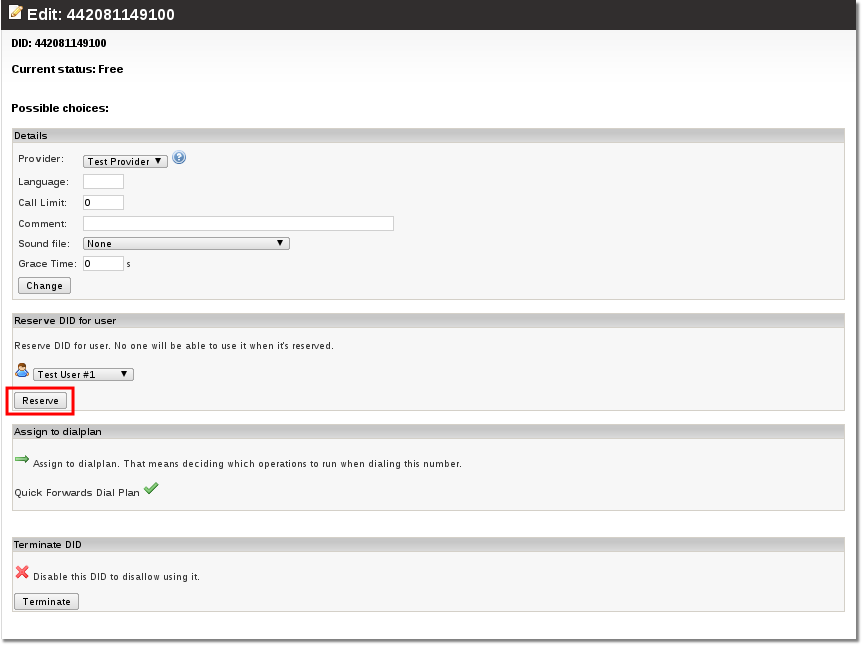
9. Reserve the DID for a user - press the marked button:
10. Now you have to select the device you configured earlier with callflow, in this case it will be SIP/1001:
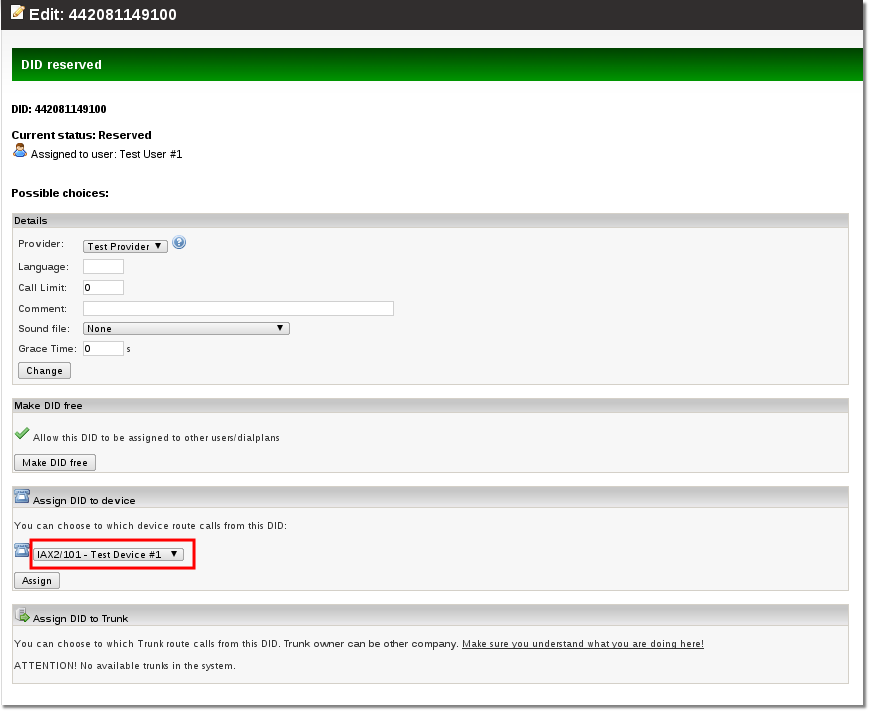
11. Save the changes by pressing the marked button:
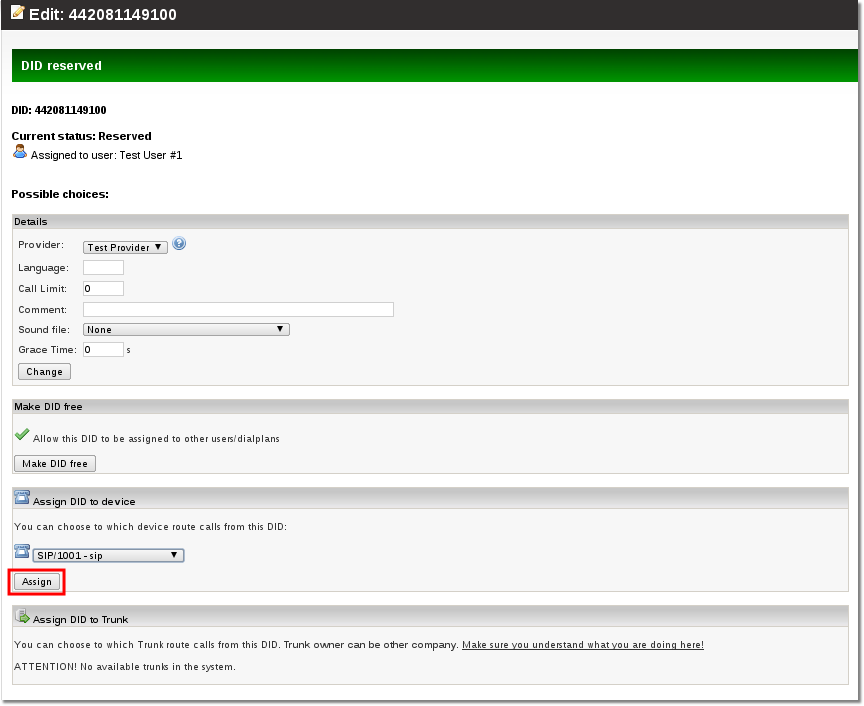
How to allow incoming connections from DIDx.net
DIDx.net used IP's
DIDX may send you calls from any of the IP's below.
You can find the most up-to-date at KB.DIDX list of IP addresses at http://kb.didx.net/tiki-index.php?page=IP%20Addresses
Last update (2016 Jan 29):
67.15.128.14 – sip1.didx.net
67.15.128.18 – sip2.didx.net
198.101.50.4 – sip4.didx.net
198.101.50.2 – sip5.didx.net
74.55.75.30 – sip6.didx.net
67.228.182.162 – sip8.didx.net
66.228.114.228 - sip10.didx.net
88.208.247.34 – eu1.didx.org
Configuration on MOR
In order to receive incoming connections from DIDx you can ether create IP authenticated Providers for all IP's or you can do the following: It is possible to implement multiple DIDx IP addresses by making these changes:
1. Create a provider in MOR, with a name didx:
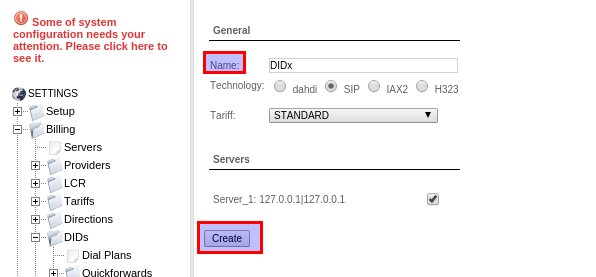
2. Afterwards, enter any IP (or leave blank) in Provider Network settings, and write down Provider Device ID value, you
will need it later.
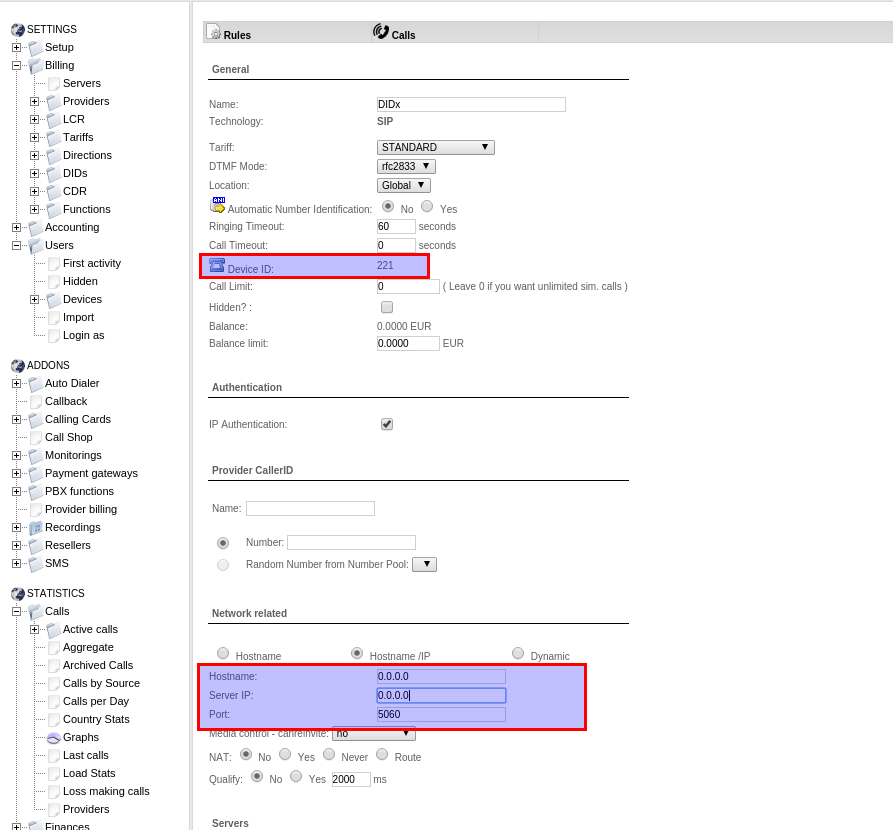
3. Now connect to your server over ssh and locate this file /etc/asterisk/extensions_mor_didx.conf and find these lines:
[from-didx]
exten => _X.,1,Set(CDR(ACCOUNTCODE)=0)
exten => _X.,2,Goto(mor,${EXTEN},1)
Now you need to change (ACCOUNTCODE)=0 value (0) to Provider Device ID value as follows:
exten => _X.,1,Set(CDR(ACCOUNTCODE)=221)
exten => _X.,2,Goto(mor,${EXTEN},1)
4. Make sure, file /etc/asterisk/sip.conf has this line included:
#include sip_didx.conf
NOTE: sip_didx.conf file contains list of DIDWW server IPs, so this file must be included if you are using DIDx DIDs. Without this list, all incoming calls from DIDx will not be allowed by MOR.
5. Restart Asterisk
Now your system is updated with all the DIDx IP addresses that are listed in their recommendations.
Now there is no need to create one Provider for each IP
That's all
