Difference between revisions of "Centos installation"
| (11 intermediate revisions by 5 users not shown) | |||
| Line 1: | Line 1: | ||
In order to install MOR, you need the Centos | In order to install MOR, you need the Centos 6 system ('''Install newest CentOS 6 version'''). | ||
First of all, you need to download the Install image. Decide which architecture you need (i386 or x86_64) and download | First of all, you need to download the Install image. Decide which architecture you need (i386 or x86_64) and download minimal iso, because necessary to install only the base system. | ||
How do you choose between i386 (32bit) and x86_64 (64bit)? There is a simple rule: if you have 4gb of RAM or more, choose x86_64 (64bit). | How do you choose between i386 (32bit) and x86_64 (64bit)? There is a simple rule: if you have 4gb of RAM or more, choose x86_64 (64bit). | ||
Centos can be downloaded from here: http://mirror.centos.org/centos/ | Centos can be downloaded from here: http://mirror.centos.org/centos/6/isos/ (we recommend downloading latest releases). | ||
As an example, for i386 you should download the file ''CentOS- | As an example, for i386 you should download the file ''CentOS-6.7-i386-minimal.iso''. | ||
For x86_64, download the file ''CentOS- | For x86_64, download the file ''CentOS-6.7-x86_64-minimal.iso'' | ||
'''Make sure file IS NOT LiveCD and extension is ISO, but not .torrent!''' | '''Make sure file IS NOT LiveCD and extension is ISO, but not .torrent!''' | ||
After you burn and boot from this CD, you will see: | After you burn and boot from this CD, you will see: | ||
<br><br> | |||
[[File:Centos (1).jpg]] | [[File:Centos (1).jpg]] | ||
<br><br> | |||
Press enter. System will ask you to check your installation media. Press ''Skip'' to save the time: | Press enter. System will ask you to check your installation media. Press ''Skip'' to save the time: | ||
<br><br> | |||
[[File:Centos (2).jpg]] | [[File:Centos (2).jpg]] | ||
<br><br> | |||
Now select your language here and click ''Next'': | Now select your language here and click ''Next'': | ||
<br><br> | |||
[[File:Centos (3).jpg]] | [[File:Centos (3).jpg]] | ||
<br><br> | |||
Select your keyboard layout and click ''Next'': | Select your keyboard layout and click ''Next'': | ||
<br><br> | |||
[[File:Centos (4).jpg]] | [[File:Centos (4).jpg]] | ||
<br><br> | |||
If your hard disk is blank (no partition) you will get this message. Click ''Yes, discard any data'' and then click ''Next'': | If your hard disk is blank (no partition) you will get this message. Click ''Yes, discard any data'' and then click ''Next'': | ||
<br><br> | |||
[[File:Centos (5).jpg]] | [[File:Centos (5).jpg]] | ||
<br><br> | |||
Type your Hostname and click ''Next'': | Type your Hostname and click ''Next'': | ||
<br><br> | |||
[[File:Centos (6).jpg]] | [[File:Centos (6).jpg]] | ||
<br><br> | |||
Select your time zone and click ''Next'': | Select your time zone and click ''Next'': | ||
<br><br> | |||
[[File:Centos (7).jpg]] | [[File:Centos (7).jpg]] | ||
<br><br> | |||
Create a strong password for your system and click ''Next''. | Create a strong password for your system and click ''Next''. | ||
<br><br> | |||
[[File:Centos (8).jpg]] | [[File:Centos (8).jpg]] | ||
<br><br> | |||
Read this menu carefully. First section will use all the spaces of your HDD and erase all data. Second Section will only remove previous Linux partition. Third section will reduce size of exiting partition and create some free spaces to install CentOS. In last section you can create partition manually. Just choose last section to manually create partition: | Read this menu carefully. First section will use all the spaces of your HDD and erase all data. Second Section will only remove previous Linux partition. Third section will reduce size of exiting partition and create some free spaces to install CentOS. In last section you can create partition manually. Just choose last section to manually create partition: | ||
<br><br> | |||
[[File:Centos (9).jpg]] | [[File:Centos (9).jpg]] | ||
<br><br> | |||
Here you have to create | Here you have to create root ( / ) partition to install CentOS and Swap area. Select ''free'' and click ''Create''. | ||
<br><br> | |||
[[File:Centos (10).jpg]] | [[File:Centos (10).jpg]] | ||
<br><br> | |||
Select ''Standard Partition'' and click ''Create''. | Select ''Standard Partition'' and click ''Create''. | ||
Optionally, if your hardware supports it and you are familiar with configuration, you can setup RAID1. | |||
<br><br> | |||
[[File:Centos (11).jpg]] | [[File:Centos (11).jpg]] | ||
<br><br> | |||
You have to create a Linux swap area. Swap area should be same size as server's RAM size, but no more than 4GB. In ''File System Type'' select ''Swap''. Give the size of this partition in MB and click ''Ok'': | |||
<br><br> | |||
[[File:Centos (12).jpg]] | |||
<br><br> | |||
Next, you have to create root ( / ) partition. Again, select ''free'', click ''Create'' and click "Create" in next window too. | |||
Change "Mount Point" to " / ", select "Fill to maximum allowable size" and click "OK". | |||
"File System Type" can be either EXT3 or EXT4. | |||
<br><br> | |||
[[File:Centos (12_1).jpg]] | |||
<br><br> | |||
Click "Next". | |||
Now you will get a warning message (''Format Warning''). Click ''Format''. If additional warning table will appear, click "Write changes to disk". | |||
<br><br> | |||
[[File:Centos (13).jpg]] | [[File:Centos (13).jpg]] | ||
<br><br> | |||
Click ''Next'': | Click ''Next'': | ||
<br><br> | |||
[[File:Centos (14).jpg]] | [[File:Centos (14).jpg]] | ||
<br><br> | |||
Select your desired option. If you want desktop version select ''Desktop'' or if you want to install server then select ''Basic Server''. You can also customize default software installation by clicking on ''Add additional Software repositories'' or ''Modify repository''. Then click ''Next''. | Select your desired option. If you want desktop version select ''Desktop'' or if you want to install server then select ''Basic Server''. You can also customize default software installation by clicking on ''Add additional Software repositories'' or ''Modify repository''. Then click ''Next''. | ||
<br><br> | |||
[[File:Centos (15).jpg]] | [[File:Centos (15).jpg]] | ||
<br><br> | |||
After finishing all the process you will get a "Congratulations" message. Click on ''Reboot''. | After finishing all the process you will get a "Congratulations" message. Click on ''Reboot''. | ||
<br><br> | |||
[[File:Centos (16).jpg]] | [[File:Centos (16).jpg]] | ||
<br><br> | |||
After reboot your computer you will get a login screen. Just type root as user name and your password. | After reboot your computer you will get a login screen. Just type root as user name and your password. | ||
| Line 95: | Line 106: | ||
=See also= | =See also= | ||
[[CentOS installation on OVH servers]] | [[OVH server installation|CentOS installation on OVH servers]] | ||
Latest revision as of 10:42, 5 January 2016
In order to install MOR, you need the Centos 6 system (Install newest CentOS 6 version).
First of all, you need to download the Install image. Decide which architecture you need (i386 or x86_64) and download minimal iso, because necessary to install only the base system.
How do you choose between i386 (32bit) and x86_64 (64bit)? There is a simple rule: if you have 4gb of RAM or more, choose x86_64 (64bit).
Centos can be downloaded from here: http://mirror.centos.org/centos/6/isos/ (we recommend downloading latest releases).
As an example, for i386 you should download the file CentOS-6.7-i386-minimal.iso.
For x86_64, download the file CentOS-6.7-x86_64-minimal.iso
Make sure file IS NOT LiveCD and extension is ISO, but not .torrent!
After you burn and boot from this CD, you will see:
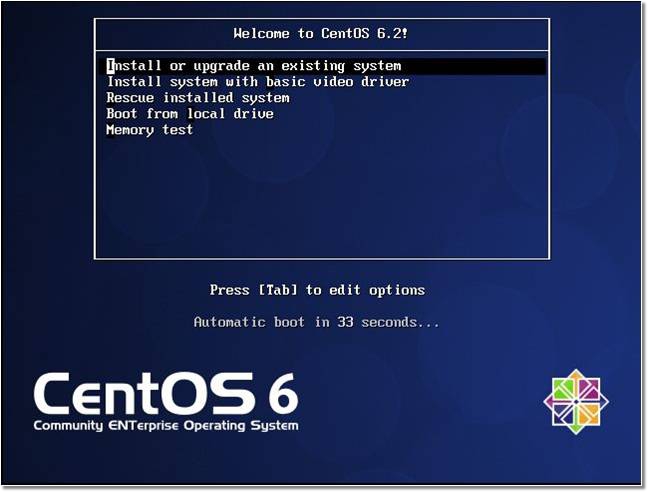
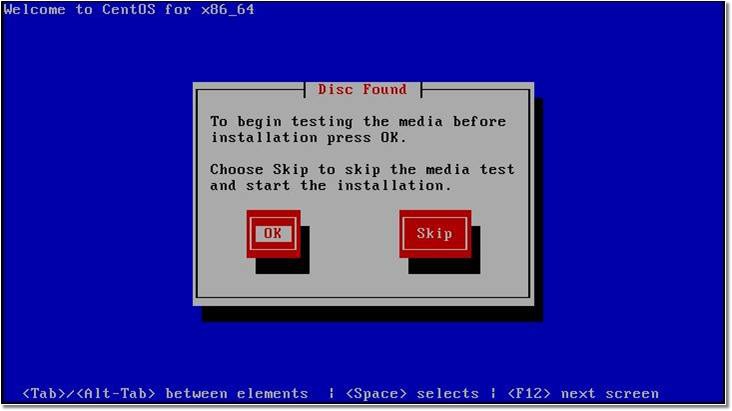
Press enter. System will ask you to check your installation media. Press Skip to save the time:
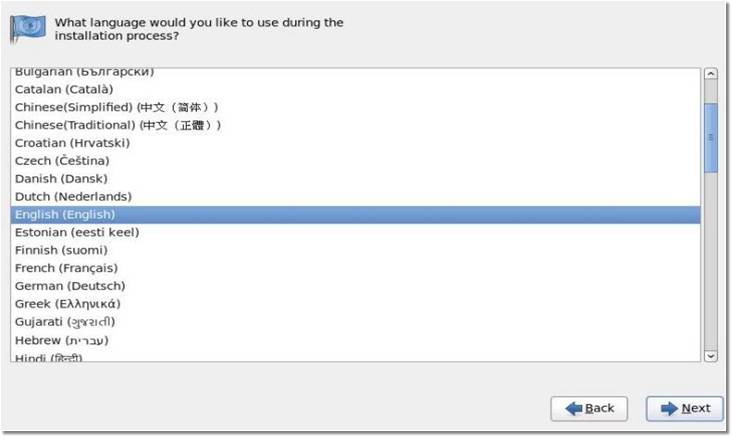
Now select your language here and click Next:
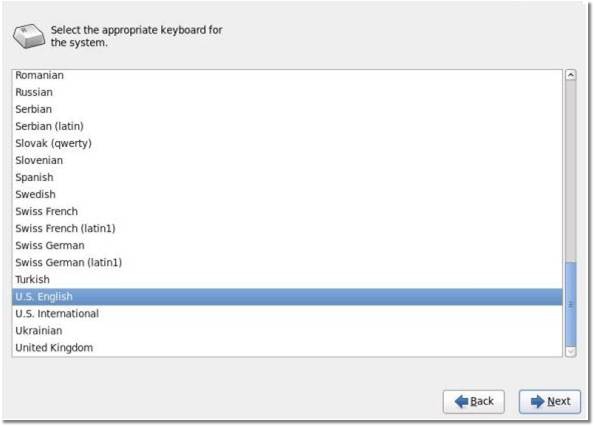
Select your keyboard layout and click Next:
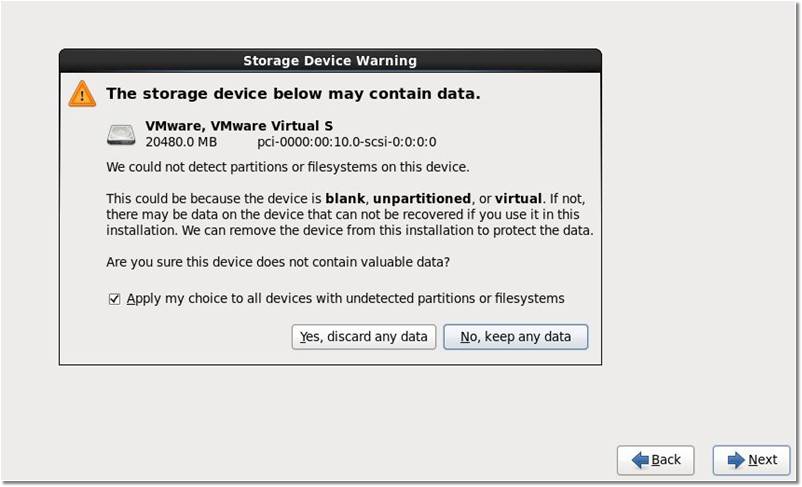
If your hard disk is blank (no partition) you will get this message. Click Yes, discard any data and then click Next:
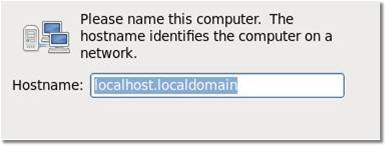
Type your Hostname and click Next:
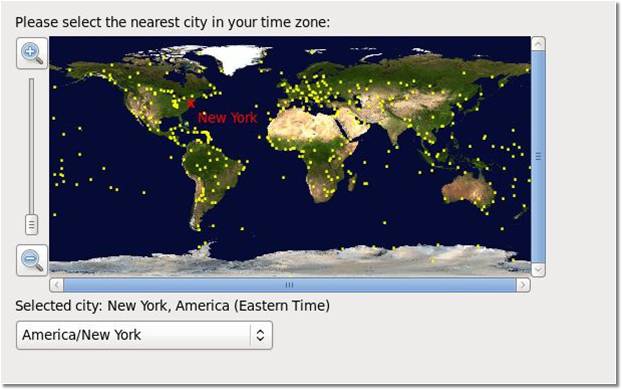
Select your time zone and click Next:
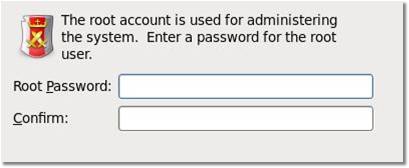
Create a strong password for your system and click Next.
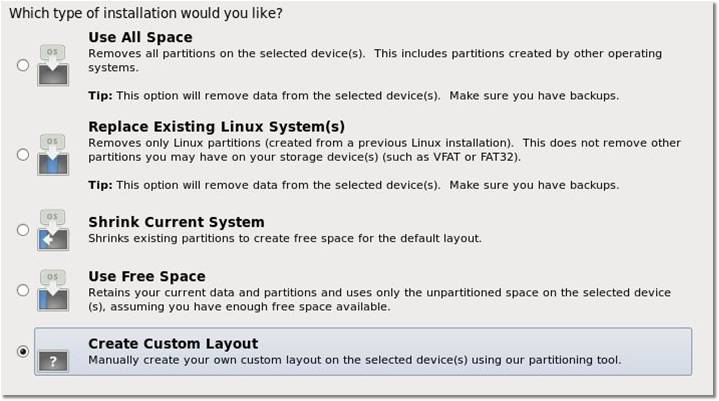
Read this menu carefully. First section will use all the spaces of your HDD and erase all data. Second Section will only remove previous Linux partition. Third section will reduce size of exiting partition and create some free spaces to install CentOS. In last section you can create partition manually. Just choose last section to manually create partition:
Here you have to create root ( / ) partition to install CentOS and Swap area. Select free and click Create.

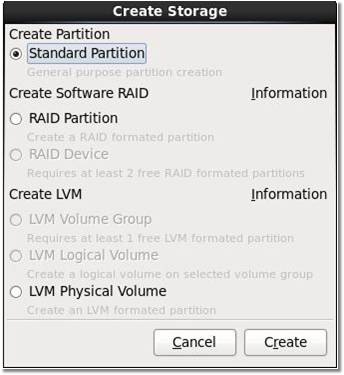
Select Standard Partition and click Create.
Optionally, if your hardware supports it and you are familiar with configuration, you can setup RAID1.
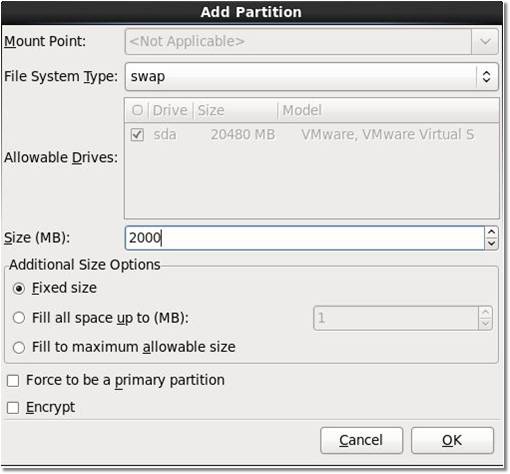
You have to create a Linux swap area. Swap area should be same size as server's RAM size, but no more than 4GB. In File System Type select Swap. Give the size of this partition in MB and click Ok:
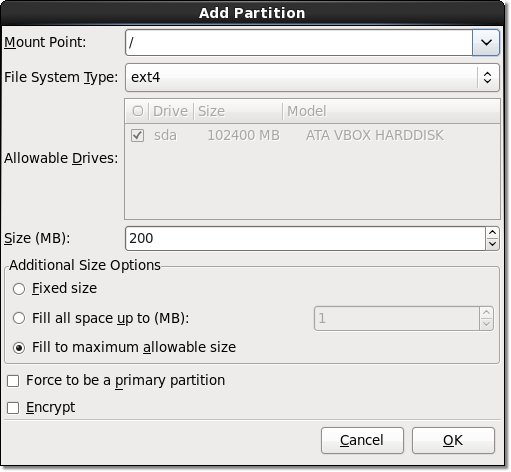
Next, you have to create root ( / ) partition. Again, select free, click Create and click "Create" in next window too.
Change "Mount Point" to " / ", select "Fill to maximum allowable size" and click "OK".
"File System Type" can be either EXT3 or EXT4.
Click "Next".
Now you will get a warning message (Format Warning). Click Format. If additional warning table will appear, click "Write changes to disk".
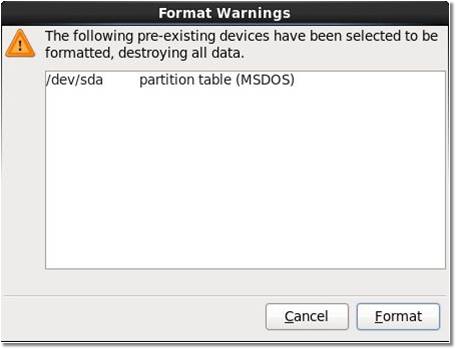
Click Next:
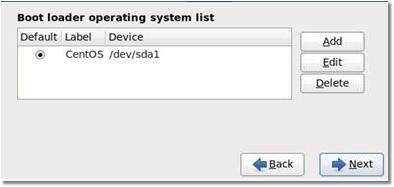
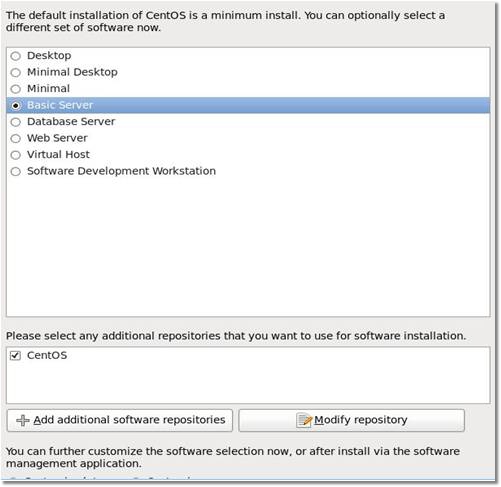
Select your desired option. If you want desktop version select Desktop or if you want to install server then select Basic Server. You can also customize default software installation by clicking on Add additional Software repositories or Modify repository. Then click Next.
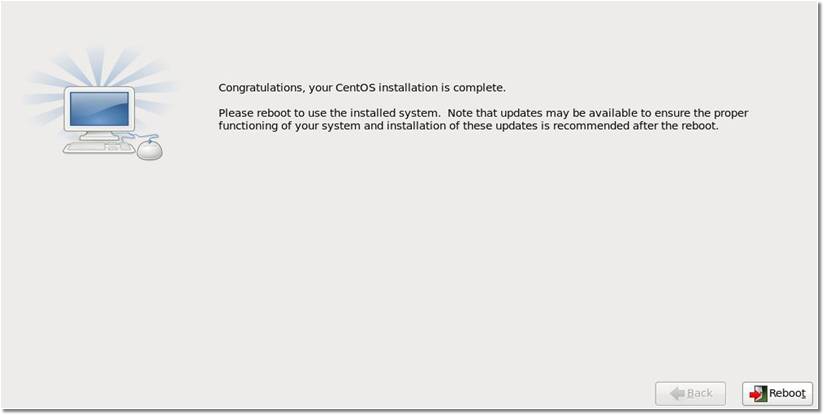
After finishing all the process you will get a "Congratulations" message. Click on Reboot.
After reboot your computer you will get a login screen. Just type root as user name and your password.
Troubleshooting
If the installer is asking you for CD #2, #3, #4, or anything else, it means you failed to UNSELECT all packets, as was pointed out above.
Solution:
1. Read the manual carefully once again.
2. Do as it says EXACTLY (unselect ALL packets).
3. Reinstall.
