Difference between revisions of "Google Checkout tech details"
From Kolmisoft Wiki
Jump to navigationJump to search
| (2 intermediate revisions by 2 users not shown) | |||
| Line 1: | Line 1: | ||
= Google Checkout = | = Google Checkout = | ||
[[Image:googlecheckout_logo.png]] | [[Image:googlecheckout_logo.png|right]] | ||
http://checkout.google.com | http://checkout.google.com | ||
==What do you need before begining?== | ==What do you need before begining?== | ||
Please check if your business model corresponds to Google [https://checkout.google.com/support/sell/bin/answer.py?answer=75724 policy] | |||
Before proceeding you need a valid (not self signed) [http://checkout.google.com/support/sell/bin/topic.py?topic=12156 SSL certificate] implemented in MOR. | Before proceeding you need a valid (not self signed) [http://checkout.google.com/support/sell/bin/topic.py?topic=12156 SSL certificate] implemented in MOR. | ||
<br> | <br> | ||
| Line 37: | Line 38: | ||
== How to configure MOR to work with Google Checkout?== | == How to configure MOR to work with Google Checkout?== | ||
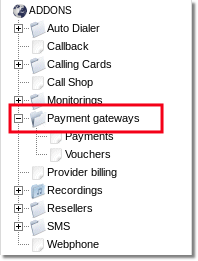
1. Go to | 1. Go to '''ADDONS –> Payment gateways''' and click on Google Checkout logo. | ||
<br><br> | <br><br> | ||
[[File:payment_gateways_path.png]] | [[File:payment_gateways_path.png]] | ||
<br><br> | <br><br> | ||
2 | 2. The marked settings are the most important: | ||
<br><br> | <br><br> | ||
[[Image:payment_gateways_google_checkout.png|1000px]] | [[Image:payment_gateways_google_checkout.png|1000px]] | ||
<br><br> | <br><br> | ||
* | |||
* Enter | * '''Enabled''' – Check this box to make Google Checkout Payment gateway available for your clients. | ||
* | * '''Tax in amount''' – "Include" tax into amount that user has to pay or "Exclude" if you want to exclude the tax from the amount that is added to user's balance | ||
* '''Minimum amount''' – Minimum payment amount | |||
* '''Maximum amount''' – Maximum payment amount. | |||
* '''Default currency''' – Select are required currency. '''It is very important to select the same currency as in Google Checkout here.''' | |||
* Enter '''Merchant ID''' and '''Merchant key''' – they are visible at Google Checkout integration menu (look at the previous picture) | |||
* '''Use sandbox''' – Use Google Checkout testing environment. | |||
* '''Payment message''' | |||
* '''Payment confirmation by you''' | |||
** '''Not required''' – No confirmation is required. Every payment is added to clients balance immediately. | |||
** '''Required for suspicious payments''' – currently Authorize.net doesn't provide enough info to calculate suspiciousness. | |||
** '''Required for all payments''' – When payments are completed they must be confirmed manually. | |||
* '''Notify by email''' – Check to receive notifications by email. | |||
* '''Logo''' – You can select and upload a custom logo picture. MOR accepts images that are *.jpg, *.png or *.gif and less that 100Kb in size. | |||
<br><br> | <br><br> | ||
3. Save the settings | |||
== More examples of configuration == | == More examples of configuration == | ||
| Line 59: | Line 68: | ||
<br><br> | <br><br> | ||
[[File:Google_checkout_1481.jpg]] | [[File:Google_checkout_1481.jpg]] | ||
<br><br> | |||
[[File:Google_Checkout_2.jpg]] | [[File:Google_Checkout_2.jpg]] | ||
<br><br> | |||
=See also= | |||
* [[Payment Gateway Addon]] | |||
Latest revision as of 09:33, 31 May 2013
Google Checkout
What do you need before begining?
Please check if your business model corresponds to Google policy
Before proceeding you need a valid (not self signed) SSL certificate implemented in MOR.
All the valid certificates recognized by Google checkout are listed here
What is Google Checkout?
Google Checkout is an online payment processing service provided by Google aimed at simplifying the process of paying for online purchases.
More information can be found here
How to configure Google Checkout to work with MOR?
1. Go to Google Checkout and configure it as follows:
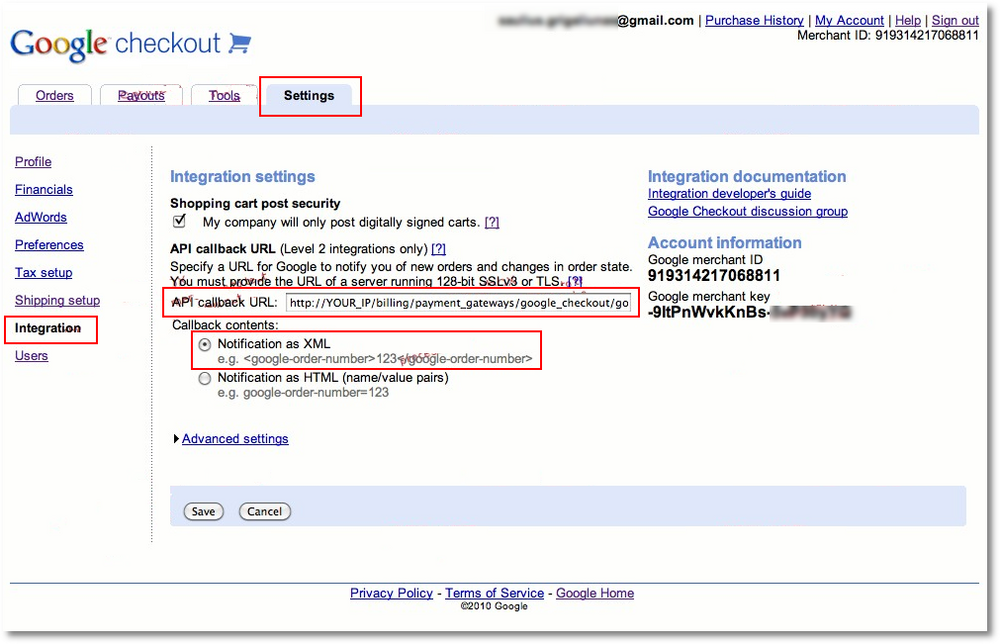
- API Callback URL must be set to:
http://YOUR_SERVER_IP/billing/payment_gateways/google_checkout/google_checkout/notify
- Notification as XML must also be selected
How to configure MOR to work with Google Checkout?
1. Go to ADDONS –> Payment gateways and click on Google Checkout logo.
2. The marked settings are the most important:
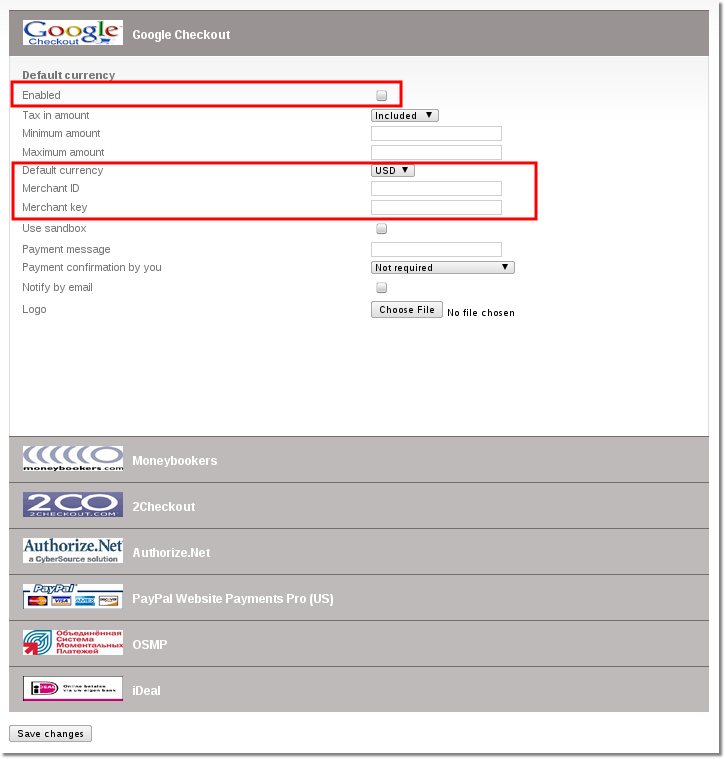
- Enabled – Check this box to make Google Checkout Payment gateway available for your clients.
- Tax in amount – "Include" tax into amount that user has to pay or "Exclude" if you want to exclude the tax from the amount that is added to user's balance
- Minimum amount – Minimum payment amount
- Maximum amount – Maximum payment amount.
- Default currency – Select are required currency. It is very important to select the same currency as in Google Checkout here.
- Enter Merchant ID and Merchant key – they are visible at Google Checkout integration menu (look at the previous picture)
- Use sandbox – Use Google Checkout testing environment.
- Payment message
- Payment confirmation by you
- Not required – No confirmation is required. Every payment is added to clients balance immediately.
- Required for suspicious payments – currently Authorize.net doesn't provide enough info to calculate suspiciousness.
- Required for all payments – When payments are completed they must be confirmed manually.
- Notify by email – Check to receive notifications by email.
- Logo – You can select and upload a custom logo picture. MOR accepts images that are *.jpg, *.png or *.gif and less that 100Kb in size.
3. Save the settings
More examples of configuration
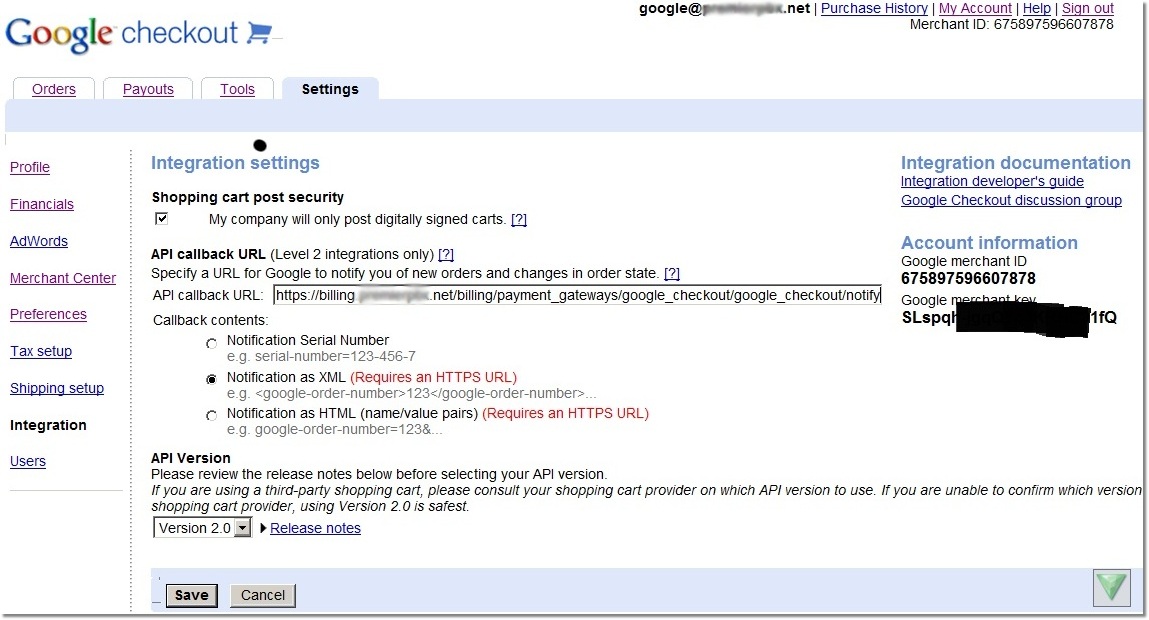
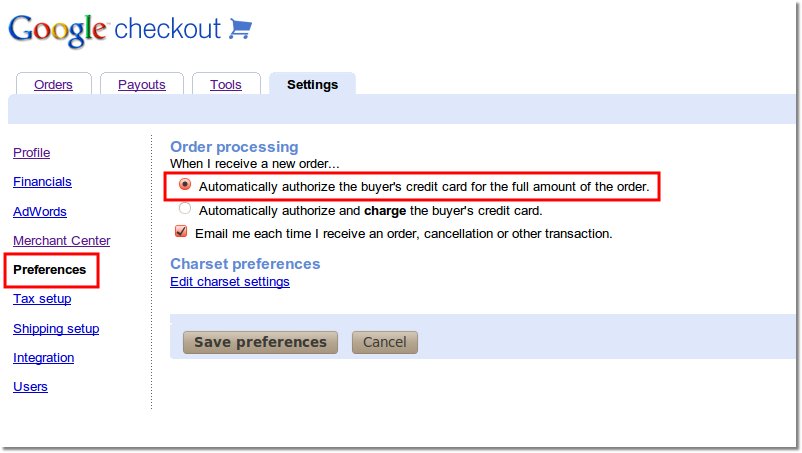
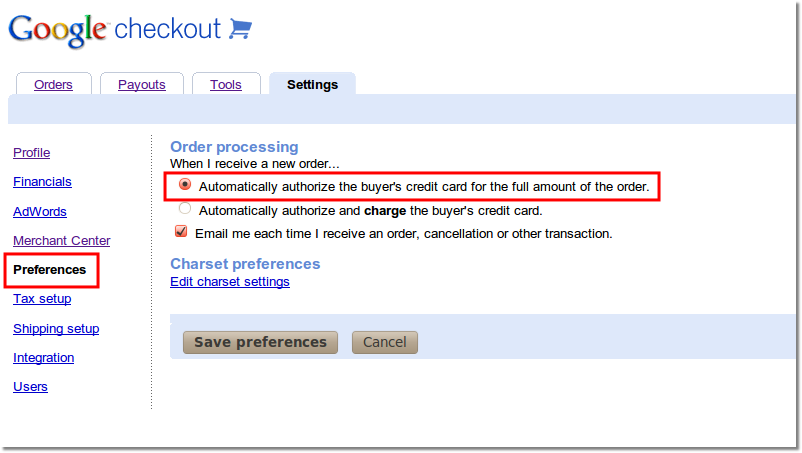
Here are more examples of correct configuration:
