Difference between revisions of "Authorize net tech details"
(Created page with '=What is Authorize.net?= [http://en.wikipedia.org/wiki/Authorize.Net Authorize.net in Wikipedia] <br> =Where to find Authorize.net settings?= 1. Navigate to '''ADDONS - Payment…') |
|||
| (10 intermediate revisions by one other user not shown) | |||
| Line 1: | Line 1: | ||
=What is Authorize.net?= | =What is Authorize.net?= | ||
[[Image:googlecheckout_logo.png|right]] | |||
[http://en.wikipedia.org/wiki/Authorize.Net Authorize.net in Wikipedia] | [http://en.wikipedia.org/wiki/Authorize.Net Authorize.net in Wikipedia] | ||
=Which type of API from Authorize.net does MOR use?= | |||
MOR uses ARB API from [http://developer.authorize.net/api/arb/ Authorize.net] | |||
<br> | <br> | ||
=Where to find Authorize.net settings?= | =Where to find Authorize.net settings?= | ||
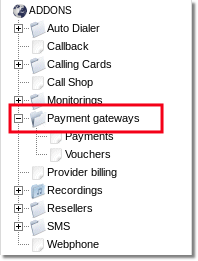
1. Navigate to '''ADDONS - Payment gateways''' | 1. Navigate to '''ADDONS - Payment gateways''' | ||
<br><br> | |||
[[File:payment_gateways_path.png]] | |||
<br><br> | |||
=How can I setup Authorize.net?= | =How can I setup Authorize.net?= | ||
| Line 12: | Line 20: | ||
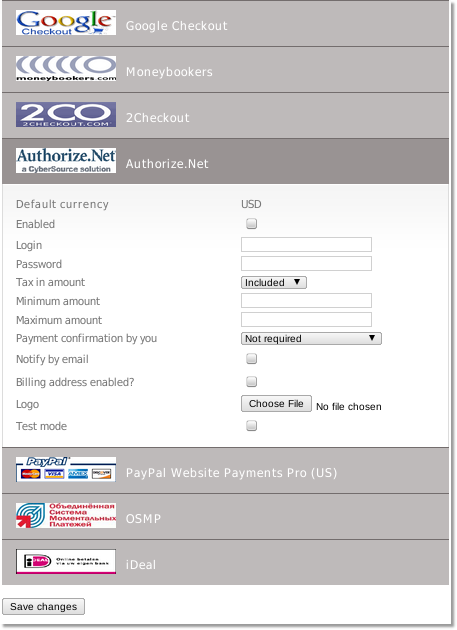
This is Authorize.net setup page in MOR: | This is Authorize.net setup page in MOR: | ||
<br><br> | |||
[[File:Authorize.net.png]] | |||
<br><br> | <br><br> | ||
| Line 17: | Line 27: | ||
* '''Login''' - Authorize.net account login. | * '''Login''' - Authorize.net account login. | ||
* ''' | * '''Password''' - Authorize.net account password. | ||
* '''Tax in amount''' - "Include" tax into amount that user has to pay or "Exclude" if you want to exclude the tax from the amount that is added to user's balance | * '''Tax in amount''' - "Include" tax into amount that user has to pay or "Exclude" if you want to exclude the tax from the amount that is added to user's balance | ||
| Line 31: | Line 41: | ||
* '''Notify by email''' - Check to receive notifications by email. | * '''Notify by email''' - Check to receive notifications by email. | ||
* '''Billing address enabled?''' - require or not billing address details (when making a payment use will be asked for additional details) | |||
* '''Test mode''' - Turns on the test mode. Use this option only if you know what you are doing. In test mode MOR will send payment requests to bank's test environment, so the payments will not transfer actual money. On the other hand MOR still counts these payments as real and updates user's balance. | * '''Test mode''' - Turns on the test mode. Use this option only if you know what you are doing. In test mode MOR will send payment requests to bank's test environment, so the payments will not transfer actual money. On the other hand MOR still counts these payments as real and updates user's balance. | ||
| Line 38: | Line 50: | ||
=Troubleshooting= | =Troubleshooting= | ||
'''All payments are being show as Error in Card details''' | |||
<br><br> | |||
Please check The Transaction Key that you have embedded in your MOR settings. Just to be sure, generate a new transaction key, disable the old transaction key, and enter the new value in your MOR settings and test the connection. | |||
To obtain the Transaction Key: | |||
1. Login to your Merchant Interface at https://account.authorize.net | |||
2. Click Settings in the main left side menu. | |||
3. Click API Login ID and Transaction Key. | |||
4. Enter your Secret Answer (the answer to your Secret Question configured at account setup). | |||
5. To disable the old transaction key, click the check box labeled Disable Old Transaction Key. | |||
(Note: If the Disable Old Transaction Key check box is not selected, the old transaction key will automatically expire in 24 hours.) | |||
6. Click Submit to continue. Your new Transaction Key is displayed. | |||
7. Add new transaction key in to MOR. | |||
8. Test connection. | |||
<br><br> | |||
=See also= | |||
* [[Payment Gateway Addon]] | |||
Latest revision as of 09:17, 31 May 2013
What is Authorize.net?
Which type of API from Authorize.net does MOR use?
MOR uses ARB API from Authorize.net
Where to find Authorize.net settings?
1. Navigate to ADDONS - Payment gateways

How can I setup Authorize.net?
This example is made using ING bank as an example. Control panels of other banks may differ but the process should be similar.
This is Authorize.net setup page in MOR:

- Enabled - Check this box to make Authorize.net available for your clients.
- Login - Authorize.net account login.
- Password - Authorize.net account password.
- Tax in amount - "Include" tax into amount that user has to pay or "Exclude" if you want to exclude the tax from the amount that is added to user's balance
- Minimum amount - Minimum payment amount
- Maximum amount - Maximum payment amount.
- Payment confirmation by you
- Not required - No confirmation is required. Every payment is added to clients balance immediately.
- Required for suspicious payments - currently Authorize.net doesn't provide enough info to calculate suspiciousness.
- Required for all payments - When payments are completed they must be confirmed manually.
- Notify by email - Check to receive notifications by email.
- Billing address enabled? - require or not billing address details (when making a payment use will be asked for additional details)
- Test mode - Turns on the test mode. Use this option only if you know what you are doing. In test mode MOR will send payment requests to bank's test environment, so the payments will not transfer actual money. On the other hand MOR still counts these payments as real and updates user's balance.
- Logo - You can select and upload a custom logo picture. MOR accepts images that are *.jpg, *.png or *.gif and less that 100Kb in size.
Troubleshooting
All payments are being show as Error in Card details
Please check The Transaction Key that you have embedded in your MOR settings. Just to be sure, generate a new transaction key, disable the old transaction key, and enter the new value in your MOR settings and test the connection.
To obtain the Transaction Key:
1. Login to your Merchant Interface at https://account.authorize.net
2. Click Settings in the main left side menu.
3. Click API Login ID and Transaction Key.
4. Enter your Secret Answer (the answer to your Secret Question configured at account setup).
5. To disable the old transaction key, click the check box labeled Disable Old Transaction Key. (Note: If the Disable Old Transaction Key check box is not selected, the old transaction key will automatically expire in 24 hours.)
6. Click Submit to continue. Your new Transaction Key is displayed.
7. Add new transaction key in to MOR.
8. Test connection.
