Difference between revisions of "CDR Import"
| Line 27: | Line 27: | ||
[[File:Cdr_import_wrong_separators.png]] | [[File:Cdr_import_wrong_separators.png]] | ||
<br><br> | <br><br> | ||
Next you will have to assign columns to CDR values. In step 2, you can see the necessary fields to select. They are marked by a star (*). Without selecting at least one field marked by *, you will not be able to continue the import process. Select the appropriate settings and click '''Assign Columns''': | Next you will have to assign columns to CDR values. In step 2, you can see the necessary fields to select. They are marked by a star (*). Without selecting at least one field marked by *, you will not be able to continue the import process. Select the appropriate settings and click '''Assign Columns''': | ||
<br><br> | |||
[[Image:cdrimport2_2.png]] | [[Image:cdrimport2_2.png]] | ||
<br><br> | |||
Here you will be presented with a parsed file. If something is not right, click the '''Back''' button. If it's okay, click '''Confirm columns''': | Here you will be presented with a parsed file. If something is not right, click the '''Back''' button. If it's okay, click '''Confirm columns''': | ||
<br><br> | |||
[[Image:cdrimport3.png]] | [[Image:cdrimport3.png]] | ||
<br><br> | |||
Here you can choose method which should be used to assign calls to device: | Here you can choose method which should be used to assign calls to device: | ||
<br><br> | |||
[[Image:cdrimport4_2.png]] | [[Image:cdrimport4_2.png]] | ||
<br><br> | |||
* '''Select provider''' - allows to assign calls to certain provider. You will not see this option if you selected provider ID in step 2. | * '''Select provider''' - allows to assign calls to certain provider. You will not see this option if you selected provider ID in step 2. | ||
* '''Import by user''' - allows to assign calls to one user. | * '''Import by user''' - allows to assign calls to one user. | ||
| Line 55: | Line 54: | ||
If there is provider ID in a file that doesn't exist in a system, file is not imported and you are informed about bad CDRs in step 5. If you chose to leave Provider ID not selected in step 2, everything is fine and you won't see the line "Bad CDRs". | If there is provider ID in a file that doesn't exist in a system, file is not imported and you are informed about bad CDRs in step 5. If you chose to leave Provider ID not selected in step 2, everything is fine and you won't see the line "Bad CDRs". | ||
<br><br> | |||
[[Image:cdrimport5_2.png]] | [[Image:cdrimport5_2.png]] | ||
<br><br> | |||
When you choose to import provider ID in step 2, you can select Provider in step 6, but this is optional. This column will not be visible if you are not importing provider's ID. | When you choose to import provider ID in step 2, you can select Provider in step 6, but this is optional. This column will not be visible if you are not importing provider's ID. | ||
<br><br> | |||
[[Image:cdrimport6_4.png]] | [[Image:cdrimport6_4.png]] | ||
<br><br> | |||
= Export = | = Export = | ||
Revision as of 14:33, 3 October 2012
Configuration
In Configuration, make sure you select the correct options for these values:
- CSV Column Separator.
- CSV Decimal Separator.
If the settings do not match your CSV file, you will not be able to import CDRs.
Import
Sometimes MOR can be used as separate billing software (that is, other than for real-time billing). When using MOR as separate billing software, it is possible to import CDRs from other switches (they need not be Asterisk) and bill these CDRs.
CDR Import can be found in SETTINGS –> Billing –> CDR –> Import.
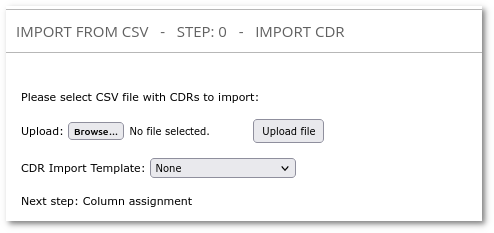
The first step is to select a CSV file to import:
Click on Upload file.
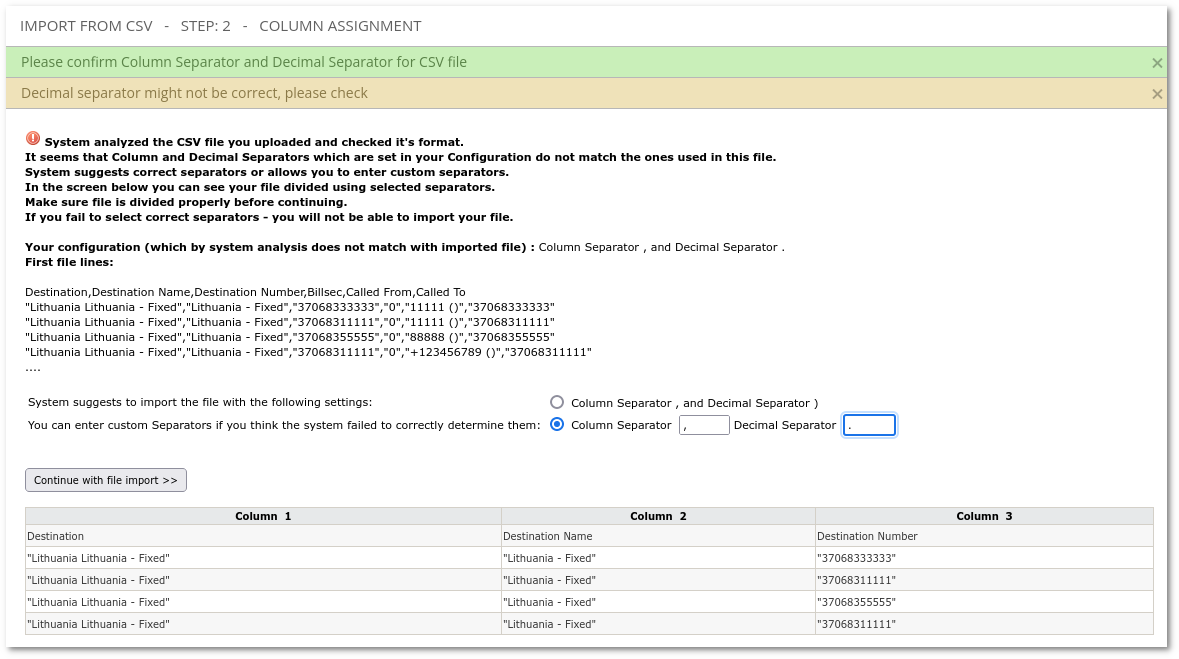
Sometimes MOR system is able to detect wrong CSV separator settings. If CSV separator settings are wrong MOR will suggest you to change them:
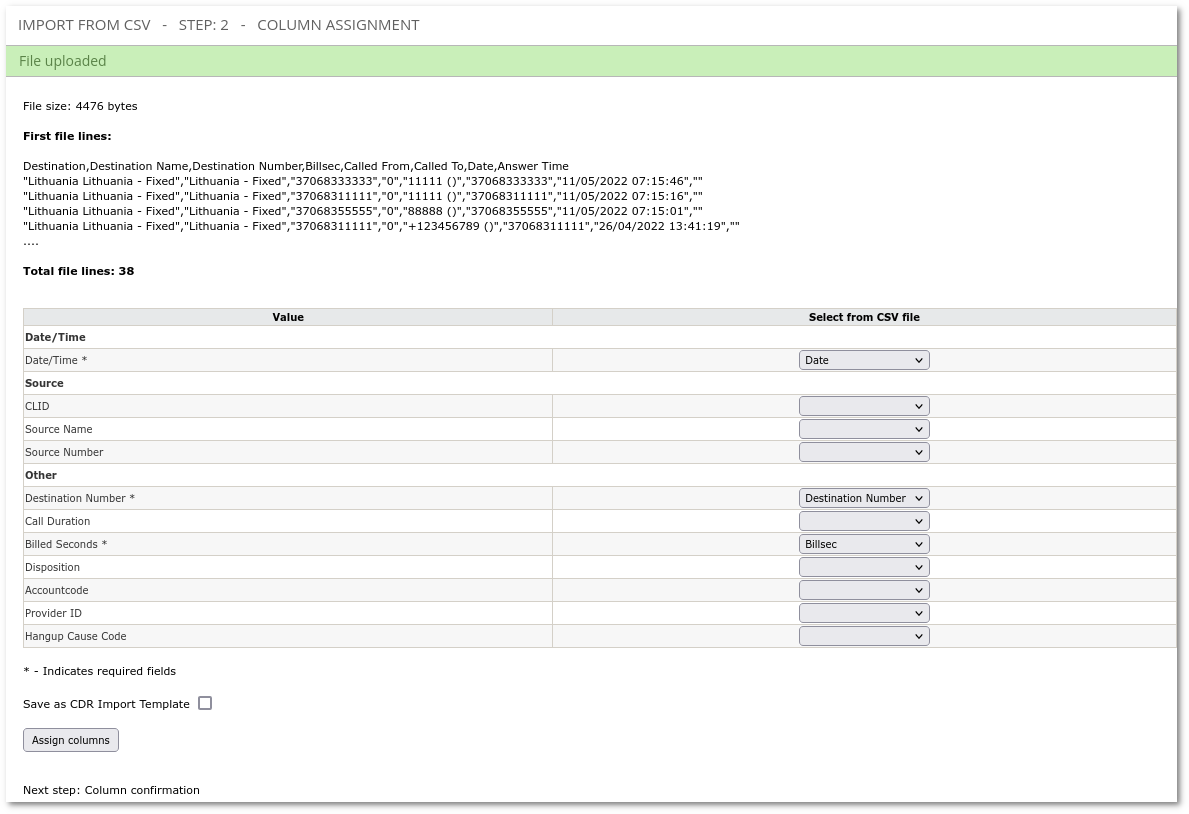
Next you will have to assign columns to CDR values. In step 2, you can see the necessary fields to select. They are marked by a star (*). Without selecting at least one field marked by *, you will not be able to continue the import process. Select the appropriate settings and click Assign Columns:
Here you will be presented with a parsed file. If something is not right, click the Back button. If it's okay, click Confirm columns:

Here you can choose method which should be used to assign calls to device:
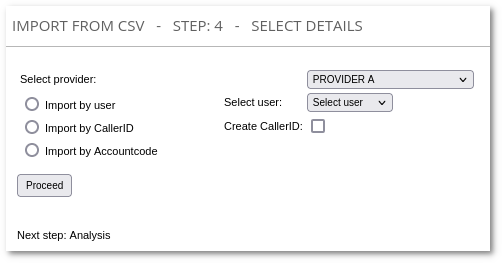
- Select provider - allows to assign calls to certain provider. You will not see this option if you selected provider ID in step 2.
- Import by user - allows to assign calls to one user.
- Select user - user and device should be chosen here, when Import by user is selected.
- Import by CallerID - allows to automatically assign calls to users by CallerID. It checks CLIs on Device settings. If CLI matches with CallerID call is assigned to this Device.
- Create CallerID - creates list of all CallerIDs on CDR file and allows to assign CallerIDs to Devices. It creates new CLIs.
Choosing provider ID during the import
There is an option in step 2 where you can choose provider ID. System automatically selects tariff according to the ID from the file which is the same as Provider ID in MOR.
If there is provider ID in a file that doesn't exist in a system, file is not imported and you are informed about bad CDRs in step 5. If you chose to leave Provider ID not selected in step 2, everything is fine and you won't see the line "Bad CDRs".
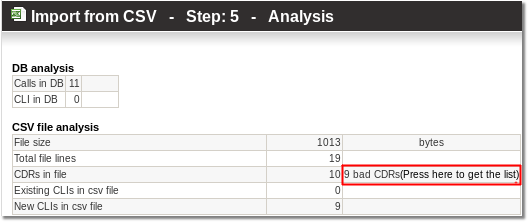
When you choose to import provider ID in step 2, you can select Provider in step 6, but this is optional. This column will not be visible if you are not importing provider's ID.

Export
You can export CDR in either the PDF or the CSV format. This can be done in the Call Stats page (STATISTICS –> Calls) and other places where you see:
Just cick on one of these links and you will get CDR in the selected period.
Calls to DIDs
Calls to DIDs are billed as for calls to normal numbers.
Calls to DIDs which belong to the caller are not billed at all (Price = 0).
