Vital PBX interconnection with MOR
From Kolmisoft Wiki
Important!!! Manual is not finished !!
To connect the multitenant Vital PBX with MOR you should do these steps on the MOR:
Adding once
1. Create the Tariff without rates
2. Create LCR without providers
3. Create an Interconnection User with Tariff and LCR from 1 and 2.
This user can be used for all pbx servers.
All interconnection devices can be assigned to this user
Adding for each whole Vital PBX server
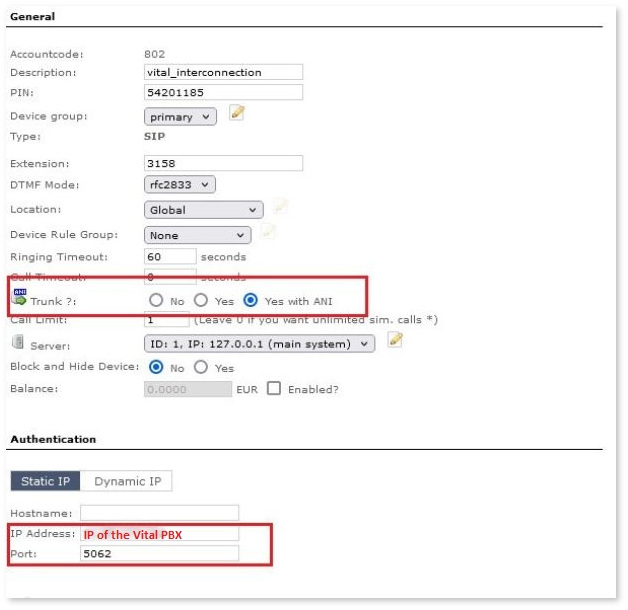
1. Create a device for the Interconnection user with the IP of the Vital PBX server - type Trunk Yes with Ani (As on screenshot)

Adding a new tenant on the Vital PBX
Steps in the MOR
1. Add new user (name of the tenant)
2. Add to this user regular tariff and the LCR with providers assigned to have the possibility to make calls
3. Add a Virtual Device to this user
4. Add CLI to this Virtual Device (as on the screenshot )
Steps in the Vital PBX
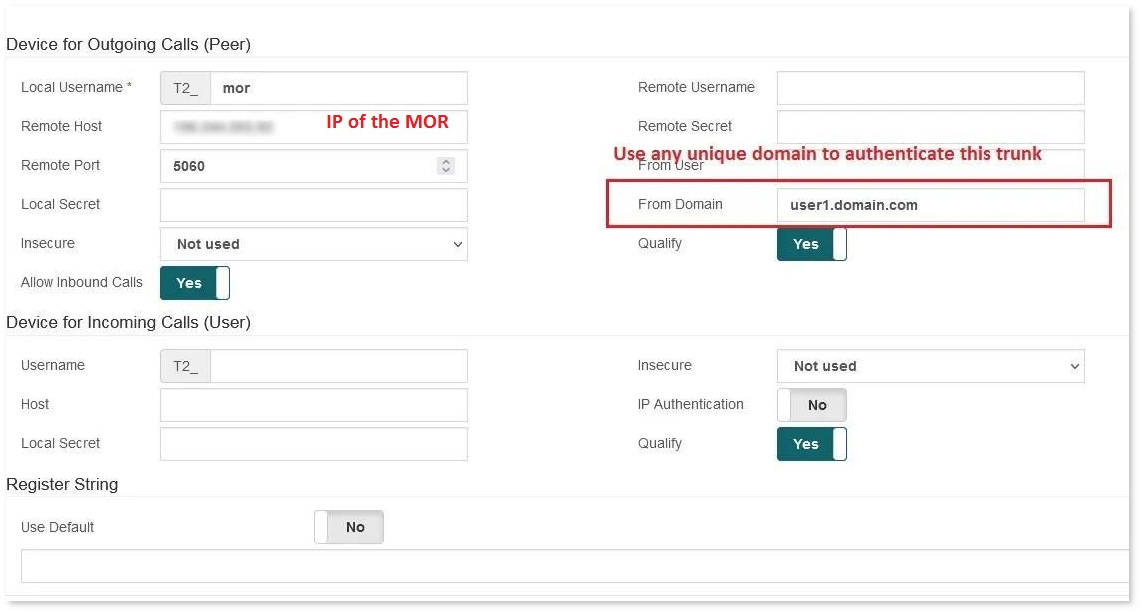
1. Add trunk (as on the screenshot)
====
Configurations in MOR
- Create an Interconnection User with an empty Tariff (without rates) and empty LCR (without providers). If multiple clients use the same IP address and MOR cannot do proper authorization through the domain, it will bill one of your users. To avoid this, you must create a “fake” Interconnection User that will be used in all cases, where authorization cannot be done (e.g. your users are sending calls from a domain that is not defined in MOR).
- Create a SIP device for the Interconnection User with the IP address of the VitalPBX server.
- Choose
 Trunk --> “Yes” or
  Trunk with ANI.
 - Create a regular User (that represents your client on VitalPBX) in MOR. Assign a proper Tariff and LCR for this User.
- Add a Virtual Device for this User and in the top settings click on
 CLIs and then “Add new CLI”.
 - Fill in the field "Domain". VitalPBX usually uses port 5062, so you should create a unique subdomain, followed by a port, for each of your tenants in VitalPBX (e.g. user1.domain.com:5062, user2.domain.com:5062, etc.).
Configurations in VitalPBX
- Create a new trunk and enter the IP address of MOR.
- If you entered some hostname name in MOR CLI > Domain settings, add the same hostname here (e.g. user1.domain.com).


