Difference between revisions of "M4 Users"
| (9 intermediate revisions by 3 users not shown) | |||
| Line 1: | Line 1: | ||
<br><br><br> | |||
<html> | |||
<div align="center"> | |||
<iframe width="640" height="360" src="https://www.youtube.com/embed/SAUBGWS4Pg8" title="YouTube video player" frameborder="0" allow="accelerometer; autoplay; clipboard-write; encrypted-media; gyroscope; picture-in-picture" allowfullscreen></iframe> | |||
</div> | |||
</html> | |||
<br> | |||
</div> | |||
<br><br> | |||
=Where to find user details?= | =Where to find user details?= | ||
Go to '''SETTINGS –> Users''' | Go to '''SETTINGS –> Users''' | ||
Here you can see list of all users. | Here you can see a list of all users. | ||
<br><br> | <br><br> | ||
[[File:M4_Users_path_2.png]] | [[File:M4_Users_path_2.png]] | ||
<br><br> | <br><br> | ||
Select the [[image:icon_edit.png]] icon in window above and you will reach personal User settings page. In this window you will see a lot of options grouped into sections. | Select the [[image:icon_edit.png]] icon in the window above and you will reach the personal User settings page. In this window, you will see a lot of options grouped into sections. | ||
<!---This functionality is available from MOR X4---> | <!---This functionality is available from MOR X4---> | ||
'''NOTE''' that admin is not shown in Users list. To see your own details go to '''PERSONAL MENU –> Details'''. | '''NOTE''' that admin is not shown in the Users list. To see your own details go to '''PERSONAL MENU –> Details'''. | ||
<br><br> | <br><br> | ||
Select the [[image:icon_edit.png]] Bulk management icon in | Select the [[image:icon_edit.png]] Bulk management icon in the window above to access bulk management options. | ||
<br><br> | <br><br> | ||
[[File:M4_Users_path_bulk_management.png]] | [[File:M4_Users_path_bulk_management.png]] | ||
| Line 19: | Line 29: | ||
Every User can update his own details in '''PERSONAL MENU –> Details'''.<br><br> | Every User can update his own details in '''PERSONAL MENU –> Details'''.<br><br> | ||
To disallow users to change their details Admin/Reseller has to check setting "Do not allow users to change their Personal Details" in '''SETTINGS -> Setup -> Settings -> Various'''. After this User Details can only be updated by user's owner.<br><br> | To disallow users to change their details Admin/Reseller has to check the setting "Do not allow users to change their Personal Details" in '''SETTINGS -> Setup -> Settings -> Various'''. After this User Details can only be updated by the user's owner.<br><br> | ||
'''NOTE''' that even if User is not allowed to update his own details, he still can see it in '''PERSONAL MENU –> Details''' as form with | '''NOTE''' that even if the User is not allowed to update his own details, he still can see it in '''PERSONAL MENU –> Details''' as a form with no editable options. | ||
<br><br> | <br><br> | ||
= General = | = General = | ||
| Line 26: | Line 36: | ||
* '''Status''' - indicates User status for accounting purposes. It is just a note and does not affect functionality in any way. | * '''Status''' - indicates User status for accounting purposes. It is just a note and does not affect functionality in any way. | ||
* '''Username''' – username for user to login to MOR GUI. | * '''Username''' – username for user to login to MOR GUI. | ||
* '''Password''' – password for user to | * '''Password''' – password for the user to log in to MOR GUI. | ||
* '''Suggest strong password''' - secure password will be generated and filled in the password field. | * '''Suggest strong password''' - secure password will be generated and filled in the password field. | ||
* '''2FA Enabled''' - enables two factors authentication for this User. Only visible if 2FA is enabled in system settings. | * '''2FA Enabled''' - enables two factors authentication for this User. Only visible if 2FA is enabled in system settings. | ||
* '''[[Balance and Credit | Balance]]''' – the user's balance. | * '''[[Balance and Credit | Balance]]''' – the user's balance. | ||
* '''Balance range''' – minimal and maximal balance | * '''Balance range''' – a minimal and maximal balance that the User will be able to have. Value "0.0000" is not considered unlimited. | ||
* '''[[Minimum contract billing | Minimal Charge for Calls]]''' – minimum charge user pays for voice calls. | * '''[[Minimum contract billing | Minimal Charge for Calls]]''' – minimum charge user pays for voice calls. | ||
* '''[[Minimum contract billing | Minimal Charge for Calls Date]]''' – date since when the previous option is valid. | * '''[[Minimum contract billing | Minimal Charge for Calls Date]]''' – date since when the previous option is valid. | ||
| Line 38: | Line 48: | ||
* '''Price Protection''' - set User's Price Protection method. | * '''Price Protection''' - set User's Price Protection method. | ||
** '''Off''' - Price Protection disabled (default) | ** '''Off''' - Price Protection disabled (default) | ||
** '''Minimal Rate Margin''' - if margin is lower than this value, call will fail with [[Rate margin is lower than allowed|HGC 324 - Rate margin is lower than allowed]] | ** '''Minimal Rate Margin''' - if the margin is lower than this value, the call will fail with [[Rate margin is lower than allowed|HGC 324 - Rate margin is lower than allowed]] | ||
** '''Minimal Rate Margin Percent''' - if margin percent is lower than this value, call will fail with [[Rate margin is lower than allowed|HGC 324 - Rate margin is lower than allowed]] | ** '''Minimal Rate Margin Percent''' - if margin percent is lower than this value, the call will fail with [[Rate margin is lower than allowed|HGC 324 - Rate margin is lower than allowed]] | ||
* '''Default Currency''' – User's default Currency | * '''Default Currency''' – User's default Currency | ||
* '''Time Zone''' – User's native Time Zone | * '''Time Zone''' – User's native Time Zone | ||
* '''Time Format''' – Available options - '''Default''' from general settings, '''H:M:S''', '''M:S'''. The option is taken into account when showing the user info on the GUI and creating invoices for the user. | * '''Time Format''' – Available options - '''Default''' from general settings, '''H:M:S''', '''M:S'''. The option is taken into account when showing the user info on the GUI and creating invoices for the user. | ||
* '''Responsible Manager''' – dropdown to choose Manager responsible for this User. (only Admin can set Responsible Manager) | * '''Responsible Manager''' – dropdown to choose the Manager responsible for this User. (only Admin can set Responsible Manager) | ||
* '''PBX Pool''' – PBX pool assigned to User | * '''PBX Pool''' – PBX pool assigned to User | ||
* '''Hide Non-Answered calls''' – with this option enabled simple user sees only answered calls in [[Last Calls]] and | * '''Hide Non-Answered calls''' – with this option enabled simple user sees only answered calls in [[Last Calls]] and on the Detailed Statistics page. | ||
* '''Ignore Global Alerts''' – check and User will be ignored on checking for [[ | * '''Ignore Global Alerts''' – check and User will be ignored on checking for [[M4_Alerts | Alerts]] | ||
* '''Show Hangup Cause''' – allow User to see numeric hangup cause value (for example '''FAILED (41)''' instead of '''FAILED'''). | * '''Show Hangup Cause''' – allow User to see numeric hangup cause value (for example '''FAILED (41)''' instead of '''FAILED'''). | ||
* '''Round Call Price in CDR''' - Yes or No. This is not a visual setting. For E.g. Call Price will be saved in CDR rounded by these settings. | * '''Round Call Price in CDR''' - Yes or No. This is not a visual setting. For E.g. Call Price will be saved in CDR rounded by these settings. | ||
| Line 53: | Line 63: | ||
* '''Rate Notification Template''' - [[Rate Notifications | select desired template]]''' | * '''Rate Notification Template''' - [[Rate Notifications | select desired template]]''' | ||
* '''Hide financial data in Quick Stats''' - if enabled, financial data in Quick Stats will be hidden. | * '''Hide financial data in Quick Stats''' - if enabled, financial data in Quick Stats will be hidden. | ||
* ''' | * '''Show Calls Statistics for last''' - allows setting a day amount limit on shown calls statistics. | ||
* '''Show Quick Stats''' - enables or disables Quick Stats view in a user profile. | |||
<br><br> | <br><br> | ||
= Fraud Protection = | = Fraud Protection = | ||
* '''Enforce Daily Limit''' - enable or disable Fraud Protection. | * '''Enforce Daily Limit''' - enable or disable Fraud Protection. | ||
* '''Daily Spend Limit''' - limit in User's currency. When Daily Spend Limit value reached, the User cannot make more calls. Daily Spend Limit value is reset at midnight in the User's time zone. | * '''Daily Spend Limit''' - limit in User's currency. When the Daily Spend Limit value is reached, the User cannot make more calls. The Daily Spend Limit value is reset at midnight in the User's time zone. | ||
* '''Daily Spend Warning''' - the User will receive an email with a warning message once set value reached. | * '''Daily Spend Warning''' - the User will receive an email with a warning message once the set value is reached. | ||
* '''Kill Calls In Progress''' - kill all User's calls when Daily Spend Limit reached. | * '''Kill Calls In Progress''' - kill all User's calls when Daily Spend Limit is reached. | ||
* '''Show Daily Limit''' - the User will see Daily Spend Limit in his account dashboard. | * '''Show Daily Limit''' - the User will see Daily Spend Limit in his account dashboard. | ||
* '''Allow Customer To Edit''' - the User can set his Fraud Protection Daily Spend Limit value. | * '''Allow Customer To Edit''' - the User can set his Fraud Protection Daily Spend Limit value. | ||
| Line 72: | Line 83: | ||
= Warning Balance Email = | = Warning Balance Email = | ||
If you want to get | If you want to get an email notification or send it to a User and Accountant (or take another action) when his balance drops lower than a certain amount, check this setting and enter the desired amount. | ||
More details: [[ | More details: [[M4 Warning Balance | Warning Balance]] | ||
<br><br> | <br><br> | ||
= Invoices = | = Invoices = | ||
* '''Generate Invoice automatically''' – should we generate Invoices for this User automatically based on set Billing Period? | * '''Generate Invoice automatically''' – should we generate Invoices for this User automatically based on the set Billing Period? | ||
* '''Generate Invoice manually''' - should this user be included when we generate Invoice manually with option "All Users"? | * '''Generate Invoice manually''' - should this user be included when we generate an Invoice manually with the option "All Users"? | ||
* '''Billing Period''' – select period for which Invoice should be generated. | * '''Billing Period''' – select the period for which the Invoice should be generated. | ||
* '''Grace Period''' – select period for which Invoice should be paid by User. For example, if you generate Invoice for January 1-31, and you set Grace Period 15 days, then User will see Due Date February 15 (15 days after Invoice period end). | * '''Grace Period''' – (Due Date setting) select the period for which the Invoice should be paid by the User. For example, if you generate an Invoice for January 1-31, and you set Grace Period as 15 days, then the User will see the Due Date of February 15 (15 days after the Invoice period end). | ||
* '''Create Invoices on Manual Payments''' - generate an Invoice when a new [[ | * '''Create Invoices on Manual Payments''' - generate an Invoice when a new [[M4 Payments | Payment]] (of type Payment from Client) is made. An invoice will be sent to the User's email and will be listed in the Invoice list. It is not possible to recalculate such an invoice. | ||
<br><br> | <br><br> | ||
| Line 90: | Line 101: | ||
<br> | <br> | ||
Static Billing Period time can be set to one of these values: Weekly, Bi-weekly, Monthly, Bimonthly, Quarterly, Half-yearly. | Static Billing Period time can be set to one of these values: Weekly, Bi-weekly, Monthly, Bimonthly, Quarterly, and Half-yearly. | ||
Once the Period will be selected, information will be displayed about the First Day of the Period, the Last Day of the Period, and the Invoice creation date. | Once the Period will be selected, information will be displayed about the First Day of the Period, the Last Day of the Period, and the Invoice creation date. | ||
| Line 100: | Line 111: | ||
<br> | <br> | ||
Dynamic Periodic Type allows selecting flexible billing periods. | Dynamic Periodic Type allows selecting flexible billing periods. | ||
If '''Generation time:''' is set to 24 hours (default value), Invoice will be generated at midnight (00:00), at today + period day(s) + 2. | If '''Generation time:''' is set to 24 hours (default value), the Invoice will be generated at midnight (00:00), at today + period day(s) + 2. | ||
For example, let's say today is 2018-09-06 and we choose parameter '''From date''' 2018-09-06 and parameter '''every 4 days''' and '''Generation time:''' 24 hours (default value). | For example, let's say today is 2018-09-06 and we choose parameter ''' From date''' 2018-09-06 and parameter '''every 4 days''' and '''Generation time:''' 24 hours (default value). | ||
The system will start to generate the invoice on at 2018-09-11 00:00:00 and the invoice will be generated for the period 2018-09-06 and 2018-09-09. | |||
The next invoice generation will begin on 2018-09-15 and the period for this invoice will be 2018-09-10 and 2018-09-13. | |||
If '''Generation time:''' is less than 24 hours, invoice will be generated at selected hour, at today + period day(s) + 1 day + Generation time. This is handy if we want to generate | If '''Generation time:''' is less than 24 hours, an invoice will be generated at the selected hour, at today + period day(s) + 1 day + Generation time. This is handy if we want to generate invoices for each day. | ||
For example, let's say today is 2018-09-06 and we set parameter '''From date''' 2018-09-06 and parameter '''every 1 days''' and '''Generation time:''' 23 hours. | For example, let's say today is 2018-09-06 and we set parameter ''' From date''' 2018-09-06 and parameter '''every 1 days''' and '''Generation time:''' 23 hours. | ||
Invoice will be generated for 2018-09-06 00:00:00 - 23:59:59 at 2018-09-07 23:00:00. Next invoice will be generated at 2018-09-08 23:00:00 for 2018-09-07 00:00:00 - 23:59:59 and so on. | Invoice will be generated for 2018-09-06 00:00:00 - 23:59:59 at 2018-09-07 23:00:00. Next invoice will be generated at 2018-09-08 23:00:00 for 2018-09-07 00:00:00 - 23:59:59 and so on. | ||
<br><br> | <br><br> | ||
| Line 114: | Line 125: | ||
Here Admin can upload documents for simple Users. Each document can have a comment made by Admin. Admin can upload, download and delete documents for simple Users. | Here Admin can upload documents for simple Users. Each document can have a comment made by Admin. Admin can upload, download and delete documents for simple Users. | ||
Simple users can see these documents under their '''Personal Details''' menu. Simple | Simple users can see these documents under their '''Personal Details''' menu. Simple Users can only download documents, it is not possible to delete or upload new Documents for him/her. | ||
<br><br> | <br><br> | ||
[[File:documents_admin.png]] | [[File:documents_admin.png]] | ||
| Line 142: | Line 153: | ||
* '''Main email''' | * '''Main email''' | ||
* '''NOC email''' | * '''NOC email''' | ||
* '''Billing email''' | * '''Billing email''' - Sends Invoices to set email. If Billing email is empty, then invoices are sent to Main email. | ||
* '''Rates email''' | * '''Rates email''' | ||
If 2 emails is needed to be put in, write them in such format: test@kolmisoft.com; test2@kolmisoft.com | |||
<br><br> | <br><br> | ||
= Taxes = | = Taxes = | ||
Latest revision as of 10:44, 7 April 2023
Where to find user details?
Go to SETTINGS –> Users
Here you can see a list of all users.

Select the ![]() icon in the window above and you will reach the personal User settings page. In this window, you will see a lot of options grouped into sections.
icon in the window above and you will reach the personal User settings page. In this window, you will see a lot of options grouped into sections.
NOTE that admin is not shown in the Users list. To see your own details go to PERSONAL MENU –> Details.
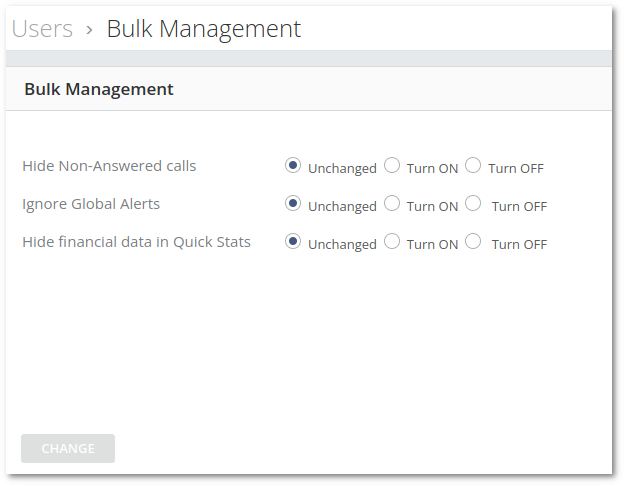
Select the ![]() Bulk management icon in the window above to access bulk management options.
Bulk management icon in the window above to access bulk management options.
Details update
Every User can update his own details in PERSONAL MENU –> Details.
To disallow users to change their details Admin/Reseller has to check the setting "Do not allow users to change their Personal Details" in SETTINGS -> Setup -> Settings -> Various. After this User Details can only be updated by the user's owner.
NOTE that even if the User is not allowed to update his own details, he still can see it in PERSONAL MENU –> Details as a form with no editable options.
General
- Status - indicates User status for accounting purposes. It is just a note and does not affect functionality in any way.
- Username – username for user to login to MOR GUI.
- Password – password for the user to log in to MOR GUI.
- Suggest strong password - secure password will be generated and filled in the password field.
- 2FA Enabled - enables two factors authentication for this User. Only visible if 2FA is enabled in system settings.
- Balance – the user's balance.
- Balance range – a minimal and maximal balance that the User will be able to have. Value "0.0000" is not considered unlimited.
- Minimal Charge for Calls – minimum charge user pays for voice calls.
- Minimal Charge for Calls Date – date since when the previous option is valid.
- Not Hidden/Hidden – is this user hidden?
- Call Limit – how many simultaneous calls the user can make?
- Max Call rate - set maximum allowed rate (price per min) when making calls (0 - unlimited).
- Price Protection - set User's Price Protection method.
- Off - Price Protection disabled (default)
- Minimal Rate Margin - if the margin is lower than this value, the call will fail with HGC 324 - Rate margin is lower than allowed
- Minimal Rate Margin Percent - if margin percent is lower than this value, the call will fail with HGC 324 - Rate margin is lower than allowed
- Default Currency – User's default Currency
- Time Zone – User's native Time Zone
- Time Format – Available options - Default from general settings, H:M:S, M:S. The option is taken into account when showing the user info on the GUI and creating invoices for the user.
- Responsible Manager – dropdown to choose the Manager responsible for this User. (only Admin can set Responsible Manager)
- PBX Pool – PBX pool assigned to User
- Hide Non-Answered calls – with this option enabled simple user sees only answered calls in Last Calls and on the Detailed Statistics page.
- Ignore Global Alerts – check and User will be ignored on checking for Alerts
- Show Hangup Cause – allow User to see numeric hangup cause value (for example FAILED (41) instead of FAILED).
- Round Call Price in CDR - Yes or No. This is not a visual setting. For E.g. Call Price will be saved in CDR rounded by these settings.
- Digits used for Price - round the call price to this many decimal places.
- Rounding method - rounding method to use for the call price.
- Rate Notification Template - select desired template
- Hide financial data in Quick Stats - if enabled, financial data in Quick Stats will be hidden.
- Show Calls Statistics for last - allows setting a day amount limit on shown calls statistics.
- Show Quick Stats - enables or disables Quick Stats view in a user profile.
Fraud Protection
- Enforce Daily Limit - enable or disable Fraud Protection.
- Daily Spend Limit - limit in User's currency. When the Daily Spend Limit value is reached, the User cannot make more calls. The Daily Spend Limit value is reset at midnight in the User's time zone.
- Daily Spend Warning - the User will receive an email with a warning message once the set value is reached.
- Kill Calls In Progress - kill all User's calls when Daily Spend Limit is reached.
- Show Daily Limit - the User will see Daily Spend Limit in his account dashboard.
- Allow Customer To Edit - the User can set his Fraud Protection Daily Spend Limit value.
- Kill All Calls Now - all User's calls will be terminated.
Blocking
Various options for User Blocking.
Warning Balance Email
If you want to get an email notification or send it to a User and Accountant (or take another action) when his balance drops lower than a certain amount, check this setting and enter the desired amount.
More details: Warning Balance
Invoices
- Generate Invoice automatically – should we generate Invoices for this User automatically based on the set Billing Period?
- Generate Invoice manually - should this user be included when we generate an Invoice manually with the option "All Users"?
- Billing Period – select the period for which the Invoice should be generated.
- Grace Period – (Due Date setting) select the period for which the Invoice should be paid by the User. For example, if you generate an Invoice for January 1-31, and you set Grace Period as 15 days, then the User will see the Due Date of February 15 (15 days after the Invoice period end).
- Create Invoices on Manual Payments - generate an Invoice when a new Payment (of type Payment from Client) is made. An invoice will be sent to the User's email and will be listed in the Invoice list. It is not possible to recalculate such an invoice.
Static Invoice Billing Period time
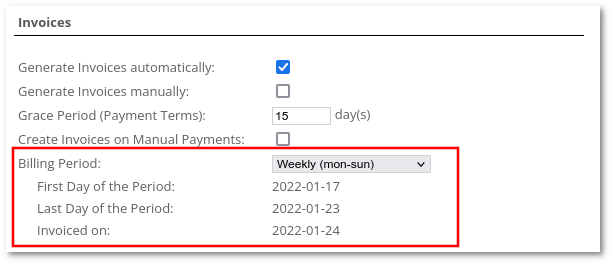
Static Billing Period time can be set to one of these values: Weekly, Bi-weekly, Monthly, Bimonthly, Quarterly, and Half-yearly.
Once the Period will be selected, information will be displayed about the First Day of the Period, the Last Day of the Period, and the Invoice creation date.
Every X days in Dynamic Periodic type
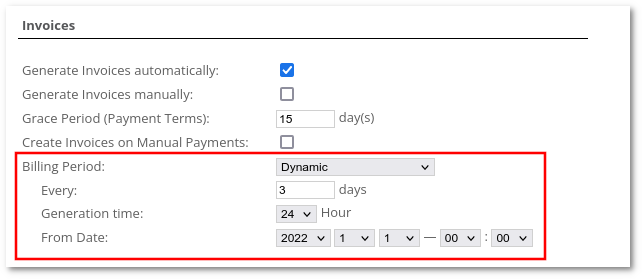
Dynamic Periodic Type allows selecting flexible billing periods.
If Generation time: is set to 24 hours (default value), the Invoice will be generated at midnight (00:00), at today + period day(s) + 2.
For example, let's say today is 2018-09-06 and we choose parameter From date 2018-09-06 and parameter every 4 days and Generation time: 24 hours (default value). The system will start to generate the invoice on at 2018-09-11 00:00:00 and the invoice will be generated for the period 2018-09-06 and 2018-09-09. The next invoice generation will begin on 2018-09-15 and the period for this invoice will be 2018-09-10 and 2018-09-13.
If Generation time: is less than 24 hours, an invoice will be generated at the selected hour, at today + period day(s) + 1 day + Generation time. This is handy if we want to generate invoices for each day.
For example, let's say today is 2018-09-06 and we set parameter From date 2018-09-06 and parameter every 1 days and Generation time: 23 hours.
Invoice will be generated for 2018-09-06 00:00:00 - 23:59:59 at 2018-09-07 23:00:00. Next invoice will be generated at 2018-09-08 23:00:00 for 2018-09-07 00:00:00 - 23:59:59 and so on.
Documents
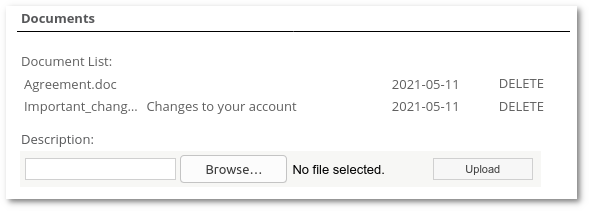
Here Admin can upload documents for simple Users. Each document can have a comment made by Admin. Admin can upload, download and delete documents for simple Users.
Simple users can see these documents under their Personal Details menu. Simple Users can only download documents, it is not possible to delete or upload new Documents for him/her.
PayPal
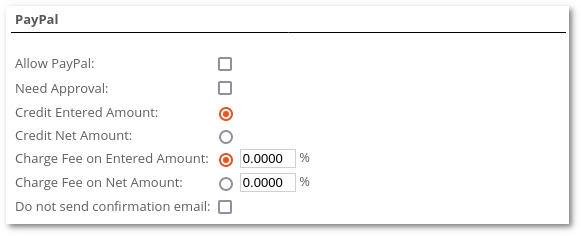
- Allow PayPal - enable or disable PayPal payments for user. If enabled, PayPal will be displayed on the user's dashboard.
- Need Approval - if enabled, the user's balance will be updated only when the admin confirms the payment.
- Credit Entered Amount - credit entered amount minus the calculated fee.
- Credit Net Amount - amount returned by PayPal minus the calculated fee.
- Charge Fee on Entered Amount - amount in percent.
- Charge Fee on Net Amount - amount in percent.
- Do not send confirmation email - if enabled, a confirmation email is not sent to the user.
Details
Self-explanatory.
If Country of Taxation is in the EU, validation of TAX Registration Number will be checked from this website: http://ec.europa.eu/taxation_customs/vies/
Company Emails
Self-explanatory:
- Main email
- NOC email
- Billing email - Sends Invoices to set email. If Billing email is empty, then invoices are sent to Main email.
- Rates email
If 2 emails is needed to be put in, write them in such format: test@kolmisoft.com; test2@kolmisoft.com
Taxes
Here tax parameters are entered for the user.
The tax system is explained here.
Registration Address
Self-explanatory.
NOTE:
From version 2.255, Email field was removed. All entered email addresses are moved to Main Email field in section Company Emails.
Blacklists / Whitelists
Enable static Source - enables static Blacklist or Whitelist
- No - do not use any Blacklist or Whitelist
- Blacklist - choose Number Pool which will be used to block calls sent by User specific Source numbers. If User sends CallerID number which is in selected Number Pool then call will be hangup with hangupcause 334 - Source number is in blacklist
- Whitelist - choose Number Pool which will be used to allow User to send only specific Source numbers. If User sends number which is NOT in selected Number Pool then call will be hangup with hangupcause 335 - Source number is not in whitelist
Enable static Destination - enables static Blacklist or Whitelist
- No - do not use any Blacklist or Whitelist
- Blacklist - choose Number Pool which will be used to block User from calling specific Destination numbers. If User calls number which is in selected Number Pool then call will be hangup with hangupcause 325 - Destination is in blacklist
- Whitelist - choose Number Pool which will be used to allow User to call only specific Destination numbers. If User calls number which is NOT in selected Number Pool then call will be hangup with hangupcause 326 - Destination is not in whitelist
Note: when using Number Pools for Blacklist/Whitelist, it is possible to upload prefixes. To do so, just import prefixes with percent sign at the end (example: 370% will act as prefix for 370xxxxxxxx number).
Important: Blacklists / Whitelists work for Originator only. They will not work for Terminator.
