Difference between revisions of "Directions and Destinations"
| (18 intermediate revisions by 4 users not shown) | |||
| Line 1: | Line 1: | ||
= | <br><br><br> | ||
<html> | |||
<div align="center"> | |||
<iframe width="640" height="360" src="https://www.youtube.com/embed/q3M72nsN4Ts" title="YouTube video player" frameborder="0" allow="accelerometer; autoplay; clipboard-write; encrypted-media; gyroscope; picture-in-picture" allowfullscreen></iframe> | |||
</div> | |||
</html> | |||
= Description = | |||
'''Directions''' refers to countries, or perhaps to a satellite network. The term merely describes the direction in which the call is routed.<br><br> '''Destinations''' are more concrete concepts of the calls course. <br>'''Example:'''<br> | |||
Let's say we are dialing number 37068547771. According to this number the '''Direction''' is Lithuania, but the '''Destination''' is the mobile network Bite. Destinations are determined by the Prefix which is unique for each Destination. The Prefix in the example is 370685. | |||
<br><br> | |||
== Who can configure and use destinations? == | |||
'''Destinations''' | * Only admin can create, edit, delete directions and destinations and access '''Direction''' and '''Destinations''' pages. | ||
<br><br> | |||
= Usage = | |||
== Directions== | |||
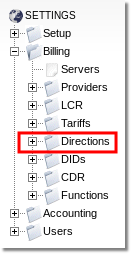
Go to '''SETTINGS –> Billing –> Directions'''. | |||
<br><br> | |||
[[File:directions-menu.png]] | |||
<br><br> | |||
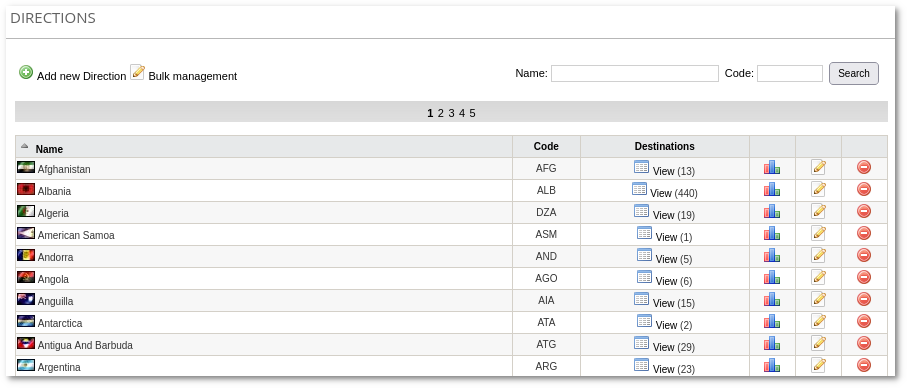
You can see all Directions with their details, such as country code and assigned destinations number, in the main window. | |||
<br><br> | |||
[[File:directions-main.png]] | |||
<br><br> | |||
If you click on statistics icon [[File:statistics_icon.png]], you can see how many calls were made to that direction during the selected time period. | |||
You can also edit [[File:edit.png]] the name of a direction, but you cannot change the country code. When deleting the direction all the destinations assigned to that direction will also be deleted. | |||
Click [[file: icon add.png]]'''New direction''' to add new Direction into system. You will see the following window: | |||
<br><br> | |||
[[File:Directions new.png]] | |||
<br><br> | |||
Enter the name and direction code. Click '''Create'''. New direction will be created and can be filled with Destinations. | |||
By clicking on Destinations column [[file: icon details.png]]'''View''' link, you can access the Destinations list for specific Direction. | |||
<br><br> | |||
==Destinations== | |||
'''SETTINGS –> Billing –> Directions''' and click on Destinations column [[file: icon details.png]]'''View''' link to access the Destinations list for specific Direction: | |||
<br><br> | |||
[[File:Afghanistan.png]] | |||
<br><br> | |||
===Create=== | |||
Click [[Image:icon_add.png]]"Add new destination" to add new Destinations into system. You will see the following window: | |||
<br><br> | |||
[[File:Destination new.png]] | |||
<br><br> | |||
Enter destination's prefix, name and click '''Create'''. Now you can add it to [[Destinations Groups]]. | |||
===Import=== | |||
* QUESTION: How do you import destinations from a file? | * QUESTION: How do you import destinations from a file? | ||
* ANSWER: You can import them using the Tariff import script. Just create a dummy tariff, add dummy | * ANSWER: You can import them using the [[Rate import from CSV|Tariff import script]]. Just create a dummy tariff, add dummy Rates, and import. Destinations will be created automatically. Later you can delete the Tariff. Just remember to enter prefixes in E.164 format. | ||
NOTE: You can get a CSV file with all Destinations in the Tariffs window. It is suitable for rate entering and importing back to MOR. | NOTE: You can get a CSV file with all Destinations in the [[Tariffs]] window. It is suitable for rate entering and importing back to MOR. | ||
<br><br> | <br><br> | ||
=Bulk management= | IMPORTANT NOTE: When adding new Destinations, make sure you include them in some Destination Group. Otherwise you will get corrupted invoices if the user uses a retail tariff. | ||
<br><br> | |||
===Bulk management=== | |||
<!---This functionality is available from MOR 10---> | <!---This functionality is available from MOR 10---> | ||
With Bulk management you are able to: | |||
* rename multiple Destinations by specifying a [http://en.wikipedia.org/wiki/Regular_expression regexp] pattern. | |||
* reassign multiple Destinations to other Direction by specifying a [http://en.wikipedia.org/wiki/Regular_expression regexp] pattern. | |||
<br><br> | |||
Go to '''SETTINGS –> Billing –> Directions''' and click on [[image:icon_edit.png]]'''Bulk management''' link | |||
<br><br> | |||
====Rename==== | |||
Enter a '''prefix''' [http://en.wikipedia.org/wiki/Regular_expression regexp] which Destinations should be renamed, write in '''Destination details''' to what name you want to rename those destinations: | |||
<br><br> | |||
[[File:Destinations_bulk_management_rename.png]] | |||
<br><br> | |||
Click '''Rename''' and MOR will show you which Destinations are going to be renamed: | |||
<br><br> | |||
[[File:Destinations_bulk_management_rename_confirm.png]] | |||
<br><br> | |||
If you want to proceed - press '''Confirm changes''' at the bottom of the window and the Destinations will be renamed: | |||
<br><br> | |||
[[File:renamed_destinations.png]] | |||
<br><br> | |||
====Reassign==== | |||
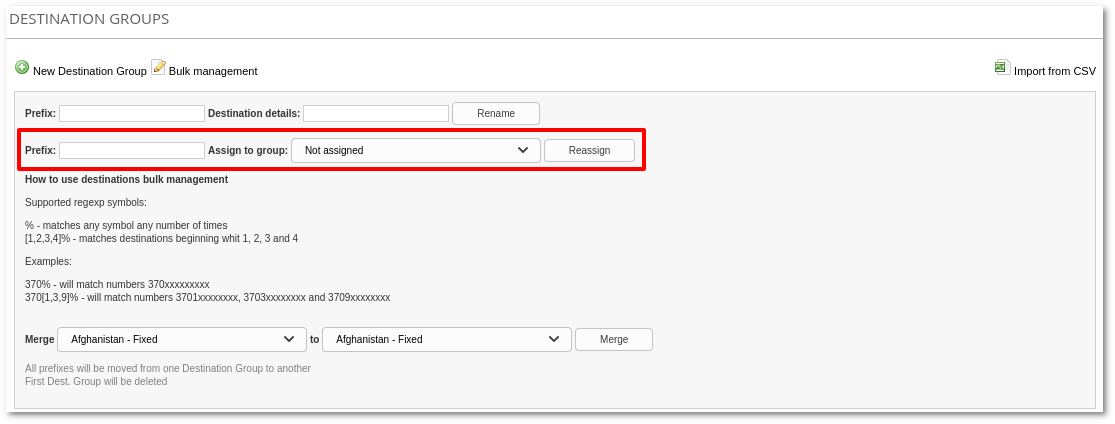
Enter a '''prefix''' [http://en.wikipedia.org/wiki/Regular_expression regexp] which destinations should be reassigned, select a '''group to assign''' to and specify '''type''': | |||
<br><br> | <br><br> | ||
[[File:Destinations_bulk_management.png]] | [[File:Destinations_bulk_management.png]] | ||
<br><br> | <br><br> | ||
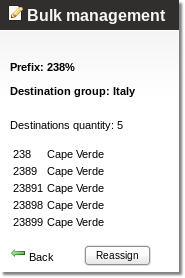
Press '''Reassign''' and MOR will show you which Destinations are going to be reassigned: | |||
<br><br> | <br><br> | ||
[[File:Destinations_bulk_management_confirm.png]] | [[File:Destinations_bulk_management_confirm.png]] | ||
<br><br> | <br><br> | ||
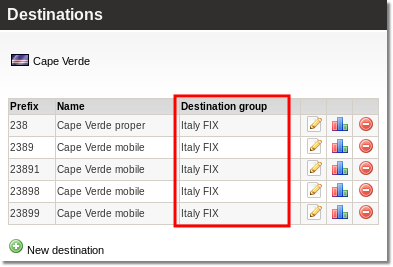
If you want to proceed - press '''Reassign''' at the bottom of the window again and the destinations will be reassigned: | |||
<br><br> | |||
[[File:reassigned_destination.png]] | |||
<br><br> | <br><br> | ||
==MOR supported regexp patters== | ====MOR supported regexp patters==== | ||
Supported regexp symbols: | Supported regexp symbols: | ||
| Line 48: | Line 100: | ||
[1,2,3,4]% - matches destinations beginning whit 1, 2, 3 and 4 | [1,2,3,4]% - matches destinations beginning whit 1, 2, 3 and 4 | ||
<br><br> | |||
'''Examples''' | |||
370% - will match numbers 370xxxxxxxxx | 370% - will match numbers 370xxxxxxxxx | ||
370[1,3,9]% - will match numbers 3701xxxxxxxx, 3703xxxxxxxx and 3709xxxxxxxx | 370[1,3,9]% - will match numbers 3701xxxxxxxx, 3703xxxxxxxx and 3709xxxxxxxx | ||
<br><br> | |||
=Unassigned Destinations= | |||
[[File:UnassignedDestinations.jpg]] | |||
<br> | |||
Destinations without Destinations Groups will appear in '''SETTINGS –> Billing –> Directions –> Unassigned Destinations''' where you can assign them to the chosen Destinations Groups. | |||
<br><br> | |||
==Fix all Unassigned Destinations== | |||
<br> | |||
[[File:FixUnassignedDestinations.jpg]] | |||
<br><br> | |||
Press '''Fix all Unassigned Destinations''' do assign all unassigned destinations at once. | |||
<br><br> | |||
[[File:FixAllUnassignedDestinations.png]] | |||
<br><br> | |||
Choose preferable option and press '''Proceed'''. After that Unassigned Destinations will be assigned depending on chosen option. | |||
<br><br> | |||
=See also= | |||
* [[Destinations_Groups|Destinations Groups]] | |||
* [[Integrity_Check#Destinations_not_assigned_to_Destination_Groups|Destinations not assigned to Destination Groups]] | |||
* [[Block_some_Destination_to_User|Block some Destination to User]] | |||
* [[Block_some_Destination_to_User|Block some Destination to Provider]] | |||
Latest revision as of 09:07, 27 January 2023
Description
Directions refers to countries, or perhaps to a satellite network. The term merely describes the direction in which the call is routed.
Destinations are more concrete concepts of the calls course.
Example:
Let's say we are dialing number 37068547771. According to this number the Direction is Lithuania, but the Destination is the mobile network Bite. Destinations are determined by the Prefix which is unique for each Destination. The Prefix in the example is 370685.
Who can configure and use destinations?
- Only admin can create, edit, delete directions and destinations and access Direction and Destinations pages.
Usage
Directions
Go to SETTINGS –> Billing –> Directions.
You can see all Directions with their details, such as country code and assigned destinations number, in the main window.
If you click on statistics icon ![]() , you can see how many calls were made to that direction during the selected time period.
, you can see how many calls were made to that direction during the selected time period.
You can also edit ![]() the name of a direction, but you cannot change the country code. When deleting the direction all the destinations assigned to that direction will also be deleted.
the name of a direction, but you cannot change the country code. When deleting the direction all the destinations assigned to that direction will also be deleted.
Click ![]() New direction to add new Direction into system. You will see the following window:
New direction to add new Direction into system. You will see the following window:
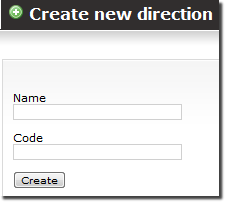
Enter the name and direction code. Click Create. New direction will be created and can be filled with Destinations.
By clicking on Destinations column ![]() View link, you can access the Destinations list for specific Direction.
View link, you can access the Destinations list for specific Direction.
Destinations
SETTINGS –> Billing –> Directions and click on Destinations column ![]() View link to access the Destinations list for specific Direction:
View link to access the Destinations list for specific Direction:
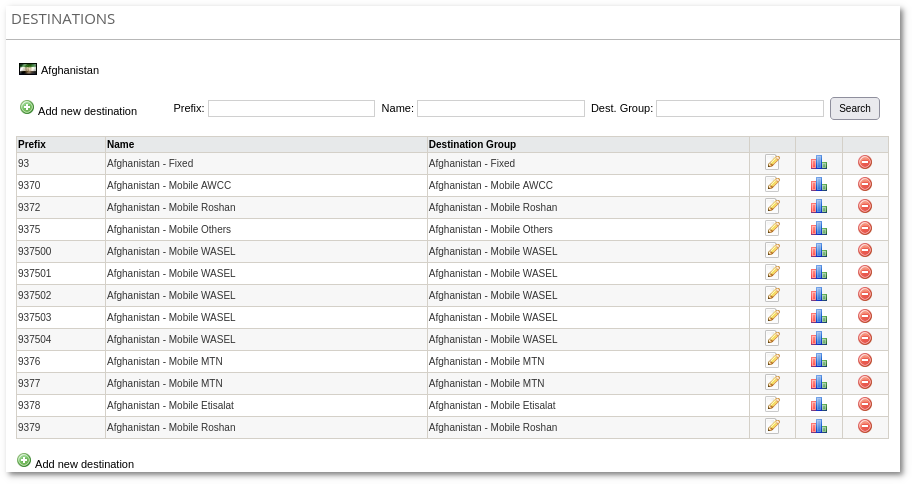
Create
Click ![]() "Add new destination" to add new Destinations into system. You will see the following window:
"Add new destination" to add new Destinations into system. You will see the following window:
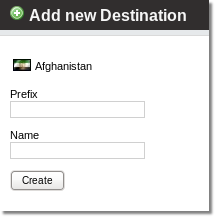
Enter destination's prefix, name and click Create. Now you can add it to Destinations Groups.
Import
- QUESTION: How do you import destinations from a file?
- ANSWER: You can import them using the Tariff import script. Just create a dummy tariff, add dummy Rates, and import. Destinations will be created automatically. Later you can delete the Tariff. Just remember to enter prefixes in E.164 format.
NOTE: You can get a CSV file with all Destinations in the Tariffs window. It is suitable for rate entering and importing back to MOR.
IMPORTANT NOTE: When adding new Destinations, make sure you include them in some Destination Group. Otherwise you will get corrupted invoices if the user uses a retail tariff.
Bulk management
With Bulk management you are able to:
- rename multiple Destinations by specifying a regexp pattern.
- reassign multiple Destinations to other Direction by specifying a regexp pattern.
Go to SETTINGS –> Billing –> Directions and click on ![]() Bulk management link
Bulk management link
Rename
Enter a prefix regexp which Destinations should be renamed, write in Destination details to what name you want to rename those destinations:
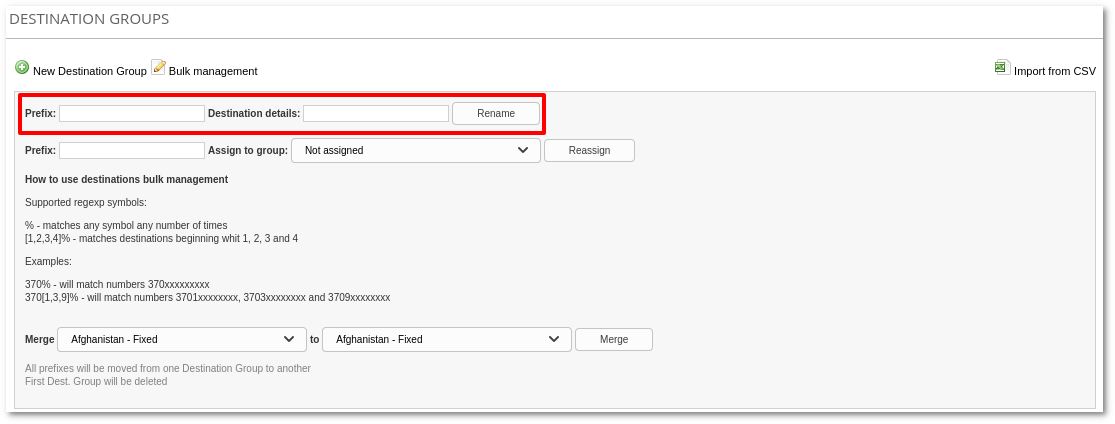
Click Rename and MOR will show you which Destinations are going to be renamed:
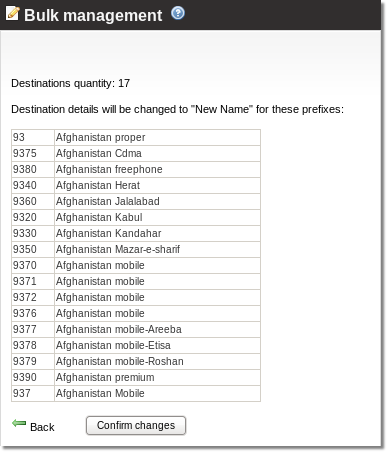
If you want to proceed - press Confirm changes at the bottom of the window and the Destinations will be renamed:
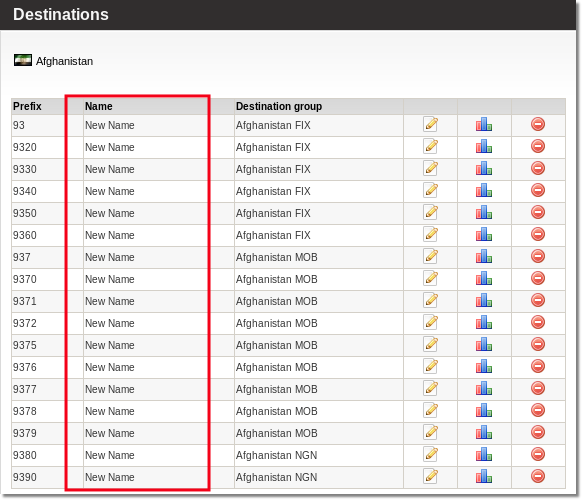
Reassign
Enter a prefix regexp which destinations should be reassigned, select a group to assign to and specify type:
Press Reassign and MOR will show you which Destinations are going to be reassigned:
If you want to proceed - press Reassign at the bottom of the window again and the destinations will be reassigned:
MOR supported regexp patters
Supported regexp symbols:
% - matches any symbol any number of times
[1,2,3,4]% - matches destinations beginning whit 1, 2, 3 and 4
Examples
370% - will match numbers 370xxxxxxxxx
370[1,3,9]% - will match numbers 3701xxxxxxxx, 3703xxxxxxxx and 3709xxxxxxxx
Unassigned Destinations
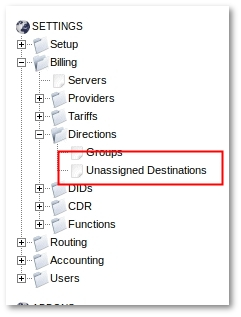
Destinations without Destinations Groups will appear in SETTINGS –> Billing –> Directions –> Unassigned Destinations where you can assign them to the chosen Destinations Groups.
Fix all Unassigned Destinations
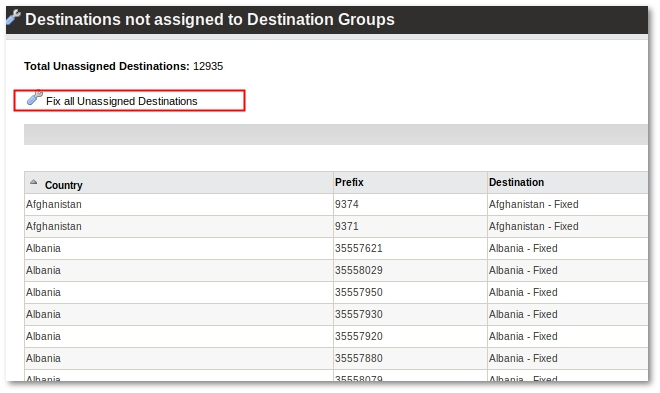
Press Fix all Unassigned Destinations do assign all unassigned destinations at once.
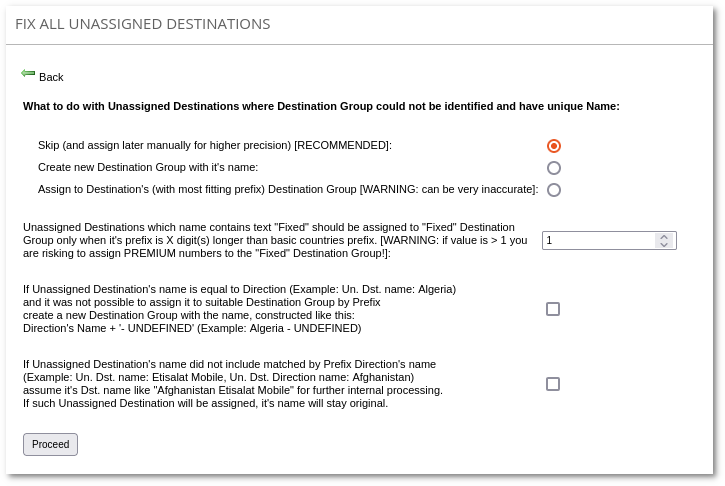
Choose preferable option and press Proceed. After that Unassigned Destinations will be assigned depending on chosen option.
