Difference between revisions of "Call Tracing"
| (41 intermediate revisions by 9 users not shown) | |||
| Line 1: | Line 1: | ||
=Overview = | <mkmeta>How to trace MOR Call</mkmeta> | ||
= MOR Call Tracing Overview = | |||
This function is for checking the setup of MOR in order to be sure | This function is for checking the setup of MOR in order to be sure a User will be able to dial out. To set MOR up isn't simple, but we are trying to make it easier with this manual and with improvements to GUI. It often happens that Users miss some important detail while trying to make everything work. Call Tracing will save a lot of head-scratching, and we hope it will be helpful for beginners. | ||
This function can be found in '''SETTINGS –> Billing –> Function –> Call Tracing'''. It can be quickly accessed in the Users menu (SETTINGS –> Users) as well. Just click on the [[Image:icon_call_tracing.png]] icon for a User. | |||
'''NOTE''' that Accountant can use this functionality with Call Tracing Usage permission. | |||
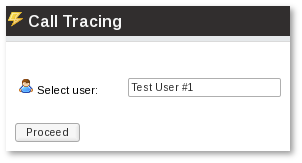
In the first window, we have to select which User we want to check: | |||
<br><br> | |||
[[Image:calltracing1.png]] | [[Image:calltracing1.png]] | ||
<br><br> | |||
= User testing = | = User testing = | ||
The next window shows us whether we have configured everything properly for the selected User. Let's look at each section separately. | |||
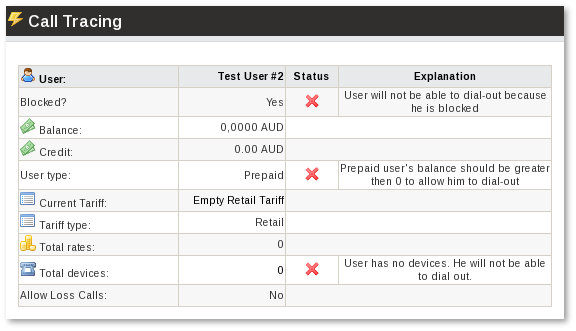
The first section shows information special to the User: | |||
<br><br> | |||
[[Image:calltracing2.png]] | [[Image:calltracing2.png]] | ||
<br><br> | |||
Here we see three errors [[Image:icon_cross.png]] that prevent the User from operating. Let's say we want to allow a User to make Calls. We will go through each of the errors and fix them. | |||
1. This error tells us that the User is Blocked and so unable to make Calls. We should go to [[User Details]] and unblock him. | |||
2. Balance and Credit for this User are empty, and the User type is Prepaid. That means he has no funds to cover the Call fees. There are several ways to go about fixing this: | |||
* If the User is postpaid, he should use some Payment method to increase his Balance. [[PayPal]] and [[Payments | Manual Payment]], among others, are good ways to do this. | |||
* We can change the User type to Postpaid and then we should adjust his Credit. Maybe it is unlimited, maybe some limit exists. But this will allow the User to dial out. | |||
3. The User has no Devices. A Device is necessary in order to dial out. Just create one for this User. | |||
'''Note:''' We also see that the User has an empty Tariff assigned. That is the reason why the User will not be able to dial out. In addition, the User can dial out only to those destinations which have Rates. Currently none of them has. You need to add some Rates to the existing Tariff or assign a non-empty Tariff to this User. | |||
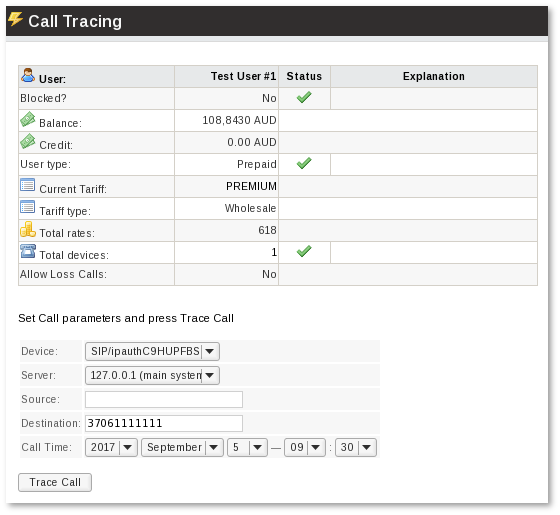
After solving all these issues, we should see: | |||
<br><br> | |||
[[Image:calltracing3.png]] | [[Image:calltracing3.png]] | ||
<br><br> | |||
= Device testing = | |||
The following section lets us choose a Device, Source, Server, Destination and a Call Time we want to test. For example: | |||
<br><br> | |||
[[Image:Calltracing3.png]] | |||
<br><br> | |||
This data means that we are testing a virtual Call from an IP authenticated SIP Device to a number 37061111111 on 2017 September 5th 09:30. | |||
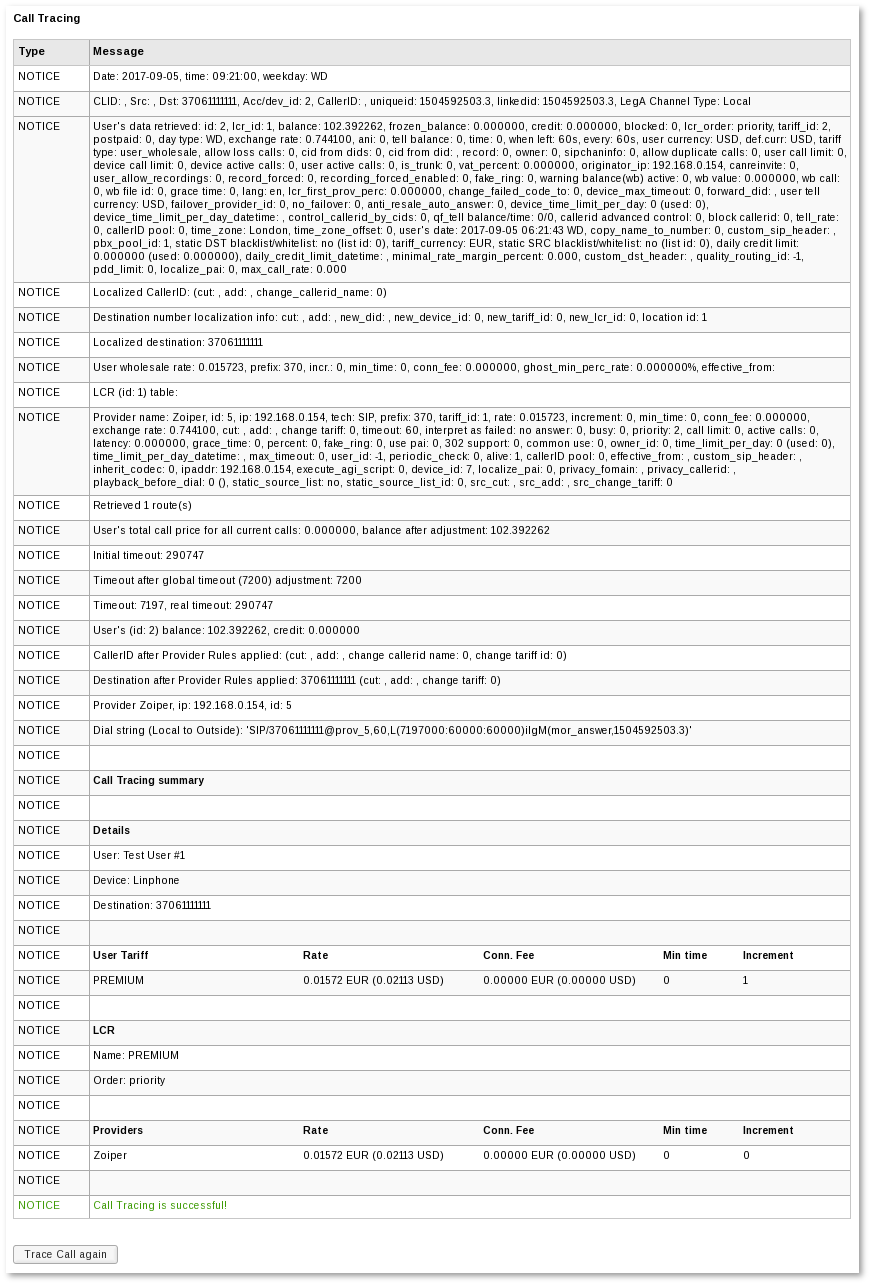
When we click '''Trace Call''', we will go to the next page and we will see something like: | |||
<br><br> | |||
[[Image:New_mor_call_tracing.png]] | |||
<br><br> | |||
Call Tracing Log will show self explanatory warnings, errors (in red colored text), other messages, and an informative summary. | |||
[[Image: | |||
<br><br> | <br><br> | ||
=From Accountant= | |||
Accountant must have '''Call tracing usage''' permission in [[Accountant_permissions | Accountant permissions group]] to use this functionality. | |||
Latest revision as of 08:58, 3 October 2017
MOR Call Tracing Overview
This function is for checking the setup of MOR in order to be sure a User will be able to dial out. To set MOR up isn't simple, but we are trying to make it easier with this manual and with improvements to GUI. It often happens that Users miss some important detail while trying to make everything work. Call Tracing will save a lot of head-scratching, and we hope it will be helpful for beginners.
This function can be found in SETTINGS –> Billing –> Function –> Call Tracing. It can be quickly accessed in the Users menu (SETTINGS –> Users) as well. Just click on the ![]() icon for a User.
icon for a User.
NOTE that Accountant can use this functionality with Call Tracing Usage permission.
In the first window, we have to select which User we want to check:

User testing
The next window shows us whether we have configured everything properly for the selected User. Let's look at each section separately.
The first section shows information special to the User:

Here we see three errors ![]() that prevent the User from operating. Let's say we want to allow a User to make Calls. We will go through each of the errors and fix them.
that prevent the User from operating. Let's say we want to allow a User to make Calls. We will go through each of the errors and fix them.
1. This error tells us that the User is Blocked and so unable to make Calls. We should go to User Details and unblock him.
2. Balance and Credit for this User are empty, and the User type is Prepaid. That means he has no funds to cover the Call fees. There are several ways to go about fixing this:
- If the User is postpaid, he should use some Payment method to increase his Balance. PayPal and Manual Payment, among others, are good ways to do this.
- We can change the User type to Postpaid and then we should adjust his Credit. Maybe it is unlimited, maybe some limit exists. But this will allow the User to dial out.
3. The User has no Devices. A Device is necessary in order to dial out. Just create one for this User.
Note: We also see that the User has an empty Tariff assigned. That is the reason why the User will not be able to dial out. In addition, the User can dial out only to those destinations which have Rates. Currently none of them has. You need to add some Rates to the existing Tariff or assign a non-empty Tariff to this User.
After solving all these issues, we should see:

Device testing
The following section lets us choose a Device, Source, Server, Destination and a Call Time we want to test. For example:

This data means that we are testing a virtual Call from an IP authenticated SIP Device to a number 37061111111 on 2017 September 5th 09:30.
When we click Trace Call, we will go to the next page and we will see something like:

Call Tracing Log will show self explanatory warnings, errors (in red colored text), other messages, and an informative summary.
From Accountant
Accountant must have Call tracing usage permission in Accountant permissions group to use this functionality.
