Difference between revisions of "Entering Rates for Wholesale Tariff"
| (4 intermediate revisions by one other user not shown) | |||
| Line 1: | Line 1: | ||
== Description == | == Description == | ||
This method is used to enter rates one by one by hand. It is primarily used for editing rates because it's very time consuming to enter thousands of rates by hand. CSV import is also available for this task. | This method is used to enter rates one by one by hand. It is primarily used for editing rates because it's very time-consuming to enter thousands of rates by hand. CSV import is also available for this task. | ||
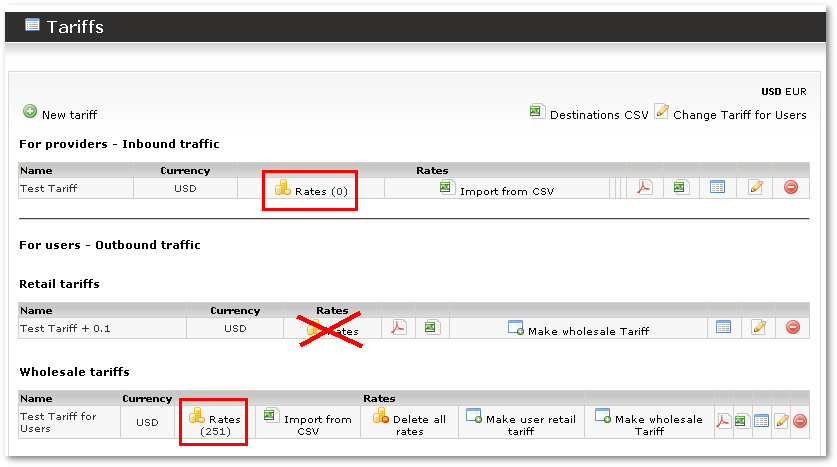
Click on [[Image:coins.png]] Rates: | Click on [[Image:coins.png]] Rates: | ||
<br><br> | |||
[[Image:enterratesforwholesale1.png]] | [[Image:enterratesforwholesale1.png]] | ||
<br><br> | |||
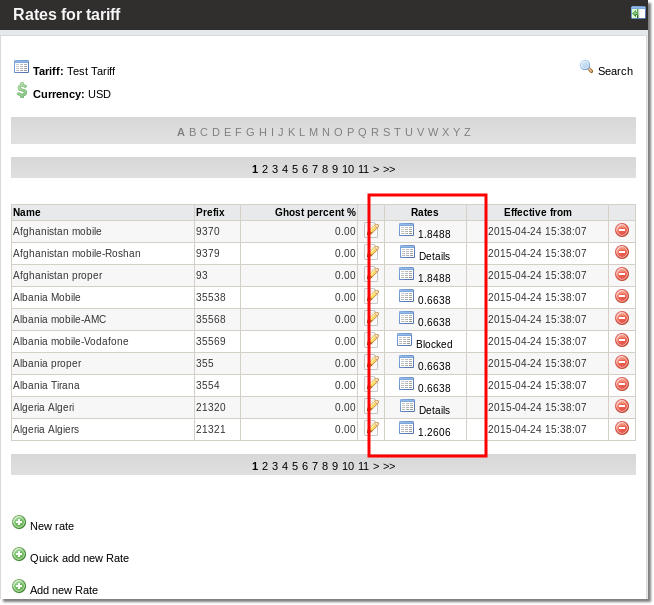
In this window you can view already entered rates: | In this window you can view already entered rates: | ||
<br><br> | |||
[[Image:enterratesforwholesale2.png]] | [[Image:enterratesforwholesale2.png]] | ||
<br><br> | |||
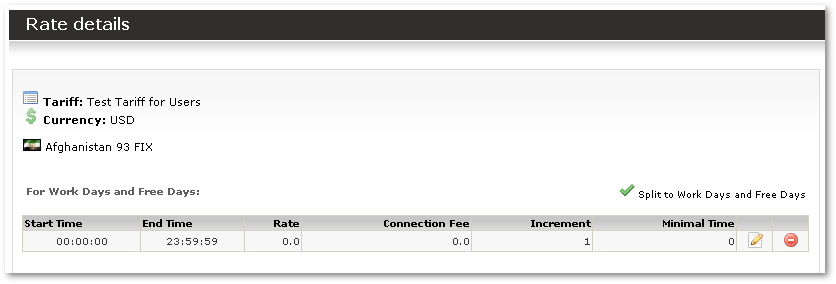
Click on [[Image:view.png]] Details to get more details: | Click on [[Image:view.png]] Details to get more details: | ||
<br><br> | |||
[[Image:enterratesforwholesale3.png]] | [[Image:enterratesforwholesale3.png]] | ||
<br><br> | |||
Here you can [[Image:check.png]] '''Split to Work Days and Free Days''', [[Image:delete.png]] delete a rate or [[Image:edit.png]] edit it: | Here you can [[Image:check.png]] '''Split to Work Days and Free Days''', [[Image:delete.png]] delete a rate or [[Image:edit.png]] edit it: | ||
<br><br> | |||
[[Image:enterratesforwholesale4.png]] | [[Image:enterratesforwholesale4.png]] | ||
<br><br> | |||
Here you can add a different '''End Time''' for different rates in a time period and change other values that are simpler than [[Advanced Rates]]. | Here you can add a different '''End Time''' for different rates in a time period and change other values that are simpler than [[Advanced Rates]]. | ||
NOTE: if there are no rates for some destinations, the user will not be able to dial these destinations using the provider to which the tariff is assigned. This is usual gotcha when call does not go through – always use [[Call Tracing]] if you have problems dialing-out! | NOTE: if there are no rates for some destinations, the user will not be able to dial these destinations using the provider to which the tariff is assigned. This is usual gotcha when call does not go through – always use [[Call Tracing]] if you have problems dialing-out! | ||
<br><br> | |||
== Adding new Rates == | == Adding new Rates == | ||
| Line 29: | Line 28: | ||
Here we show three ways of adding Rates over GUI: | Here we show three ways of adding Rates over GUI: | ||
<br><br> | |||
[[Image:enterratesforwholesale5.png]] | [[Image:enterratesforwholesale5.png]] | ||
<br><br> | |||
=== New Rate === | === New Rate === | ||
This way lets you add many rates for selected countries by first letter - for example, for all Destinations starting with A: | This way lets you add many rates for selected countries by first letter - for example, for all Destinations starting with A: | ||
<br><br> | |||
[[Image:enterratesforwholesale6.png]] | [[Image:enterratesforwholesale6.png]] | ||
<br><br> | |||
Enter Rates and click the Update button to add the desired Rates. | Enter Rates and click the Update button to add the desired Rates. | ||
<br><br> | |||
=== Quickly add a new Rate === | === Quickly add a new Rate === | ||
This way allows you to quickly add a Rate. | This way allows you to quickly add a Rate. Fill in the fields (most important are ''Prefix'' and ''Price''). Make sure the software shows you which Destination it is (if it says that there is no such Destination, you need to create it) and click ''Add Rate'': | ||
<br><br> | |||
[[ | [[File:Quick rates add.png]] | ||
<br><br> | |||
=== Add new Rate === | === Add new Rate === | ||
This method is similar to previous one except that it allows you to enter rates only to a selected country (Direction). If a country has all rates already set, it will not let you choose that country: | This method is similar to previous one except that it allows you to enter rates only to a selected country (Direction). If a country has all rates already set, it will not let you choose that country: | ||
<br><br> | |||
[[Image:enterratesforwholesale8.png]] | [[Image:enterratesforwholesale8.png]] | ||
<br><br> | |||
== User wholesale tariff == | == User wholesale tariff == | ||
This tariff is used by users and is no | This tariff is used by users and is no different from the provider wholesale tariff. All the functions are the same. This tariff type can be enabled or disabled in Settings. | ||
When a wholesale tariff type is assigned to the user, he will not be able to see all rates online. He will be able to download them in PDF or CSV format. | When a wholesale tariff type is assigned to the user, he will not be able to see all rates online. He will be able to download them in PDF or CSV format. | ||
NOTE: you can't have Custom rates for a user if he is using the Wholesale tariff. | NOTE: you can't have Custom rates for a user if he is using the Wholesale tariff. | ||
<br><br> | |||
=See also= | |||
* [[Tariffs]] | |||
* [[Entering Rates for Retail Tariff]] | |||
* [[Advanced Rates]] | |||
* [[Rate import from CSV]] | |||
Latest revision as of 14:51, 30 May 2013
Description
This method is used to enter rates one by one by hand. It is primarily used for editing rates because it's very time-consuming to enter thousands of rates by hand. CSV import is also available for this task.
Click on ![]() Rates:
Rates:
In this window you can view already entered rates:
Click on ![]() Details to get more details:
Details to get more details:
Here you can ![]() Split to Work Days and Free Days,
Split to Work Days and Free Days, ![]() delete a rate or
delete a rate or ![]() edit it:
edit it:
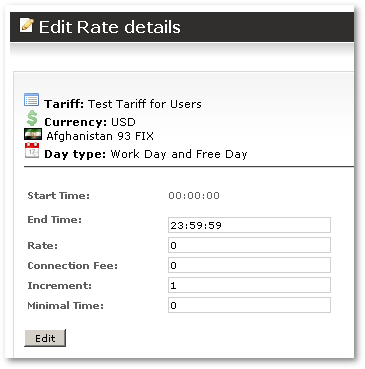
Here you can add a different End Time for different rates in a time period and change other values that are simpler than Advanced Rates.
NOTE: if there are no rates for some destinations, the user will not be able to dial these destinations using the provider to which the tariff is assigned. This is usual gotcha when call does not go through – always use Call Tracing if you have problems dialing-out!
Adding new Rates
It is possible to add Rates using GUI in three different ways. It is also possible to import Rates using CSV.
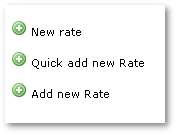
Here we show three ways of adding Rates over GUI:
New Rate
This way lets you add many rates for selected countries by first letter - for example, for all Destinations starting with A:
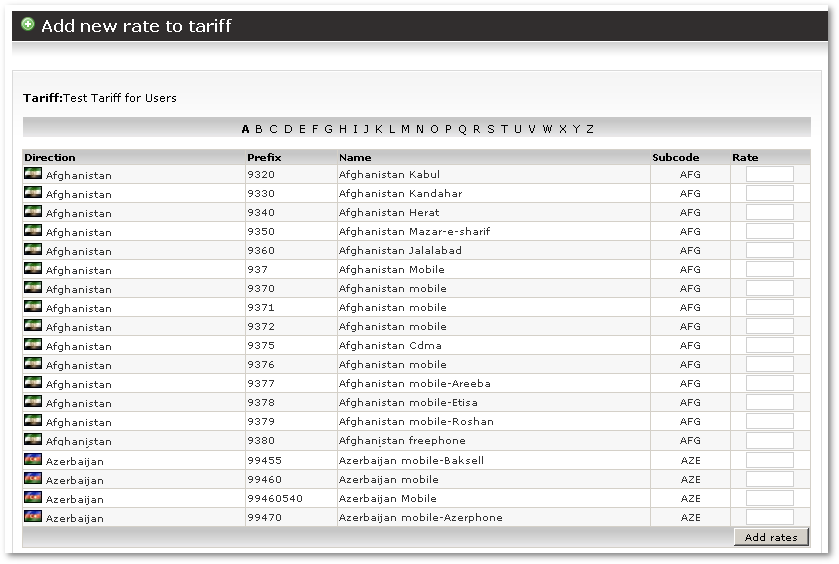
Enter Rates and click the Update button to add the desired Rates.
Quickly add a new Rate
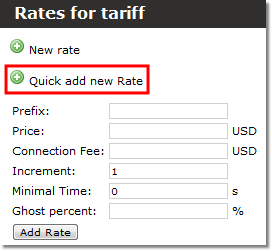
This way allows you to quickly add a Rate. Fill in the fields (most important are Prefix and Price). Make sure the software shows you which Destination it is (if it says that there is no such Destination, you need to create it) and click Add Rate:
Add new Rate
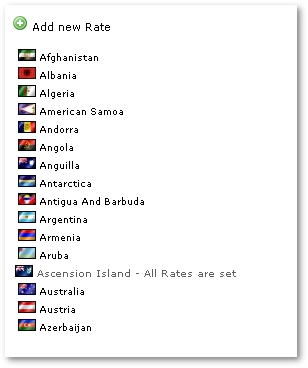
This method is similar to previous one except that it allows you to enter rates only to a selected country (Direction). If a country has all rates already set, it will not let you choose that country:
User wholesale tariff
This tariff is used by users and is no different from the provider wholesale tariff. All the functions are the same. This tariff type can be enabled or disabled in Settings.
When a wholesale tariff type is assigned to the user, he will not be able to see all rates online. He will be able to download them in PDF or CSV format.
NOTE: you can't have Custom rates for a user if he is using the Wholesale tariff.
