Difference between revisions of "Data import"
| Line 92: | Line 92: | ||
[[Image:Imports_users_selection.png|alt Imports_users_selection]] | [[Image:Imports_users_selection.png|alt Imports_users_selection]] | ||
Now | Now locate the CSV file in your local system by clicking the "Browse" button. As indicated above, don't click the "Include first line?" checkbox if you have used the first line for commenting on the fields. | ||
[[Image:Upload_csv_file.png|alt upload_csv_file]] | [[Image:Upload_csv_file.png|alt upload_csv_file]] | ||
Revision as of 10:52, 21 May 2010
User/Device/DID import
You must import the data in the following order from CSV files:
1. Users data.
2. Devices data.
3. DIDs data.
CSV file format
You can upload your data from a CSV file that has the following structure:
1. Each record is started in a new line.
2. Each piece of record information is separated with commas (see the example).
3. Text is enclosed within inverted commas (for example: "name").
4. Numbers are written without inverted commas (for example: 4).
5. The first line can be used for your own needs, such as for naming each field of information. If you use this line, do not select the "include first line?" option when asked.
For example:
We have a CSV file named example.csv with the contents:
"id", "username", "password", "e-mail"
1, "username1", "verySecretPassword", "example@example.com"
2, "username2", "34r34r4232", "example2@example.com"
3, "username3", "23er29923wjwe", "example3@example.com"
Explanation:
The first line I used here was for naming the fields, so when asked do not select "include first line?" option (if you won't use the first line for naming the fields, when please select "include first line?")
The other three lines (starting 1, 2, 3) are for data records. Each record (the first one is: 1, "username1", "verySecretPassword", "example@example.com") represents:
1 - user id.
"username1" - user's username.
"verySecretPassword" - user's password.
"example@example.com" - user's e-mail.
Your CSV file can have any number of lines with any number of fields (each line must have the same number of fields).
P.S. The file should not have any other symbols than those mentioned above. Be careful, as some editors can add their own formatting symbols. In Windows we recommend using Notepad, and in Linux: gedit, kedit, nano.
Here are some examples:
dids csv file example:
37067531061,38,38
37065431061,45,22
37062431031,2138,2138
In this example I have used the first column for DID, the second for Temporary User ID, and the third for Temporary Device ID. Your data order can be completely different. You just need to select the correct values when asked.
users csv file example:
38,2,0,"NULL","NULL",TRUE,"11420471-2-03","Example ZRt","Example ZRt","example example. 11","76/356-650","example@example.hu",04/06/07 01:48 PM," ","en",97,20,0,FALSE,TRUE,5,0,04/06/07,"NULL","NULL",0,FALSE,04/06/07,"Lajosmi",6050,1,0,1,1,TRUE,"NULL","NULL",3
45,2,0,"95757bfa00bf85b17921d709b5af0234","NULL",TRUE,"12969247-2-03","Example Ákos","Example Example, Kft","Example's 38","70/235-45-89","example@example2.hu",04/06/09 11:28 AM," ","en",97,20,0,FALSE,TRUE,5,0,04/07/09,"NULL","NULL",0,FALSE,04/06/09,"Kecexample",6000,1,0,1,1,TRUE,"NULL","NULL","NULL"
2138,2,0,"cc1b3ae8986559b10786d6ea73912bd5","NULL",TRUE,"11871633-2-03","Kos Tas","Ks Kft","Alsó ast","20/229-36-78","pli@example.hu",12/13/07 09:42 AM," ","en",97,20,0,FALSE,TRUE,5,0,12/13/07,"NULL","NULL",0,FALSE,12/13/07,"Sirly",6031,1,0,1,1,TRUE,"NULL","NULL","NULL"
In the first column is a Temporary User's ID; the other columns represent other data. As mentioned above, it does not matter in which order your data is represented in the CSV file. It only matters that each column (the data between commas) represents the same data value (id, email, password or other).
devices csv file example:
38,38,76824435,"3676586421","asd dsa u.12","jamaica","7ewfw@sip.example.com",TRUE,"dynamic","sip",TRUE,"NULL","NULL","NULL","NULL","NULL","NULL","NULL","NULL","NULL","NULL","NULL","NULL","NULL","NULL"
45,45,76846301,"3676886421","fgh hgf u.","ergerSiP","76886421@sip.example.com",TRUE,"dynamic","sip",TRUE,"NULL","NULL","NULL","NULL","NULL","NULL","NULL","NULL","NULL","NULL","NULL","NULL","NULL","NULL"
2138,2138,76505921,"3676505921","jkl lkj u.12","treK","6654@sip.example.com",FALSE,"dynamic","sip",TRUE,"NULL",FALSE,FALSE,10,FALSE,FALSE,FALSE,FALSE,FALSE,FALSE,FALSE,FALSE,,FALSE
The first column here represents "id", the second "user_id", and the others represent other data. YOUR ORDER CAN BE DIFFERENT. The main thing is that each type of data (email, password, id...) must be in the same column. When you are asked to provide data when importing, you will assign the correct data from CSV for each column and MOR will know which column represents which data.
Importing data
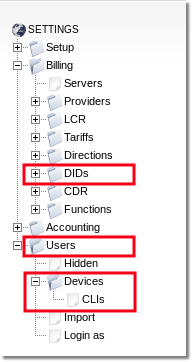
Firstly, from the MOR Graphical User Interface (GUI), navigate to: Settings -> Users -> Import, as in the picture:

Temporary User ID & Temporary Device ID
These fields are necessary to map DIDs to Devices and Devices to Users.
Example:
You have some other system with some user_ids, device_ids, DID_ids. You export them into CSV files. The relations between them are kept by these IDs, so importing them to MOR will keep these relations.
First you need to import a User with some temporary ID, then make sure this ID is near each Device you are trying to import. Select this ID as Temporary User ID when importing Devices. That way these devices will be mapped to this User.
Importing users
To import users, click on the "Import Users from CSV" link:

Now locate the CSV file in your local system by clicking the "Browse" button. As indicated above, don't click the "Include first line?" checkbox if you have used the first line for commenting on the fields.

Click on the "Upload file" button.
In next menu, please fill in the requested data (you should select the correct field from your CSV file). You must select a field for each selection box marked with an asterisk (*) symbol. Having finished, press the "Assign columns" button.

On the next page, check whether all the data was assigned correctly. If not, click the "Back" button and correct the mistakes. If all the data was assigned correctly, click the "Confirm columns" button. After the "Columns assigned" notification informs you that the columns are assigned, click the "Back to Menu" button. Having completed all these steps, you should see a page similar to this:

Importing devices
Click on the "Import Devices from CSV" link and follow the same procedure for uploading a CSV file as in the "import users" section, that is: Locate the CSV file in your local system by clicking the "Browse" button. As stated before, don't click the "Include first line?" checkbox if you have used the first line for commenting on the fields. Click on the "Upload file" button. Now you should see a menu similar to this:

In this menu, once again select a matching field from your CSV file for each selection box. It is very important to correctly select Temporary User ID and Temporary Device ID, because these fields are necessary to map DIDs to Devices and Devices to Users.
Having finished selecting the fields, press the "Assign columns" button.
Once the columns are assigned, check whether all the data is correct. If not, press the "Back" button and correct the mistakes. Click the "Back to Menu" button. Now, if you haven't made any mistakes, you should see two tables similar to these:

Importing DIDs
Click on the "Import Devices from CSV" link and follow the same steps for uploading a CSV file as in the "Import users" section. That is, locate the CSV file in your local system by clicking the "Browse" button. As stated before, don't click on the "Include first line?" checkbox if you have used the first line for commenting in the fields. Click on the "Upload file" button. Now you should see a menu similar to this:

Select all matching fields from your CSV here. It is very IMPORTANT to select the CORRECT Temporary User ID and Temporary Device ID! Having selected everything correctly, click the "Assign columns" button. In the next page, if all imported data is assigned correctly, click the "Confirm columns" button. If you haven't made any mistakes, you should now see a "DIDs created" message.
Success!
You can now check whether all your data has been imported.
To check users, go to: Settings -> Users.
To check devices, go to: Settings -> Users -> Devices.
To check DIDs, go to: Settings -> Billing -> DIDs.

Explanation about IDs
It is very confusing for many Users to understand what is User_ID/Device_ID used in Data Import.
These are temporary IDs created only for the import purposes. These IDs do HAVE NO any relation to User ID/Device ID in MOR system in Users/Devices windows!
The workflow of import:
1. We have Users/Devices/DIDs 2. We create separate file with Users and add unique ID to every User, ID is NOT related to User ID in MOR DB/GUI 3. We create separate file with Devices and add unique ID to every Device, ID is NOT related to Device ID in MOR DB/GUI, near each device we add temporary User ID from previous file which shows which Device belongs to which User 4. We create separate file with DIDs and near each DID add User_ID/Device_ID which shows which DID belongs to which User/Device 5. We import User file, MOR remembers temporary User_ID 6. We import Device file, MOR remembers temporary Device_ID and checks User_ID for such Devices which has User_ID near it in the file and assigns this Device to the appropriate User 7. We import DID file, MOR check Device_ID/User_ID in DIDs file and assigns DID to this Device/User
NOTE: in all process only TEMPORARY User_ID/Device_ID are used. In database users.id/devices.id are not used directly! They have no relations to User_ID/Device_ID from import files.
