Difference between revisions of "Authorize net tech details"
From Kolmisoft Wiki
Jump to navigationJump to search
| Line 15: | Line 15: | ||
This is Authorize.net setup page in MOR: | This is Authorize.net setup page in MOR: | ||
<br><br> | |||
[[File:Authorize.net.png]] | |||
<br><br> | <br><br> | ||
Revision as of 07:58, 25 January 2011
What is Authorize.net?
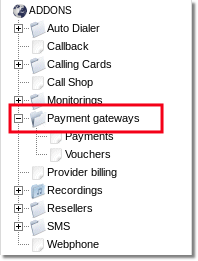
Where to find Authorize.net settings?
1. Navigate to ADDONS - Payment gateways

How can I setup Authorize.net?
This example is made using ING bank as an example. Control panels of other banks may differ but the process should be similar.
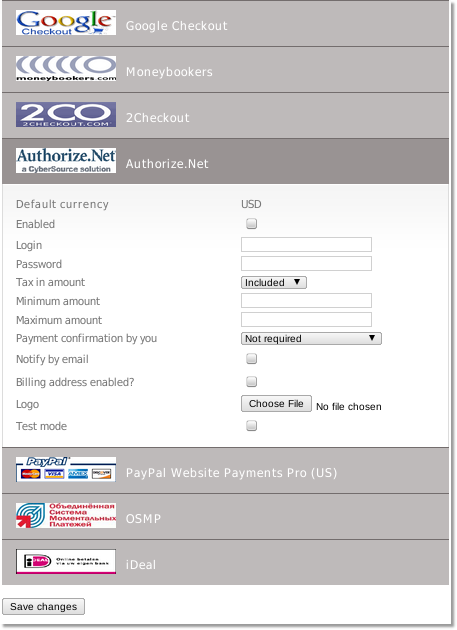
This is Authorize.net setup page in MOR:

- Enabled - Check this box to make Authorize.net available for your clients.
- Login - Authorize.net account login.
- Password - Authorize.net account password.
- Tax in amount - "Include" tax into amount that user has to pay or "Exclude" if you want to exclude the tax from the amount that is added to user's balance
- Minimum amount - Minimum payment amount
- Maximum amount - Maximum payment amount.
- Payment confirmation by you
- Not required - No confirmation is required. Every payment is added to clients balance immediately.
- Required for suspicious payments - currently Authorize.net doesn't provide enough info to calculate suspiciousness.
- Required for all payments - When payments are completed they must be confirmed manually.
- Notify by email - Check to receive notifications by email.
- Test mode - Turns on the test mode. Use this option only if you know what you are doing. In test mode MOR will send payment requests to bank's test environment, so the payments will not transfer actual money. On the other hand MOR still counts these payments as real and updates user's balance.
- Logo - You can select and upload a custom logo picture. MOR accepts images that are *.jpg, *.png or *.gif and less that 100Kb in size.
