Difference between revisions of "Basic and OLD Call Shop functionality"
(New page: = Definition = MOR is not used in Call Shops very often but has some _BASIC_ Call Shop functionality which will be described here. The main idea is to have several Phone Booths (we will...) |
|||
| Line 7: | Line 7: | ||
= Setup = | = Setup = | ||
First of all we need to create new Group for Call Shop. | |||
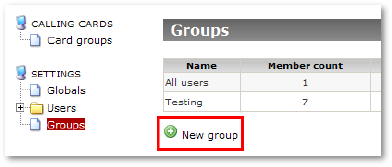
Select '''SETTINGS – Groups – New group''' | |||
[[Image:callshop1.png]] | |||
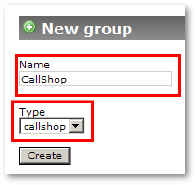
Enter name for Call Shop (“'''CallShop'''” in example) and select '''Type''' as “'''callshop'''”. Press Create. | |||
[[Image:callshop2.png]] | |||
Now we have group which will be use for Call Shop. We need to add some members to this group. | |||
Member is User in MOR terms. Lets add them. | |||
Press on '''Members''' for the '''CallShop''' group: | |||
[[Image:callshop3.png]] | |||
Each group can have different types of members. Member can be “Manager” and “User”. Manager will manage the group. Group can have several managers. | |||
Lets add manager for our Call Shop. Usually that will be “'''System Admin'''”. | |||
Make sure in selection list '''Add new member''' “admin – System Admin” is selected and press '''Add member''' button: | |||
[[Image:callshop4.png]] | |||
When new member is added, its type is „user‟, lets change it to „manager‟ | |||
Press on '''Change type''' for our only user: | |||
[[Image:callshop5.png]] | |||
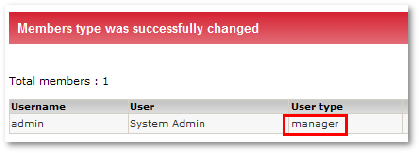
Now we have manager for our group: | |||
[[Image:callshop6.png]] | |||
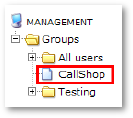
Also instantly we have new controls for the „'''CallShop'''’ group under '''MANAGEMENT''', because we are logged in as „System Admin‟ | |||
[[Image:callshop7.png]] | |||
Now we need some users for full Call Shop functionality. These users will do actual calling. | |||
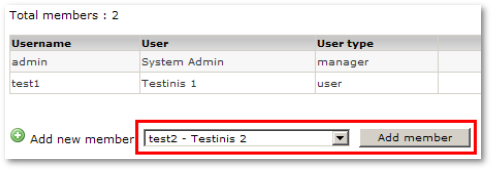
We add them same way as our manager but we leave their type as „user‟: | |||
[[Image:callshop8.png]] | |||
And second: | |||
[[Image:callshop9.png]] | |||
Now we have 3 members: 1 manager and 2 users: | |||
[[Image:callshop10.png]] | |||
The setup is complete. If users have correct setup (devices, tariffs, LCRs, etc) and they can dialout, then we can start using our Call Shop. | |||
[[Image:callshop11.png]] | |||
= Operation = | |||
[[Image:callshop12.png]] | |||
[[Image:callshop13.png]] | |||
[[Image:callshop14.png]] | |||
[[Image:callshop15.png]] | |||
Revision as of 11:27, 20 August 2009
Definition
MOR is not used in Call Shops very often but has some _BASIC_ Call Shop functionality which will be described here.
The main idea is to have several Phone Booths (we will call them „Users‟) which are allowed to dial out. After that they get billed for the calls they made.
Setup
First of all we need to create new Group for Call Shop.
Select SETTINGS – Groups – New group
Enter name for Call Shop (“CallShop” in example) and select Type as “callshop”. Press Create.
Now we have group which will be use for Call Shop. We need to add some members to this group.
Member is User in MOR terms. Lets add them.
Press on Members for the CallShop group:
Each group can have different types of members. Member can be “Manager” and “User”. Manager will manage the group. Group can have several managers.
Lets add manager for our Call Shop. Usually that will be “System Admin”.
Make sure in selection list Add new member “admin – System Admin” is selected and press Add member button:
When new member is added, its type is „user‟, lets change it to „manager‟
Press on Change type for our only user:
Now we have manager for our group:
Also instantly we have new controls for the „CallShop’ group under MANAGEMENT, because we are logged in as „System Admin‟
Now we need some users for full Call Shop functionality. These users will do actual calling.
We add them same way as our manager but we leave their type as „user‟:
And second:
Now we have 3 members: 1 manager and 2 users:
The setup is complete. If users have correct setup (devices, tariffs, LCRs, etc) and they can dialout, then we can start using our Call Shop.
